background image

User Manual

Scion Tech

SC38.MX88

9. GUI Control

The matrix can be controlled using the TCP/IP interface. The default settings are:

IP Address: 192.168.0.178
Subnet Mask: 255.255.255.0

Type the IP address in to your web browser to enter the log-in page and enter the user name and password.

User Name: admin
Password: admin

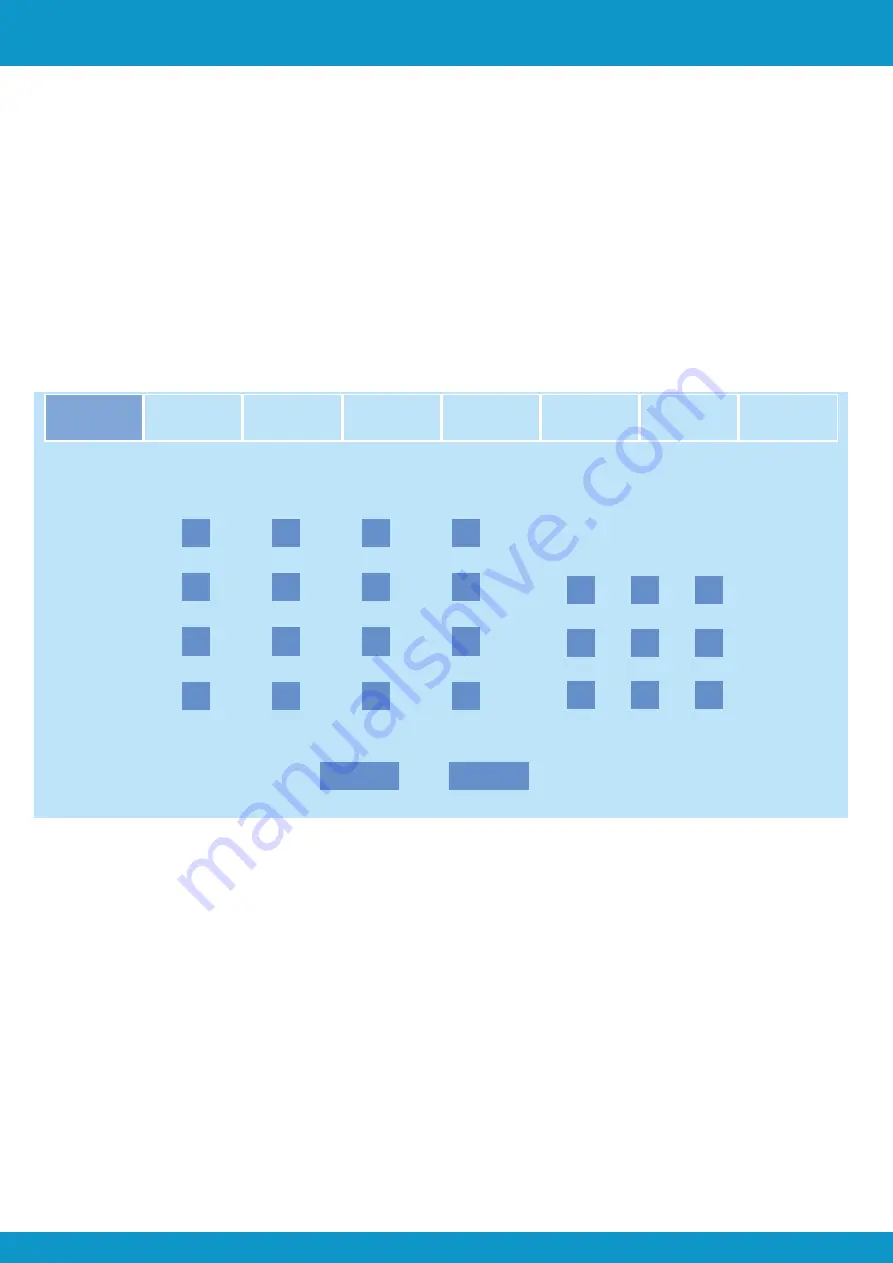
9.0.1 Signal Switching

Switching

Audio

Config

CEC

RS232

Access

Interface

Network

Output 1

Output 2

Output 3

Output 4

Input 1

Input 2

Input 3

Input 4

Scene

1

2

3

4

5

6

7

8

9

Save

Recall

Use the 4 x 4 button grid to to set which inputs are directed to which outputs. For example:- clicking the button
on the Input 1 row and Output 2 column, directs input 1 to output 2.

Use the 9 buttons in the Scene section to save and load presets.

To save a layout, first click on of the numbered buttons, then click “Save”.

To load a previously saved layout, first click one of the numbered buttons, then click the “Recall” button.

Page 14

Tel: +44 (0) 1635 862484

www.scion-tech.co.uk

[email protected]

Summary of Contents for SC38.MX88

Page 1: ...ser Manual Version 1 1a SC38 MX88 User Manual Scion Tech SC38 MX88 Tel 44 0 1635 862484 www scion tech co uk sales scion tech co uk 8 x 8 HDMI HDBaseT Matrix 18G 4K 60Hz 4 4 4 HDR Output Scaling 4K 1080P ...

Page 2: ...hat may be damaged by electrical spikes surges electric shock lighting strikes etc Use of surge protection systems is highly recommended in order to protect and extend the life of your equipment FCC Statement This equipment generates uses and can radiate radio frequency energy and if not installed and used in accordance with the instructions may cause harmful interference to radio communications e...

Page 3: ...ce to rain moisture or install this product near water Do not place items on the product as this may result in overheating Do not open or remove the housing as this may expose you to harmful voltages or electric shock Ensure the product has plenty of ventilation above and below Liquid spillage over or inside the product may result in electric shock and permanent damage In the event of spillage rem...

Page 4: ...and Un Locking Front Panel Buttons 11 8 0 3 System Status 11 8 0 4 EDID Management 12 8 0 5 Audio Settings 13 8 0 6 Presets 13 8 0 7 IP Address 13 9 Graphic User Interface GUI Control 14 9 0 1 Signal Switching 14 9 0 2 Audio Settings 15 9 0 3 Down Scaling 16 9 0 4 HDCP 16 9 0 5 EDID Copy 17 9 0 6 EDID Setting 17 9 0 7 CEC Control 18 9 0 8 RS232 Control 19 9 0 9 Access 20 9 1 1 Interface 20 9 1 2 N...

Page 5: ...ontrol to control the source device These IR signals are routed with the HDMI signal eliminating any possibility of controlling two devices at the same time The matrix also has local control using either IR the front panel buttons RS232 CEC or logging in via a web browser making it easy to link up with third party smart home controllers such as RTL Crestron Control4 and more Our SC38 MX88 matrix s...

Page 6: ... HDCP 2 2 CEC Bandwidth 18Gbps Video Resolutions 4K 60Hz 4 4 4 Colour Space RGB YCbCr 4 4 4 YCbCr 4 2 2 YUV 4 2 0 HDR HDR 10 DLD Dolby Vision Colour Depth 8 10 12 bit HDMI Audio LPCM 7 1 Dolby Atmos Dolby True HD Dolby Digital Plus DTS X DTS HD Master Audio pass through Toslink Digital Audio PCM Dolby Digital DTS DTS HD L R Stereo Audio PCM Infra Red Wide Bandwidth Frequency 30KHz to 56KHz 940nm C...

Page 7: ...YCbCr 4 4 4 YCbCr 4 2 2 YUV 4 2 0 HDR HDR 10 DLD Dolby Vision Colour Depth 8 10 12 bit HDMI Audio LPCM 7 1 Dolby Atmos Dolby True HD Dolby Digital Plus DTS X DTS HD Master Audio pass through Toslink Digital Audio PCM Dolby Digital DTS DTS HD L R Stereo Audio PCM Infra Red Wide Bandwidth Frequency 30KHz to 56KHz 940nm Cable Lengths HDMI Input Output Cable 4K 60Hz 4 4 4 5m 4K 60Hz 4 2 0 10m 1080p 60...

Page 8: ...ed 4 Input Four buttons for selecting input source 5 Output Four buttons for selecting output 6 Menu LOCK Locks and Un Locks the front panel buttons PRESET Selects a preset setting MENU Opens menu and confirms selection Enter UP Move up one page DOWN Move down one page Page 8 Tel 44 0 1635 862484 www scion tech co uk sales scion tech co uk 3 4 6 1 2 PRESET LOCK UP DOWN MENU BACK IR PWR 1 Input 2 3...

Page 9: ...T CAT5e outputs and 8 x HDMI for local connections 5 Audio Out ARC 8 x Terminal block and 4 x Toslink connectors Audio is selectable between HDMI input and HDBaseT output Toslink can also be used for ARC from the HDBaseT receivers 6 RS232 8 x Terminal block for RS232 pass though from matrix to receivers 7 Control RS232 1 x Terminal block IR 1 x 3 5mm jack TCP IP 1 x RJ45 Data socket FW 1 x USB Typ...

Page 10: ...C Audio In Toslink connector for audio in from the TV 4 FW Firmware upgrade port only 5 HDMI Out Connect to HDMI input of the TV 6 Audio Out When ARC is disabled the HDMI audio will be extracted and presented on this Toslink optical connector 7 IR In 3 5mm Jack socket for IR sender cable Pass Through 8 IR Out 3 5mm Jack socket for IR emitter cable Pass Through 9 RS232 3 Pin Phoenix terminal Pass T...

Page 11: ...ng Speakers 4 x HDMI Signal Inputs IR Out RS232 Ethernet Control IR Matrix Control Display ARC RS232 IR Source Control RS232 Pass Through IR EYE FW ALL 1 2 3 4 5 6 7 8 INPUTS Tx Rx TCP IP L R L R ALL 1 2 3 4 5 6 7 8 1 2 3 4 5 6 7 8 1 2 3 4 5 6 7 8 Audio Matrix Out ARC RS232 Control IR IN IR OUT HDMI Out HDBaseT Out 1 2 3 4 5 6 7 8 IR Remote Screen Control CAT5e 6 Receiver ...

Page 12: ...inputs When you switch a HDMI input the corresponding IR output will be switched synchronously 8 0 2 Locking Unlocking Panel Buttons Press and hold the Lock button from three seconds to lock or unlock 8 0 3 System Status Press the Menu button to display the matrix status and use the up down buttons to scroll IN LINK 1 1 1 2 1 3 1 4 Reports the signal switching status IN LINK 1 Y 2 Y 3 Y 4 Y Connec...

Page 13: ...d press Menu to confirm 2 Select Output 2 and Inputs 1 2 3 4 3 Press Menu to confirm Copy the EDID from one of the HDMI outputs to one or several inputs Example Learn the EDID from the display connected to HDMI output 4 and send it to inputs 1 and 2 1 Select Learn HDMI Out and press Menu to confirm 2 Select Output 4 and Inputs 1 2 3 Press Menu to confirm Invoke the built in EDID User Manual Scion ...

Page 14: ...nu to enter 2 Press down until you locate L R OUT 2 press Menu to confirm 3 Press down to select IN2 Breakout 4 Press Menu to confirm L R Output Volume Control 1 Press Menu and Down to locate the Audio Setting Press Menu to enter 2 Press Down to locate L R OUT 2 Vol Press Menu to confirm 3 Press Up and Down to set the required volume 4 Press Menu to confirm 8 0 6 Preset Setting The matrix supports...

Page 15: ...k Output 1 Output 2 Output 3 Output 4 Input 1 Input 2 Input 3 Input 4 Scene 1 2 3 4 5 6 7 8 9 Save Recall Use the 4 x 4 button grid to to set which inputs are directed to which outputs For example clicking the button on the Input 1 row and Output 2 column directs input 1 to output 2 Use the 9 buttons in the Scene section to save and load presets To save a layout first click on of the numbered butt...

Page 16: ...F Output 2 SPDIF Output 3 SPDIF Output 4 Audio on Input 3 Audio on Input 4 Audio on Input 2 Audio on Output 1 Audio on Output 2 Audio on Output 3 Audio on Output 4 Audio on Input 1 There are eight possible audio sources that can be selected for analogue L R outputs and twelve audio sources that can be selected for digital SPDIF outputs L R Outputs Volume Control Audio Config CEC RS232 Access Inter...

Page 17: ...n enabled a 4K input will be downscaled to 1080p Audio CEC RS232 Access Interface Network Switching Output 1 Config Output 2 Output 3 Output 4 Passive Active Down Scaling HDCP EDID Copy EDID Setting Confirm Cancel Passive Automatically follows the HDCP data from the source device Active Default If the input video has HDCP content the output HDCP is version 1 4 If the input video has no HDCP conten...

Page 18: ...lect one output port 2 Select one or several input ports Press ALL to select all input ports 3 Click confirm to save Upload user defined EDID 4 Select the user defined field 5 Click in the Combi Box and select a bin file from your computer 6 Click confirm to save 9 0 6 EDID Setting Audio CEC RS232 Access Interface Network Switching Config 1 2 3 4 Embedded EDID 1080P 2CH Down Scaling HDCP EDID Copy...

Page 19: ...Input HDBT Output HDMI Output Input CEC Vol Menu Vol Back Up Enter Left Down Right On Off Stop Previous Next Pause REW FF Play HDBT Input Control Select on or several of the HDMI input source devices to be controlled and then press the function Audio Config RS232 Access Interface Network Switching 1 2 3 4 Function HDMI Input HDBT Output HDMI Output Input CEC Vol Vol On Off Mute Page 18 Tel 44 0 16...

Page 20: ...ct the HDBaseT port associated with the HDBaseT receiver with the third party product to be controlled 2 Select Baud Rate 3 Type the RS232 commands in the Combi Box to control the third party product If Hex is selected the RS232 commands must be hexadecimal values 4 Click send to complete the operation Audio Config CEC Access Interface Network Switching Port Send HDBT 2 HDBT 1 RS232 HDBT 3 HDBT 4 ...

Page 21: ...Password admin user Version GUI V1 0 0 Firmware V1 0 0 Confirm Cancel 9 1 1 Interface Settings Edit the Title Bar label LCD readout and button labels Audio Config RS232 CEC Access Network Switching Title Bar Label LCD Readout HDBaseT Matrix Confirm Cancel Interface Button Labels Input 1 Input 1 1 Input 2 1 Input 3 1 Input 4 1 Output 1 1 Output 1 1 Output 1 1 Output 1 Output Page 20 Tel 44 0 1635 8...

Page 22: ...4 www scion tech co uk sales scion tech co uk 10 IR Remote Control 1 Enter and Exit Standby mode 2 Indication LED confirmation button selection 3 Video source selection 4 Output selection 5 Menu ALL Select all inputs or all outputs EDID Enable one or several input sources to manually capture and learn the EDID data from the output device CLEAR Cancel the current operation providing the enter butto...

Page 23: ...orking condition Warranty If your product does not work properly because of a defect in materials or workmanship our Company referred to as the warrantor will for the length of the period indicated as below Parts and labour 2 years which starts with the date of original purchase Limited Warranty period at its option either a repair your product with new or refurbished parts or b replace it with a ...

Page 24: ...THERE ARE NO EXPRESS WARRANTIES EXCEPT AS LISTED UNDER LIMITED WARRANTY COVERAGE THE WARRANTOR IS NOT LIABLE FOR INCIDENTAL OR CONSEQUENTIAL DAMAGES RESULTING FROM THE USE OF THIS PRODUCT OR ARISING OUT OF ANY BREACH OF THIS WARRANTY As examples this excludes damages for lost time cost of having someone remove or re install an installed unit if applicable travel to and from the service loss of or ...

Reviews: