background image

29

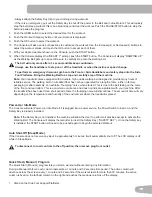
heart rates. It is more accurate to find this value by completing a stress test than by using an age related formula.

Your at-rest heart rate is influenced by endurance training. The typical adult has an at rest heart rate of approximately 72 

BPM, whereas highly trained runners may have readings of 40 BPM or lower.

The Heart Rate table is an estimate of what Heart Rate Zone (HRZ) is effective to burn fat and improve your cardiovascu

-

lar system. Physical conditions vary, there-

fore your individual HRZ could be several 

beats higher or lower than what is shown.

The most efficient procedure to burn fat dur

-

ing exercise is to start at a slow pace and 

gradually increase your intensity until your 

heart rate reaches between 50 – 70% of 

your maximum heart rate. Continue at that 

pace, keeping your heart rate in that target 

zone for over 20 minutes. The longer you 

maintain your target heart rate, the more fat 

your body will burn.

The graph is a brief guideline, describing the 

generally suggested target heart rates based 

on age. As noted above, your optimal target 

rate may be higher or lower. Consult your 

physician for your individual target heart rate 

zone.


Note:

 As with all exercises and fitness 

regimens, always use your best judgment when you increase your exercise time or intensity.

Speakers and Audio Cable

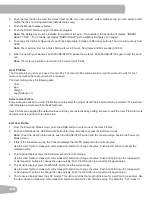
To play audio through the speakers on your machine, attach the Audio Cable to your device and to the Audio Cable Port

on the Console. With the Console turned on, you can play audio from your device through the speakers. Volume is con-

trolled from your device.


Note:

   Though your machine is Bluetooth

®

 enabled, it is unable to receive and play audio across a Bluetooth

®


connection.

20-24

FAT-BURNING TARGET HEART RATE

Heart Rate BPM 

(beats per minute)

Age

25-29

0

50

100

150

200

250

30-34 35-39 40-44 45-49 50-54 55-59 60-64 65-69

70+

196

191

186

181

176

171

166

161

156

151

146

167

162

158

154

150

145

141

137

133

128

126

Maximum Heart Rate

Target Heart Rate Zone
(keep within this range
for optimum fat-burning)

118

115

112

109

106

103

100

97

94

91

88

Summary of Contents for 510T

Page 1: ...ASSEMBLY MANUAL OWNER S MANUAL 810 510T ...

Page 2: ... S or Canada www nautilusinternational com Printed in China 2019 Nautilus Inc Schwinn the Schwinn Quality logo Schwinn 810 Schwinn 510T Schwinn Toolbox Bowflex and Nautilus are trademarks owned or licensed by Nautilus Inc registered or otherwise protected by common law in the United States and other nations Google Play is a trademark of Google Inc App Store is a service mark of Apple Inc The Bluet...

Page 3: ...ll or pose a risk of injury to the user Do not drop or put objects into any opening of the machine Never operate this treadmill with the air openings blocked Keep the air openings free of lint hair and the like Do not assemble this machine outdoors or in a wet or moist location Make sure assembly is done in an appropriate work space away from foot traffic and exposure to bystanders Some components...

Page 4: ...for home use only Do not place or use the machine in a commercial or institutional setting This includes gyms corporations work places clubs fitness centers and any public or private entity that has a machine for use by its members customers employees or affiliates Do not wear loose clothing or jewelry This machine contains moving parts Do not put fingers or other objects into moving parts of the ...

Page 5: ...he machine will be used must obey the applicable local and provincial requirements Exercise on this machine requires coordination and balance Be sure to anticipate that changes in belt speed and incline angle of deck can occur during workouts and be attentive in order to avoid loss of balance and possible injury A machine should never be left unattended when plugged in Unplug from outlet when not ...

Page 6: ...g any exercise equipment The label on the machine is available in English and French Canadian only WARNING Moving parts can crush and cut Keep guards in place Lock out power before servicing WARNING HAZARDOUS VOLTAGE Contact may cause electrical shock or burn Turn off and lock out power before servicing REVISIONS ECO REVISION REV DESCRIPTION APPROVED DATE A DRAWING RELEASE B CHANGED SIZE 8 17 09 1...

Page 7: ... grounding screw must be connected to a permanent ground such as a properly grounded outlet box cover Whenever the adapter is used it must be held in place by a metal screw Metal Screw Tab for Grounding Screw Adapter Grounded Outlet Box Grounded Outlet Grounding Pin Earthing Instructions for a 220 240V AC system This product must be electrically earthed If a malfunction occurs correct earthing dec...

Page 8: ...user s authority to operate the equipment The machine and power supply comply with part 15 of the FCC rules Operation is subject to the following two conditions 1 This device may not cause harmful interference and 2 this device must accept any interference received including interference that may cause undesired operation Note This machine and power supply have been tested and found to comply with...

Page 9: ...e height of the user and the maximum incline of the machine Basic Assembly Follow these basic points when you assemble your machine Read and understand the Important Safety Instructions before assembly Collect all the pieces necessary for each assembly step Using the recommended wrenches turn the bolts and nuts to the right clockwise to tighten and the left counterclockwise to loosen unless instru...

Page 10: ...Upright Left 4 1 Upright Right 12 1 Base Shroud Left 5 1 Base Shroud Right 13 1 Safety Key 6 1 Base Assembly 14 1 Power Cord 7 1 Handlebar Shroud Right Outer R R 15 1 Audio Cable not shown 8 1 Handlebar Shroud Right Inner R L DO NOT CUT the Shipping Strap on the Base Assembly until it has been placed face up as shown in the appropriate work space 11 4 6 12 5 2 10 8 7 9 3 1 14 13 ...

Page 11: ...r M8 G 6 Phillips Head Screw M4x0 7x12 D 2 Curved Washers M8 Note Select pieces of Hardware have been provided as spares on the Hardware Card Be aware that there may be remaining Hardware after the proper assembly of your machine HARDWARE TOOLS 2 6 mm 6 mm A B D C E F G ASSEMBLY DO NOT CUT the Shipping Strap on the Base Assembly until it has been placed face up as shown in the appropriate work spa...

Page 12: ... Use proper safety precautions and lifting techniques Bend your knees and elbows keep your back straight and pull up equally with both arms Make sure that your own physical strength is capable of lifting the walking deck until it engages the locking mechanism Use a second person if necessary Do not use the walking belt or rear roller to lift the treadmill These parts do not lock in place and can a...

Page 13: ...13 2 Route the Cables through the Right Upright and Attach the Uprights to Frame Assembly Note Do not crimp the Cables Do not fully tighten Hardware until instructed 11 4 A B C X8 ...

Page 14: ...ghtly toward the rear of the machine Hold up the rear of the walking deck and move to the side of the machine Keep clear of the movement path of the walking deck The hydraulic lift is set up to drop lightly Hold onto the walking deck until approximately 2 3 of the movement down Make sure that you use proper lifting technique bend your knees and keep your back straight The walking deck can possibly...

Page 15: ...B X2 X2 6mm 6mm 2 4 Connect the Cables and Attach the Console to Frame Assembly Note Do not crimp the Cables Be sure the hooks on the Console are set into the notches of the Uprights Install the front hardware first ...

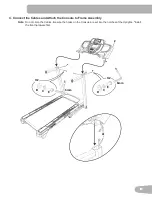
Page 16: ...ighten all Hardware from previous Steps 6 Attach the Handlebar Shrouds to the Frame Assembly NOTICE Install the Inner Handlebar Shrouds first The parts are marked to assist with assembly 2 G X2 10 8 7 9 2 G X2 F 2 ...

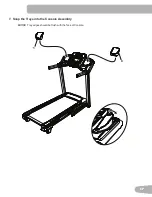
Page 17: ...17 3 1 7 Snap the Trays into the Console Assembly NOTICE Tray edges should be flush with the face of Console ...

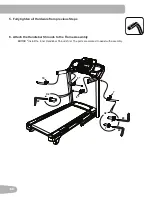
Page 18: ...18 5 12 G X2 8 Attach the Base Shrouds to the Frame Assembly ...

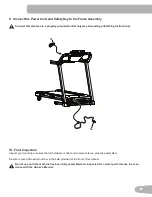
Page 19: ...nstructions 10 Final Inspection Inspect your machine to ensure that all hardware is tight and components are properly assembled Be sure to record the serial number in the field provided at the front of this manual Do not use until the machine has been fully assembled and inspected for correct performance in accor dance with the Owner s Manual 14 13 ...

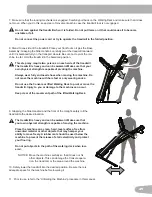
Page 20: ... move the machine with the Walking Deck not folded Rotating or moving parts can pinch resulting in personal injury 5 Make sure that there is safe clearance around on and above your treadmill Be sure to remove all water bottles media devices or loose items from the machine before moving it Be sure there is adequate height clearance for the raised deck 6 Using the support bar found below the rear of...

Page 21: ...chine Do not move the machine with bare feet or only wearing socks Do not use the Console or lifted Walking Deck to pivot or move the treadmill Injury to you or damage to the machine can occur Keep clear of the movement path of the lifted Walking Deck 9 Grasping the Side Handrail and the front of the Upright safely roll the treadmill to the desired location The treadmill is heavy and can be awkwar...

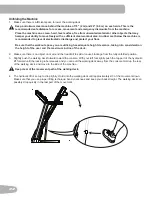
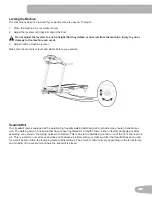
Page 22: ... into consideration the height of the user and the maximum incline of the deck 2 Make sure there is no object on or around the treadmill to spill or cause blockage from the fully unfolded position 3 Slightly push the walking deck forward toward the console With your left foot lightly push the top part of the hydraulic lift forward until the locking tube releases and you can pull the walking deck a...

Page 23: ...eadmill comes equipped with a durable high quality walking belt designed to provide many hours of reliable ser vice The walking belt on a treadmill that has not been operated for a length of time either in factory packaging or after assembly can exhibit a thumping noise when started This is due to the belt taking on the curve of the front and rear roll ers This is a common occurrence and does not ...

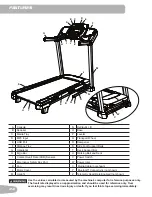
Page 24: ...mergency Safety Key Port W Power Inlet K Fan X Media Cable not shown L Motor Cover Y Bluetooth Connectivity not shown M Upright Z Telemetry Heart Rate Enabled not shown Use the values calculated or measured by the machine s computer for reference purposes only The heart rate displayed is an approximation and should be used for reference only Over exercising may result in serious injury or death If...

Page 25: ... value or moves through the options available OK button Confirms information or a selection User Options Decrease button Decreases the current value or moves through the options available Workout Category buttons Selects a category of workout programs and moves through the available workouts Pre Set Incline buttons Selects an incline value for the Walking Deck After pushing a Pre Set Incline butto...

Page 26: ...ese Heart Rate Zones can be used as a workout guide for a certain target zone max anaerobic aerobic fat burn and warm up Consult a physician before you start an exercise program Stop exercising if you feel pain or tightness in your chest become short of breath or feel faint Contact your doctor before you use the machine again Use the values calculated or measured by the machine s computer for refe...

Page 27: ...k must be at 0 to start a workout Speed Pace The Speed display field shows the belt speed in miles per hour mph or kilometers per hour km h The Pace display field shows the current time to complete a mile or kilometer at the current Speed value Note The maximum value for the Pace field is 99 59 Active Workout Category display The Active Workout Category display shows the currently selected Categor...

Page 28: ... heart rate monitor Contact Heart Rate Sensors Contact Heart Rate CHR sensors send your heart rate signals to the Console The CHR sensors are the stainless steel parts of the Handlebars To use put your hands comfortably around the sensors Be sure that your hands touch both the top and the bottom of the sensors Hold firm but not too tight or loose Both hands must make contact with the sensors for t...

Page 29: ...n The graph is a brief guideline describing the generally suggested target heart rates based on age As noted above your optimal target rate may be higher or lower Consult your physician for your individual target heart rate zone Note As with all exercises and fitness regimens always use your best judgment when you increase your exercise time or intensity Speakers and Audio Cable To play audio thro...

Page 30: ...the deck 1 With the fitness machine in your workout area inspect the walking belt to make sure it is centered and aligned If necessary refer to the Aligning the Walking Belt Procedure in the Maintenance section of this manual The edges of the Walking Belt should be under the Side Foot Support Rails If an edge of the Walking Belt can be viewed do not operate the machine Adjust the Walking Belt unti...

Page 31: ...a length of time either in factory packaging or after assembly can exhibit a thumping noise when started This is due to the belt taking on the curve of the front and rear rollers This is a common occurrence and does not indicate a problem with your machine After the treadmill has been used for a short period of time the thumping noise will discontinue The amount of time will vary depending on the ...

Page 32: ...will be the default user User Profiles are assigned the default values until they are customized by editing Be sure to edit the User Profile for more accurate calorie and heart rate information Edit User Profile 1 From the Power Up Mode screen push the USER button to select one of the User Profiles 2 Push and hold down the USER and OK buttons for three seconds to access the Edit User mode Note To ...

Page 33: ...ush the Speed Level Increase or Decrease buttons to change the Belt Speed at any time in a workout program To rapidly change the Speed level push the desired Pre Set Speed Button and then the Speed Enter Button The Walking Belt will adjust to the desired speed Note After a Pre Set Speed Button is pushed the Speed Enter Button must be pushed within 5 seconds Profile Programs These programs feature ...

Page 34: ...ue is the highest Speed of the Profile Program when accepted During a Workout the User can directly adjust the speed of the belt above the Maximum Speed setting if desired 5 Use the User Option Increase or Decrease buttons to adjust the workout goal value and push the OK button 6 The Console will display the READY prompt 7 Push START to begin the goal oriented workout WEIGHT LOSS Workout Programs ...

Page 35: ...4 Push the User Option Increase or Decrease buttons to adjust the Minimum Speed of the Belt and push the OK button The Profile Program will adjust so the Minimum Speed value is the lowest Speed of the Profile Program when accepted Note The INTERVAL INC Profile Program Workout does not have a Minimum Speed for the Belt option 5 Push the User Option Increase or Decrease buttons to adjust the Maximum...

Page 36: ...ser Option Increase or Decrease buttons to set the goal value for the workout and push the OK but ton Note Be sure to allow time for your heart rate to reach the desired heart rate zone when setting the goal The Console will display the heart rate value based on the current User settings 7 Push START to begin the workout CUSTOM Workout Program CUSTOMIZE The Custom workout program allows a user to ...

Page 37: ...ning time of the Cool Down period Note The Cool Down values are not added to Workout Result values During the Cool Down period the incline setting of the walking belt will adjust to zero Push PAUSE STOP to end the Cool Down period After the Cool Down period the Console will show the Workout Results for an additional 5 minutes Push PAUSE STOP to end the Results Mode and go back to Power Up Mode If ...

Page 38: ...ent Deck is not required It is recommended that a qualified service technician is used to flip the Walking Deck After each workout use a damp cloth to wipe your machine and Console free of moisture With the Walking Deck lowered if an edge of the Walking Belt can be seen adjust it until the edge is not viewable Note Avoid excessive moisture on the Console Weekly Check for smooth roller operation Wi...

Page 39: ...to move off center Minor adjustments to the 2 bolts at the rear of the treadmill are necessary when the belt is off center 1 Push the START button to start the walking belt Be sure not to touch the walking belt or step on the power cord Keep bystanders and children away from the product you are servicing at all times 2 Stand at the rear of the treadmill to see which direction the belt moves 3 If t...

Page 40: ... of children Store in a safe place 4 Manually rotate the belt 1 2 of the length of the belt and apply lubricant again If you used spray lubricant wait 5 minutes before turning on power to the machine to allow the aerosol to dissipate 5 Connect the power cord back into the machine and then into the wall outlet 6 Turn on the power to the machine with the power switch 7 Stay to one side of your machi...

Page 41: ...roud Right P Handlebar Shroud Left Inner C Safety Key Port J Power Cord Q Handlebar Shroud Left Outer D Fan K Safety Key R Upright Left E Contact Heart Rate Sensor L Base Cable S Base Shroud Left F Console Cable M Base Assembly G Tray Right N Handlebar Shroud Right Outer R H M S I A Q O N P G B J K C D F E L ...

Page 42: ... Adjuster V Power Switch AA Deck Cushioners FF Pivot Assembly W Power Input BB Transport Wheel GG Belt Tensioner X Motor Control Board CC Leveler HH Rear Roller Cover Y Side Foot Support Rails DD Lifting Cylinder GG EE GG BB BB Z DD HH HH X U U AA Z Y DD CC CC BB EE FF CC V W Z ...

Page 43: ...ot resolve the problem contact Cus tomer Service if inside US Canada or your local distributor if outside US Canada Speed display is not ac curate Display set to wrong unit of measure English Metric Change display to show correct units Console shuts off enters sleep mode while in use Check electrical wall outlet Make sure unit is plugged into a functioning wall outlet Test the outlet with a known ...

Page 44: ...is manual Hesitation or walking belt slips when in use Belt tension Adjust the belt tension at the rear of the machine Refer to the procedure for adjusting belt tension in this manual Belt stops moving while in use Safety key Plug Safety Key into Console See Emergency Stop Proce dure in the Important Safety Instructions section Motor overload Unit may be overloaded and draw too much current which ...

Page 45: ...45 ...

Page 46: ...46 ...

Page 47: ...duct Documentation Assembly Owner s Manuals etc damage due to improper storage or the effect of environmental conditions such as moisture or weather misuse mishandling accident natural disasters power surges A machine placed or used in a commercial or institutional setting This includes gyms corporations work places clubs fitness centers and any public or private entity that has a machine for use ...

Page 48: ... Nautilus Bowflex Schwinn 8021118 061519 A EN ...

Reviews: