background image

Function

8 Function

The item numbers specified for the corresponding individual
components relate to chapter drawings.

}

 12 [

/

 42]

8.1 Function and handling

Wedge hook chuck are actuated by rotating cylinders with or
without through holes. The axial draw- or pressure forces are
deviated into a radial jaw clamping force via the helical angle of
traction between the piston and the base jaws.
The clamp and unclamping stroke of the jaws is determined by the
cylinder. Moving or changing the base jaws with top jaws bolted to
them must be carried out in unclamped position. For safety
reasons the base jaws are still interlocked when the chuck piston is
in this position. The base jaws are unlocked mechanically.

8.2 Change or supplement of jaws

Chuck jaws for maximum clamping repeat accuracy must be
turned or ground in the chuck under clamping pressure.
• When turning or grinding, ensure that the turning ring or

turning pin is clamped 

by the top jaws

 and not by the base

jaws.

• Keep the base jaws and top jaws screwed in place for recurring

work. Tighten the jaw mounting screws to the specified
torque. 

}

 4 [

/

 17]

Tighten the jaw mounting screws with a torque wrench. On no
account tighten the screws with an extension pipe or with
hammer blows.

8.3 Disassembly of chucks for complete cleaning or in case of

damage

The item numbers specified for the corresponding individual
components relate to chapter drawings.

}

 12 [

/

 42]

The tightening torques for all screws must be observed during
every assembly and disassembly!


}

 4 [

/

 17]

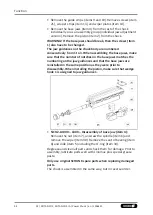
The chuck can only be disassembled once it has been removed.
• Remove the top jaws (if present), T-nuts, and mounting screws

from the base jaws.

• Remove screws (item 20) and covers (item 11) from the base

jaws.

• Unscrew the cover plate (item 28) screws on the cover (item 22)

from the chuck and remove the cover (item 3).

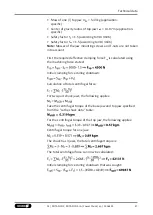
• Remove the central mounting screw M36x90.
• Remove all cover plates (item 28) in the chuck and unscrew the

screws (item 22).

33

01 | ROTA NCO2, ROTA NCO2-JA | Power Chuck | en | 1506425

Summary of Contents for ROTA NCO2

Page 1: ...Translation of Original Operating Manual Power Chuck ROTA NCO2 ROTA NCO2 JA Assembly and Operating Manual ...

Page 2: ... 02 2022 en Dear Customer thank you for trusting our products and our family owned company the leading technology supplier of robots and production machines Our team is always available to answer any questions on this product and other solutions Ask us questions and challenge us We will find a solution Best regards Your SCHUNK team Customer Management Tel 49 7572 7614 1300 Fax 49 7572 7614 1039 cu...

Page 3: ...tions for clamping force and speed 24 6 3 1 Calculation of the required clamping force in case of a given rpm 24 6 3 2 Calculation example required initial clamping force for a given speed 26 6 3 3 Calculation of the permissible speed in case of a given initial clamping force 28 6 4 Grades of Accuracy 29 6 5 Permissible imbalance 29 7 Mounting 30 7 1 Pre assembly measures 30 7 2 Mounting of the Po...

Page 4: ...7 9 3 Changing the top jaws 37 10 Disposal 38 11 Spare parts 39 12 Assembly drawings 41 13 Translation of the original declaration of incorporation 43 14 Appendix on Declaration of Incorporation as per 2006 42 EC Annex II No 1 B 44 4 01 ROTA NCO2 ROTA NCO2 JA Power Chuck en 1506425 ...

Page 5: ... this manual are provided for basic understanding of the product and may differ from the actual product design We accept no liability for damage resulting from the failure to observe and comply with this operating manual 1 1 Warnings To make risks clear the following signal words and symbols are used for safety notes DANGER Danger for persons Non observance will inevitably cause irreversible injur...

Page 6: ...t hot surfaces 1 2 Applicable documents General terms of business Catalog data sheet of the purchased product Calculation of the jaw centrifugal forces Technology chapter in the lathe chuck catalog The documents marked with an asterisk can be downloaded on our homepage schunk com ...

Page 7: ...s read and understood this operating manual in its entirety especially the chapter Basic safety notes The maximum RPM of the chuck and the required clamping force must be determined by the user for the respective clamping task based on the applicable standards and technical specifications of the manufacturer See also Calculations for clamping force and RPM in the chapter Technical data 6 19 2 2 No...

Page 8: ...ntain the lathe chuck s clamping force until the machine comes to a standstill and the workpiece can be secured e g using a crane or suitable lifting equipment The machines and equipment must fulfill the minimum requirements of the EC Machinery Directive specifically they must have effective technical measures to protect against potential mechanical hazards DANGER Possible risk of fatal injury to ...

Page 9: ...ving the chuck Note the relevant load securing regulations for working safely with cranes ground conveyors lifting gear and load handling equipment CAUTION Danger of slipping and falling in case of dirty environment where the chuck is used e g by cooling lubricants or oil Ensure that the working environment is clean before starting assembly and installation work Wear suitable safety shoes Follow t...

Page 10: ...s may be damaged The T nuts combine the top jaws with the base jaws and they should never protude over the base jaws in radial direction The outer diameter of the screwed top jaws must not exceed the outer diameter of the chuck by more than 10 CAUTION Hazard from vibration due to imbalanced rotating parts and noise generation Physical and mental strains due to imbalanced workpieces and noise durin...

Page 11: ... stroke of the clamping piston must allow a safety zone at the front and rear end position The machine spindle may only be started when the clamping piston has passed through the safety zone Only limit switches that meet the requirements for safety limit switches specified in DIN EN 60204 1 may be used When determining the necessary clamping force to machine a workpiece take the centrifugal force ...

Page 12: ... starting a new production run and between maintenance intervals Optimum safety can only be guaranteed through regular checks The clamping force should always be measured in the state of the lathe chuck as used for the current clamping situation If top jaws with clamping steps are used measuring must be performed in the same step as for the respective clamping task In the event of high operating s...

Page 13: ...use welded jaws If for constructional reasons the chuck jaws in special design are heavier than the top jaws assigned to the clamping device greater centrifugal forces must be accounted for when defining the required clamping force and the recommended speed Screw the jaw mounting screws into the bore holes furthest apart The maximum recommended speed may only be operated in conjunction with maximu...

Page 14: ...zational measures and instructions the operator must ensure that the relevant safety rules are obeyed by the persons asked to operate maintain and repair the chuck Checking the behavior of personnel The operator must at least occasionally check that the personnel are behaving in a safety conscious manner and are aware of the potential hazards Danger signs The operator must ensure that the signs co...

Page 15: ...onal protective equipment When using this product you must comply with the relevant health and safety at work rules and you must use the required personal safety equipment minimum category 2 15 01 ROTA NCO2 ROTA NCO2 JA Power Chuck en 1506425 ...

Page 16: ...m the ex works delivery date under the following conditions Observe the applicable documents 1 2 6 Observe the ambient conditions and operating conditions Observe the maximum number of clamping cycles 6 19 Observe the specified maintenance and lubrication intervals 9 37 Parts touching the workpiece and wear parts are not included in the warranty ...

Page 17: ...e MA Nm 13 28 50 88 120 160 200 290 400 500 1050 1500 Tightening torques for mounting screws used to attach top jaws onto the chuck screw quality 12 9 Screw size M6 M8 M10 M12 M14 M16 M20 M24 Max admissible torque MA Nm 16 30 50 70 130 150 220 450 Tightening torques for the protection sleeve mounting screws screw quality 8 8 Screw size M3 M4 M5 M6 Tightening torques MA Nm 1 3 3 0 5 5 9 0 17 01 ROT...

Page 18: ...NCO2 JA Power Chuck en 1506425 5 Scope of delivery 1 Power lathe chuck incl mounting screws 1 Set of base jaws with module serration NCO2 1 Set of split base jaws with individual adjustment and module serration NCO2 JA 3 Eye bolt M24 DIN 580 ...

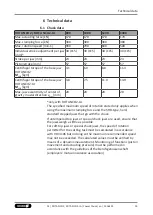
Page 19: ... The specified maximum speed of rotation stated only applies when using the maximum clamping force and the SHB type hard standard stepped jaws that go with the chuck If untempered top jaws or special chuck jaws are used ensure that the jaws weigh as little as possible For soft top jaws or special chuck jaws the speed of rotation permitted for the cutting task must be calculated in accordance with ...

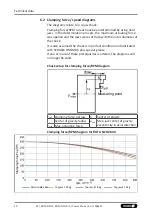
Page 20: ... also assumed the chuck is in perfect condition and lubricated with SCHUNK LINOMAX plus special grease If one or more of these prerequisites is altered the diagrams will no longer be valid Chuck setup for clamping force RPM diagram Measuring point FspB Clamping force per jaw S Center of gravity rs Center of gravity radius amax Max jaw center of gravity eccentricity in axial direction Fmax Max actu...

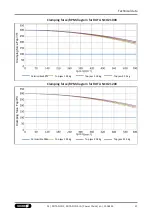
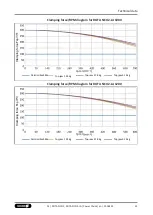
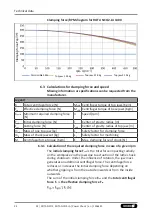
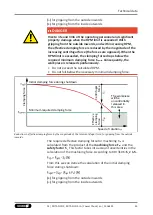
Page 21: ...ssible 33 rpm n Clamping force Fsp Top jaw 1 24 kg Top jaw 2 18 kg Top jaw 3 12 kg Clamping force RPM diagram for ROTA NCO2 1200 Permissible 33 rpm n Clamping force Fsp Top jaw 1 24 kg Top jaw 2 18 kg Top jaw 3 12 kg 21 01 ROTA NCO2 ROTA NCO2 JA Power Chuck en 1506425 ...

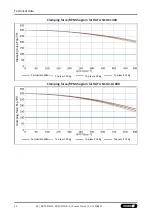
Page 22: ...Clamping force RPM diagram for ROTA NCO2 1400 Permissible 33 rpm n Clamping force Fsp Top jaw 1 24 kg Top jaw 2 18 kg Top jaw 3 12 kg Clamping force RPM diagram for ROTA NCO2 JA 800 Permissible 33 rpm n Clamping force Fsp Top jaw 1 24 kg Top jaw 2 18 kg Top jaw 3 12 kg ...

Page 23: ...ssible 33 rpm n Clamping force Fsp Top jaw 1 24 kg Top jaw 2 18 kg Top jaw 3 12 kg Clamping force RPM diagram for ROTA NCO2 JA 1200 Permissible 33 rpm n Clamping force Fsp Top jaw 1 24 kg Top jaw 2 18 kg Top jaw 3 12 kg 23 01 ROTA NCO2 ROTA NCO2 JA Power Chuck en 1506425 ...

Page 24: ...rsAB Center of gravity radius of top jaw m mAB Mass of one top jaw kg ssp Safety factor for clamping force mB Mass of chuck jaw set kg sz Safety factor for machining Mc Centrifugal force torque Kgm Σs Max clamping force of chuck N 6 3 1 Calculation of the required clamping force in case of a given rpm The initial clamping force Fsp0 is the total force impacting radially on the workpiece via the ja...

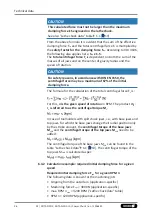
Page 25: ...mum clamping force The workpiece will be uncontrollably released in this area Speed of rotation Clamping force Centrifugal force Effective clamping force Minimum required clamping force Initial clamping force during shutdown Reduction in effective clamping force by the magnitude of the total centrifugal force for gripping from the outside inwards The required effective clamping force for machining...

Page 26: ...a for the calculation of the total centrifugal force Fc is For this n is the given speed of rotation in RPM The product mB rs is referred to as the centrifugal torque Mc In case of toolholders with split chuck jaws i e with base jaws and top jaws for which the base jaws change their radial position only by the stroke amount the centrifugal torque of the base jaws McGB and the centrifugal torque of...

Page 27: ...ed using the machining force stated Initial clamping force during shutdown Calculation of total centrifugal force For two part chuck jaws the following applies Take the centrifugal torque of the base jaw and top jaw specified from the Lathe chuck data table For the centrifugal torque of the top jaw the following applies Centrifugal torque for one jaw The chuck has 3 jaws the total centrifugal torq...

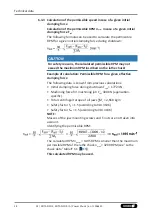
Page 28: ...ck Example of calculation Permissible RPM for a given effective clamping force The following data is known from previous calculations Initial clamping force during shutdown Fsp0 17723 N Machining force for machining job Fspz 3000 N application specific Total centrifugal torque of all jaws Mc 2 668 kgm Safety factor Sz 1 5 according to VDI 3106 Safety factor Ssp 1 5 according to VDI 3106 NOTE Masse...

Page 29: ...ass 6 3 according to DIN ISO 21940 1 Residual imbalance risks may arise due to insufficient rotation compensation being achieved see DIN EN 1550 6 2 e This applies particularly to high speeds of rotation asymmetrical workpieces or the use of different top jaws as well as uneven application of lubricants In order to prevent damage resulting from these residual risks the entire rotor is to be dynami...

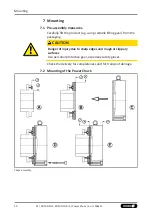
Page 30: ...ly lift the product e g using suitable lifting gear from the packaging CAUTION Danger of injury due to sharp edges and rough or slippery surfaces Use personal protective gear especially safety gloves Check the delivery for completeness and for transport damage 7 2 Mounting of the Power Chuck Chuck assembly ...

Page 31: ...lush to the center of the spindle ROTA NCO2 800 1400 ROTA NCO2 JA 800 1400 Turn the chuck on the spindle or machine table until the mounting holes and spindle flange threads are aligned Screw the central mounting screw into the drawbar or the draw tube adapter with a hexagon socket wrench until the stop 7 4 Vertical attachment ROTA NCO2 800 1400 ROTA NCO2 JA 800 1400 Turn the chuck on the spindle ...

Page 32: ...maximum admissible torques 4 17 Check radial and axial run out again Check the actuating force is functioning and is sufficiently large Check the jaw stroke of the base jaws and that these can move easily Fasten the top jaws marked 1 2 and 3 to the base jaws using T nuts and screws The spindle is disassembled in the same way but in the reverse order ...

Page 33: ...he turning ring or turning pin is clamped by the top jaws and not by the base jaws Keep the base jaws and top jaws screwed in place for recurring work Tighten the jaw mounting screws to the specified torque 4 17 Tighten the jaw mounting screws with a torque wrench On no account tighten the screws with an extension pipe or with hammer blows 8 3 Disassembly of chucks for complete cleaning or in case...

Page 34: ...ure that the number of notches on the base jaws matches the numbering on the jaw guidances and that the base jaws are reinstalled in the same position as they were prior to disassembly When installing the piston make sure that wedge hook 1 is assigned to jaw guidance 1 NCO2 JA 800 1400 Disassembly of base jaw item 4 Remove the nut item 7 unscrew the spindle item 6 and remove the wiper item 30 Remo...

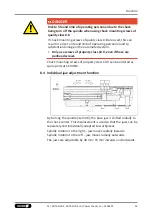
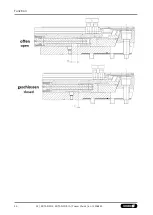
Page 35: ...9 even if these are panhead screws Chuck mounting screws of property class 10 9 can be ordered as spare parts at SCHUNK 8 4 Individual jaw adjustment function By turning the spindle item 06 the base jaw is shifted radially to the chuck center This displacement is used so that the jaws can be separately and individually adapted to workpieces Spindle rotation to the right jaw moves radially inwards ...

Page 36: ...Function 36 01 ROTA NCO2 ROTA NCO2 JA Power Chuck en 1506425 ...

Page 37: ...three segments evenly in order to avoid large imbalances Technical condition With the smallest possible actuating pressure hydraulic cylinder the base jaws should move evenly This method only provides a limited indication and is no substitute for measuring the clamping force If the clamping force has dropped too much or if the base jaws and piston no longer move properly the chuck will have to be ...

Page 38: ...rain out Collect the escaping liquids and dispose of them properly in line with the statutory provisions Remove any identifiable plastic or aluminum parts installed in or on the chuck and dispose of them properly in line with the statutory provisions Dispose of the chuck s metal parts as scrap metal Alternatively you can return the chuck to SCHUNK for proper disposal ...

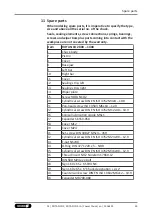
Page 39: ...ew ROTA NCO2 20 Cylindrical screw DIN EN ISO 4762 M4x8 10 9 21 Pan head screw ISO 14583 M6x10 12 9 22 Cylindrical screw DIN EN ISO 4762 M12x30 10 9 26 Conical lubrication nipple M6x1 27 Expander SK550 050 28 Cover M12 29 Cover M24 31 Set screw DIN 34827 M5x4 45H 32 Cylindrical screw DIN EN ISO 4762 M24x90 12 9 33 T nut NS240 34 O Ring DIN 3771 220 x 5 NBR 35 Cylindrical screw DIN EN ISO 4762 M36x9...

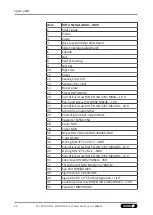
Page 40: ...30 12 9 22 Cylindrical screw DIN EN ISO 4762 M12x30 10 9 25 Lubrication nipple M6x1 26 Conical lubrication nipple M6x1 27 Expander SK550 050 28 Cover M12 29 Cover M24 30 Wiper DA17 BUSAK WD1700300 N90 31 T nut NS240 32 O Ring DIN 3771 220 x 5 NBR 33 Cylindrical screw DIN EN ISO 4762 M36x90 12 9 34 O Ring DIN 3771 28 x 2 NBR 35 Cylindrical screw DIN EN ISO 4762 M24x90 12 9 36 Set screw DIN 34827 M5...

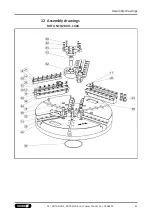
Page 41: ...Assembly drawings 12 Assembly drawings ROTA NCO2 800 1400 41 01 ROTA NCO2 ROTA NCO2 JA Power Chuck en 1506425 ...

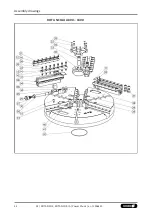
Page 42: ...Assembly drawings 42 01 ROTA NCO2 ROTA NCO2 JA Power Chuck en 1506425 ROTA NCO2 JA 800 1400 ...

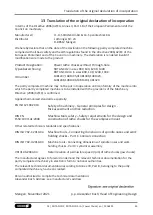
Page 43: ...ons of the Machinery Directive 2006 42 EC is confirmed Applied harmonized standards especially EN ISO 12100 2010 Safety of machinery General principles for design Risk assessment and risk reduction DIN EN 1550 1997 A1 2008 Machine tools safety Safety requirements for the design and construction of lathe chucks for the workpiece mount Other related technical standards and specifications DIN ISO 702...

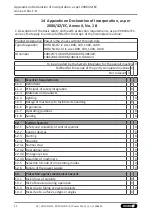
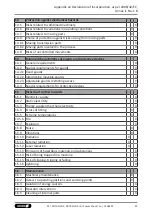
Page 44: ...achine Fulfilled for the scope of the partly completed machine Not relevant 1 1 Essential Requirements 1 1 1 Definitions X 1 1 2 Principles of safety integration X 1 1 3 Materials and products X 1 1 4 Lighting X 1 1 5 Design of machinery to facilitate its handling X 1 1 6 Ergonomics X 1 1 7 Operating positions X 1 1 8 Seating X 1 2 Control Systems 1 2 1 Safety and reliability of control systems X ...

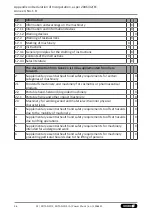
Page 45: ...1 4 2 3 Adjustable guards restricting access X 1 4 3 Special requirements for protective devices X 1 5 Risks due to other hazards 1 5 1 Electricity supply X 1 5 2 Static electricity X 1 5 3 Energy supply other than electricity X 1 5 4 Errors of fitting X 1 5 5 Extreme temperatures X 1 45 6 Fire X 1 5 7 Explosion X 1 5 8 Noise X 1 5 9 Vibrations X 1 5 10 Radiation X 1 5 11 External radiation X 1 5 ...

Page 46: ...lth and safety requirements for certain categories of machinery X 2 1 Foodstuffs machinery and machinery for cosmetics or pharmaceutical products X 2 2 Portable hand held and or guided machinery X 2 2 1 Portable fixing and other impact machinery X 2 3 Machinery for working wood and material with similar physical characteristics X 3 Supplementary essential health and safety requirements to offset h...

Page 47: ......

Page 48: ... D SCHUNK GmbH Co Spanntechnik KG Lothringer Str 23 D 88512 Mengen Tel 49 7572 7614 0 Fax 49 7572 7614 1099 info de schunk com schunk com Folgen Sie uns I Follow us 02 2022 2022 SCHUNK GmbH Co KG 01 ROTA NCO2 ROTA NCO2 JA Power Chuck en 1506425 ...

Reviews: