


7
Montage- und Betriebsanleitung für
2-Finger-Parallelgreifer Type RH 901 – RH 960
Operating manual for
2-Finger-Parallel-Gripper Type RH 901 – RH 960
9.
Näherungsschalter
(auf besondere Bestellung, siehe Katalog)
Benötigen Sie mehr Informationen über die Handhabung von
Sensoren, wenden Sie sich vertrauensvoll an Ihren SCHUNK-
Ansprechpartner oder nutzen Sie unsere Download-Möglich-
keiten unter
www.schunk.com > Produkte > Automation > Zubehör
ACHTUNG!
Beim Anschließen der Näherungsschalter muss die
Versorgungsspannung abgeschaltet sein.
RH 901 K, RH 901 ST 10, RH 905
HINWEIS:
Micro-Foto-Sensoren können nicht nachgerüstet werden! Sie
müssen mit dem Greifer bestellt werden, da sie installiert geliefert
werden.
Schließen Sie den Micro-Foto-Sensor an den Verrstärker an und
verbinden Sie den Verstärker mit Ihrer Kontrolleinheit.
9.
Proximity switches
(on separate order, see catalog)
If you would like more information on the operation of sensors,
please contact your SCHUNK representative. Information is also
available for download at
www.schunk.com>Products>Automation>Accessories
CAUTION!
During installation of the proximity switches, switch
off all power supply.
RH 901, RH 901 ST 10, RH 905
NOTE:
Please note that micro-photo sensors can not be retrofitted ! They
have to be ordered together with the gripper used for your appli-
cation and we will ship them assembled.
Connect the micro-photo-sensor with the amplifier and connect it
with your control.
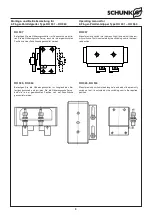
Lichtschranke
Klemmleiste
gegriffen
offen
schwarz
schwarz
orange
orange
offen
geschlossen
(gegriffen)
violett
rot
grau
grau
(geschlossen)
Last
Last
Verstärker
In
ne
re
Be
sc
ha
ltu
ng
Steckverbinder
Micro-Foto-Sensor am Greifer
Light barrier
Clamping strip
clamped
open
black
black
orange
orange
open
closed
(clamped)
purple
red
grey
grey
(closed)
Load
Load
Amplifier
In
te
rn
al
w
ir
er
in
g
Pin- and socket connector
Micro-photo-sensor at the gripper
RH 901 K, RH 901 ST 10
RH 905
Ø 4.2
8.5
Ø 4.2
9.5


