background image


Maintenance and care 


05.00|21151452 KSP plus-IN, KSP-LH plus-IN, KSP plus-IN2, KSP-LH plus-IN2 |en 

41 


in pressure of more than 0.5 bar 


If the clamping system is leaking, check the screws first (e.g., with 

Metaflux leak detection spray). Seal any leaking screws. 
Once the screws are sealed, check for leaks and replace if 

necessary (see Disassembling and assembling the clamping block 

(

 7.1, Page 38)

). 

Summary of Contents for KSP plus-IN

Page 1: ...Translation of Original Operating Manual TANDEM Clamping Block KSP plus IN KSP LH plus IN KSP plus IN2 KSP LH plus IN2 Assembly and Operating Manual Superior Clamping and Gripping ...

Page 2: ...ight to make alterations for the purpose of technical improvement Document number 1151452 Version 05 00 20 07 2020 en H D SCHUNK GmbH Co All rights reserved Dear Customer thank you for trusting our products and our family owned company the leading technology supplier of robots and production machines Our team is always available to answer any questions on this product and other solutions Ask us qu...

Page 3: ... 10 2 9 Notes on safe operation 11 2 10 Transport 11 2 11 Malfunctions 12 2 12 Disposal 12 2 13 Fundamental dangers 12 2 13 1 Protection during handling and assembly 12 2 13 2 Protection during commissioning and operation 13 2 13 3 Protection against dangerous movements 13 2 13 4 Notes on particular risks 14 3 Technical data 16 4 Tightening torques for screws 18 5 Assembly 19 5 1 Pre assembly meas...

Page 4: ...mping 31 5 5 8 Circuit and functional diagram for internal workpiece clamping 33 6 Troubleshooting 35 7 Maintenance and care 37 7 1 Disassembling and assembling the clamping block 38 7 2 Leak test 40 8 Sealing kits accessory packs and parts lists 42 8 1 Sealing kit lists 42 8 2 Accessory packs 43 8 3 Parts lists 44 8 4 Proximity Switches and Supply Cables variant IN for Single or Replacement Order...

Page 5: ...ons in this manual Illustrations in this manual are provided for basic understanding and may differ from the actual product design In addition to these instructions the documents listed under 1 1 2 Page 6 are applicable Presentation of Warning Labels To make risks clear the following signal words and symbols are used for safety notes DANGER Danger for persons Non observance will inevitably cause i...

Page 6: ... delivery date from factory or 500 000 cycles if it is used as intended under the following conditions Observe the applicable documents 1 1 2 Page 6 Observe the ambient conditions and operating conditions 2 6 Page 9 Observance of the specified care and maintenance instructions 7 Page 37 Parts touching the workpiece and wear parts are not included in the warranty A cycle consists of a complete clam...

Page 7: ...N2 KSP LH plus IN2 en 7 Accessories see catalog or data sheets when ordering separately Top jaw blanks type STR KTR Supporting jaws type TBA G TANDEM Base plates Valves pneumatic screws Extension cable for INW inductive proximity switch Retrofitting kit IN2 1 4 ...

Page 8: ...nt as a press as a punching tool as a lathe chuck as a drill or as a cutting tool It is used in working environments that are not permissible Workpieces are not properly clamped Safety regulations are disregarded and persons are working at this product for example to machine clamped workpieces without additional protective equipment The technical data specified by the manufacturer are exceeded dur...

Page 9: ...significantly reduce the clamping force Do not use welded jaws Reduce operating pressure for higher clamping points Environmental and operating conditions Required ambient conditions and operating conditions Incorrect ambient and operating conditions can make the product unsafe leading to the risk of serious injuries considerable material damage and or a significant reduction to the product s life...

Page 10: ...d experience qualified personnel is able to perform the delegated tasks recognize and avoid possible dangers and knows the relevant standards and regulations Instructed persons were instructed by the operator about the delegated tasks and possible dangers due to improper behaviour Due to its technical training knowledge and experience service personnel of the manufacturer is able to perform the de...

Page 11: ...ot apply to products that are designed for special environments Eliminate any malfunction immediately Observe the care and maintenance instructions Observe the current safety accident prevention and environmental protection regulations regarding the product s application field IMPORTANT Following a longer shutdown period more than approx 6 hours always re tension the clamping device in order to co...

Page 12: ...ial and environmental harm Follow local regulations on dispatching product components for recycling or proper disposal Fundamental dangers General Observe safety distances Never deactivate safety devices Before commissioning the product take appropriate protective measures to secure the danger zone Disconnect power sources before installation modification maintenance or calibration Ensure that no ...

Page 13: ...ous injuries while working with the product Switch off the energy supply ensure that no residual energy remains and secure against inadvertent reactivation Never rely solely on the response of the monitoring function to avert danger Until the installed monitors become effective it must be assumed that the drive movement is faulty with its action being dependent on the control unit and the current ...

Page 14: ...he EC Machinery Directive 2006 42 EC specifically they must have effective technical measures to protect against possible mechanical hazards WARNING Risk of injury from workpiece loss if compressed air or oil pressure fails or is reduced and from improper controlling operator error Use pressure maintenance valves Safeguards in user program WARNING Risk of injury from clamping block or chuck jaws f...

Page 15: ... of slipping or falling if the operational environment of the clamping block is not clean e g contaminated with cooling lubricants or oil Ensure that the working environment is clean before starting assembly and installation work Wear suitable safety boots Follow the safety and accident prevention regulations when operating the clamping block especially when working with machine tools and other te...

Page 16: ...ressure 9 9 6 9 9 6 Repeat accuracy mm 0 01 0 02 0 03 0 01 0 02 0 03 max jaw height mm 60 60 150 150 200 500 Weight kg 4 11 32 4 11 32 Clamping force is the arithmetic sum of the individual forces occurring at the chuck jaws at a distance of H see catalog 1 1 2 Page 6 Sizes 100 160 When using an ABP A base plate the maximum pressure must be limited to 7 bar End position spread after 100 consecutiv...

Page 17: ...ension KSP plus IN KSP LH plus IN KSP plus IN2 KSP LH plus IN2 100 160 250 M 59 100 150 N M8 M10 M12 O 15 18 20 P 4 4 5 Ø Q 10f7 12f7 14f7 Ø R 11 13 16 S 4 5 6 6 T 57 5 66 5 77 2 U 14 20 14 22 27 5 42 5 V 14 20 14 22 27 5 42 5 W only IN2 65 8 72 8 134 8 X only IN2 82 1 99 124 5 Y only IN2 63 5 73 87 2 Design IN ...

Page 18: ...M5 M6 M8 M10 M12 M14 M16 M18 M20 M22 M24 Admissible torque MA Nm 4 2 7 5 13 28 50 88 120 160 200 290 400 500 Tightening torques to mount top jaws on the TANDEM clamping block screw quality 12 9 Screw size M4 M5 M6 M8 M10 M12 M14 M16 M20 M24 Tightening torques MA Nm 5 9 15 32 62 108 170 262 510 880 Tightening torques to mount the chuck piston onto the cylinder piston screw quality 12 9 Screw size M...

Page 19: ...or removal Make sure the clamping block and chuck jaws do not fall during transport installation or removal Use a crane and or a transport truck for transportation Only install the clamping block on machines with the appropriate connection dimensions Pre assembly measures Carefully lift the product e g using suitable lifting gear from the packaging CAUTION Danger of injury due to sharp edges and r...

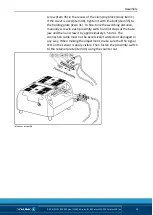
Page 20: ...table with repeat accuracy Do not realign the clamping block after removing it from the machine table e g after replacing the seals When using fitting screws item 9 use them instead of the clamping sleeves item 27 and the two corresponding screws item 19 Connecting the clamping block Make sure the power supply is off when connecting the clamping block See chapter Basic Safety Notes CAUTION Risk of...

Page 21: ...ithout a base plate Connections III and IV in the base for hose free direct connection to the machine table or on the base plate The threads for hose free direct connection are not designed for pneumatic fittings Thread for pneumatic screwed connection on the front KSPplus 100 IN and IN2 KSP LH plus 100 IN and IN2 M5 KSPplus 160 IN and IN2 KSP LH plus 160 IN and IN2 G1 8 KSPplus 250 IN and IN2 KSP...

Page 22: ...s 100 und KSP F plus 100 Use the M8 x 30 screws from the base plate accessory pack instead of the M8 x 35 screws item 19 For KSP plus 160 KSP LH plus 160 und KSP F plus 160 Use the M10 x 40 screws from the base plate accessory pack instead of the M10 x 35 screws item 19 For KSP plus 250 KSP LH plus 250 und KSP F plus 250 Use the M12 x 45 screws from the base plate accessory pack instead of the M12...

Page 23: ...lamping position can be monitored through recesses in the base jaws of the clamping block The signals can be directly processed by the machine control system The monitoring result is The clamping force block is open or closed for I D or O D clamping depending on the application Information on handling sensors is available at schunk com or from SCHUNK contact persons Technical data for the sensors ...

Page 24: ...Proximity switches are electronic components which can react sensitively to high frequency interference or electromagnetic fields Check that the cable is correctly connected and installed There must be sufficient distance between the switches and sources of interference and their supply cables Parallel switching of multiple sensor outputs of the same design npn pnp is permissible though this does ...

Page 25: ...IN2 KSP LH plus IN2 en 25 Basic construction and dimensions of the inductive proximity switches with scew fastened connection cable Dimensions IN Dimensions IN2 IN S M8 1 left and IN S M8 2 right Dimensions and switching functions of the INW 50 S M12 5 5 1 5 5 2 ...

Page 26: ...2 x 1 Protection class in accordance with DIN EN 60529 IP 67 for the pin terminal only when screwed on Dimensions and switching functions INW 80 S M12 Technical data Seize M8 x 1 x 32 mm Switching function Closer Switching distance 1 5 mm Voltage 10 30 V DC Residual ripple 15 Max current on contact 200 mA short circuit proof Switching hysteresis 15 of the nominal switching distance Temperature ran...

Page 27: ...e 10 30 V DC Ripple 15 Max current on contact 200 mA short circuit proof Switching hysteresis 15 of the nominal switching distance Temperature range 25 C to 70 C Switching frequency approx 1000 Hz Voltage drop max load 2 5 V Thread on connecting plug for feed cable M8 x 1 Protection class in accordance with DIN EN 60529 IP 67 for the pin terminal only when screwed on Dimensions and switching funct...

Page 28: ...monitoring the jaw stroke end position for O D and I D clamping as well as for monitoring the clamping position Adjust the switching point of proximity switch S1 installed on the left so that the required switching signal is present when the stroke end position is open or closed Proximity switch S2 is used for monitoring the clamping position between the two jaw end positions Adjust the switching ...

Page 29: ... item 31 To fine tune the switching distance manually screw in each proximity switch until it stops at the base jaw and then unscrew it by approximately 1 5 turns The connection cable must not be excessively twisted nor damaged in any way When making the adjustment make sure that the signal LED on the sensor is easily visible Then fasten the proximity switch to the retainer plate item 31 using the...

Page 30: ...y adjust the switching position Then link the plug connection between the proximity switch and connecting cable NOTE The sensor head of the proximity switches may not touch the base jaws under any circumstances in the operating condition Both proximity switches must be installed in the operating condition to prevent chips from entering the clamping system through the open clamp ...

Page 31: ...amping The circuit diagram and the functional diagram show the recommended settings of the proximity switches for monitoring End position open and Clamping position reached The circuit diagram can also be adjusted for monitoring Stroke end position closed and Missed clamping position The proximity switches can also be individually adjusted on the retaining plate Fig 5 Circuit diagram for external ...

Page 32: ...Assembly 32 05 00 21151452 KSP plus IN KSP LH plus IN KSP plus IN2 KSP LH plus IN2 en Fig 6 Functional diagram for external workpiece clamping ...

Page 33: ...amping The circuit diagram and the functional diagram show the recommended settings of the proximity switches for monitoring End position closed and Clamping position reached The circuit diagram can also be adjusted for monitoring Stroke end position open and Missed clamping position The proximity switches can also be individually adjusted on the retaining plate Fig 7 Circuit diagram for internal ...

Page 34: ...Assembly 34 05 00 21151452 KSP plus IN KSP LH plus IN KSP plus IN2 KSP LH plus IN2 en Fig 8 Functional diagram for internal workpiece clamping ...

Page 35: ...ng system to SCHUNK for repairs or disassemble clamping system and repair using original SCHUNK spare parts 7 1 Page 38 Piston rod or piston rod screw connection broken overload Send clamping system to SCHUNK for repairs or disassemble clamping system and repair using original SCHUNK spare parts 7 1 Page 38 Active air connections sealed Remove set screws from sealed air connections No control of s...

Page 36: ...ust the position Adjust position to workpiece tolerances Clamping block does not complete stroke Possible cause Remedial measures Chips or dirt between covering strip and base jaws Unscrew the covering strip item 7 and remove chips and dirt Clamping force getting weaker Possible cause Remedial measures Clamping block not sealed tightly Check connection and seal screws reseal or replace Seals damag...

Page 37: ... LINOMAX 200 depending on load but at least once per month or every 10 000 clamps Make sure the chuck jaws are in the open position Disassemble the base jaws and the chuck piston at least once every three months or more often if necessary Clean the housing base jaws and chuck piston and lubricate all the guides housing base jaws chuck piston with LINOMAX 200 Reassemble everything and relubricate t...

Page 38: ...switch is fastened with a hexagon nut and washer item 34 The counter supports item 32 can be removed at the same time as the proximity switches When replacing wearing parts e g seals for seal kit list see 8 1 Page 42 adhere to the following order 1 Apply 6 bar of air pressure to the clamping system until the jaws are in the OPEN position 2 Remove the covering strip item 7 and the guide strips item...

Page 39: ... sure the cylinder piston item 4 is level and not tilted 18 Gently press the quad ring item 12 inward from all sides so that it slides more easily over the edge of the housing item 1 19 Press the cylinder piston item 4 into the cylinder of the housing item 1 Do not tilt the cylinder piston item 4 20 Place the O rings items 20 22 in the housing item 1 and the O ring item 17 around the cover item 5 ...

Page 40: ...e inductive proximity switches If necessary adjust the switching position The sensor head of the proximity switches may not touch the base jaws under any circumstances during operation 31 Check for leaks 32 Adjust the inductive proximity switches while checking for correct signal output Leak test The following components are required to check for leaks pressure gauge shut off valve and quick coupl...

Page 41: ...2 en 41 in pressure of more than 0 5 bar If the clamping system is leaking check the screws first e g with Metaflux leak detection spray Seal any leaking screws Once the screws are sealed check for leaks and replace if necessary see Disassembling and assembling the clamping block 7 1 Page 38 ...
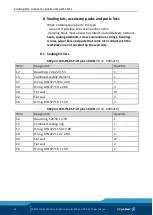
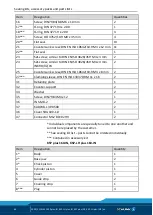
Page 42: ...t come into contact with the workpiece are not covered by the warranty Sealing kit lists KSPplus 100 IN KSP LH plus 100 IN ID no 0405219 Item Designation Quantity 12 Quad ring 72 62 x 3 53 1 15 Combined sealing element 1 17 O ring DIN 3771 93 x 2 00 1 18 O ring DIN 3771 9 x 2 00 4 20 Flat seal 13 22 Flat seal 2 50 O ring DIN 3771 6 x 1 50 2 KSPplus 160 IN KSP LH plus 160 IN ID no 0405319 Item Desi...

Page 43: ...s a compete kit Accessory packs KSP plus 100 IN KSP LH plus 100 IN KSP plus 100 IN2 KSP LH plus 100 IN2 Item Designation Quantity 8 Plug 4 9 Fitting screw 10f7 M8 2 18 O ring DIN 3771 9 x 2 00 4 19 Screw DEI 4762 10 9 M8 x 30 mm 4 27 Clamping sleeve DIN EN ISO 13337 DRM 11 x 16 2 51 Screw DEI 4762 12 9 M6 x 16 mm 8 54 O ring DIN 3771 6 x 1 50 4 KSP plus 160 IN KSP LH plus 160 IN KSP plus 160 IN2 K...

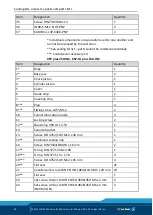
Page 44: ...8 52 T handle for KSP M10 2 53 Set screw DIN EN ISO 4026 M10 x 30 mm 2 54 O ring DIN 3771 6 x 1 50 4 Parts lists KSP plus 100 IN KSP LH plus 100 IN Item Designation Quantity 1 Body 1 2 Base jaw 2 3 Chuck piston 1 4 Cylinder piston 1 5 Cover 1 6 Guide strip 2 7 Covering strip 1 8 Plug 4 9 Fitting screw 10f7 M8 2 10 Funnel lubrication nipple 4 11 Locking screw 2 12 Quad ring 72 62 x 3 53 1 13 Sound ...

Page 45: ...g plate 1 32 Counter support 2 34 Washer 2 35 Screw DIN 7984 M4 x 12 1 36 IN 50 S M12 NHS PNP CLOSER 2 37 KA BW12 L 3P 0300 PNP 2 Individual components are specially tuned to one another and cannot be replaced by the customer See sealing kit list parts cannot be ordered individually Contained in accessory kit KSP plus 100 IN2 KSP LH plus 100 IN2 Item Designation Quantities 1 Body 1 2 Base jaw 2 3 ...

Page 46: ... 4026 45H M4 x 4 mm IN6RD VZ PA 2 25 Countersunk screw DIN EN ISO 10642 10 9 M4 x 8 mm 2 27 Clamping sleeve DIN EN ISO 13337 DRM 11 x 16 2 31 Retaining plate 1 32 Counter support 2 34 Washer 2 35 Screw DIN 7984 M4 x 12 1 36 IN S M8 2 2 37 KA BW8 L 3P 0500 2 46 Cover SBG 100 1 0 1 47 Connector M12 BCC02H9 2 Individual components are specially tuned to one another and cannot be replaced by the custo...

Page 47: ...ISO 10642 10 9 M5 x 20 mm 15 22 Flat seal 1 23 Set screw similar to DIN EN ISO 4026 45H M5 x 4 mm 4 25 Countersunk screw DIN EN ISO 10642 10 9 M5 x 10 mm 2 26 Set screw DIN EN ISO 4026 45H M4 x 4 mm IN6RD VZ PA 1 27 Clamping sleeve DIN EN ISO 13337 DRM 13 x 18 2 31 Retaining plate 1 32 Counter support 2 34 Washer 2 35 Screw DIN 7984 M5 x 12 1 36 IN 50 S M12 NHS PNP CLOSER 2 37 KA BW12 L 3P 0300 PN...

Page 48: ...00 1 18 O ring DIN 3771 12 x 2 00 4 19 Screw DEI 4762 10 9 M10 x 40 mm 4 20 Flat seal 17 21 Countersunk screw DIN EN ISO 10642 10 9 M5 x 20 mm 15 22 Flat seal 1 23 Set screw similar to DIN EN ISO 4026 45H M5 x 4 mm 4 25 Countersunk screw DIN EN ISO 10642 10 9 M5 x 10 mm 2 26 Set screw DIN EN ISO 4026 45H M4 x 4 mm IN6RD VZ PA 1 27 Clamping sleeve DIN EN ISO 13337 DRM 13 x 18 2 31 Retaining plate 1...

Page 49: ...09 14 x 3 53 1 13 Sound absorber 1 14 Screw DEI 4762 10 9 M12 x 30 mm 1 15 Combined sealing ring 1 16 Screw DIN 7984 8 8 M8 x 16 mm 2 17 O ring DIN 3771 238 x 2 00 1 18 O ring DIN 3771 15 x 1 78 4 19 Screw DEI 4762 10 9 M12 x 45 mm 4 20 Flat seal 21 21 Countersunk screw DIN EN ISO 10642 10 9 M5 x 20 mm 19 22 Flat seal 1 23 Set screw similar to DIN EN ISO 4026 45H M5 x 4 mm 2 24 Set screw similar t...

Page 50: ...on Quantity 1 Body 1 2 Base jaw 2 3 Chuck piston 1 4 Cylinder piston 1 5 Cover 1 6 Guide strip 2 7 Covering strip 1 8 Plug 4 9 Fitting screw 14f7 M12 2 10 Funnel lubrication nipple 4 11 Locking screw 2 12 Quad ring 209 14 x 3 53 1 13 Sound absorber 1 14 Screw DEI 4762 10 9 M12 x 30 mm 1 15 Combined sealing ring 1 16 Screw DIN 7984 8 8 M8 x 16 mm 2 17 O ring DIN 3771 238 x 2 00 1 18 O ring DIN 3771...

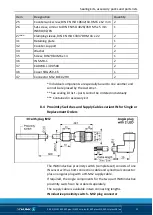
Page 51: ...ctor M12 BCC02H9 2 Individual components are specially tuned to one another and cannot be replaced by the customer See sealing kit list parts cannot be ordered individually Contained in accessory kit Proximity Switches and Supply Cables variant IN for Single or Replacement Orders The INW inductive proximity switch complete set consists of one IN sensor with a short connection cable and cylindrical...

Page 52: ...ity Switches and Supply Cables variant IN2 for Single or Replacement Orders For the IN2 variant there is a request from the sensor type IN an angular supply cable type KA M12 and a self convertible plug connector Inductive proximity switch IN M8 plug connection Designation ID number IN S M8 1 1349984 IN S M8 2 1349990 Angular plug KA M12 plug connection Designation ID number KA BW8 L 3P 0500 cable...

Page 53: ...Assembly drawing 05 00 21151452 KSP plus IN KSP LH plus IN KSP plus IN2 KSP LH plus IN2 en 53 Assembly drawing Size 160 for sizes 160 250 Centering with clamping sleeves Centering with fitting screws 9 ...

Page 54: ... 250 IN2 KSP LH plus 250 IN2 KSP Z plus 250 IN2 KSP LH Z plus 250 IN2 ID number 0405207 0405227 0405208 0405228 0405307 0405327 0405308 0405328 0405507 0405527 0405508 0405528 1349646 1349647 1349648 1349649 1349650 1349651 1349664 1349665 1349666 1349667 1349668 1349670 The partly completed machine may not be put into operation until conformity of the machine into which the partly completed machi...

Page 55: ...9666 1349667 1349668 1349670 To be provided by the System Integrator for the overall machine Fulfilled for the scope of the partly completed machine Not relevant 1 1 Essential Requirements 1 1 1 Definitions X 1 1 2 Principles of safety integration X 1 1 3 Materials and products X 1 1 4 Lighting X 1 1 5 Design of machinery to facilitate its handling X 1 1 6 Ergonomics X 1 1 7 Operating positions X ...

Page 56: ...ator intervention X 1 6 5 Cleaning of internal parts X 1 7 Information 1 7 1 Information and warnings on the machinery X 1 7 1 1 Information and information devices X 1 7 1 2 Warning devices X 1 7 2 Warning of residual risks X 1 7 3 Marking of machinery X 1 7 4 Instructions X 1 7 4 1 General principles for the drafting of instructions X 1 7 4 2 Contents of the instructions X 1 7 4 3 Sales literatu...

Reviews: