Assembly
20
05.00|21151452 KSP plus-IN, KSP-LH plus-IN, KSP plus-IN2, KSP-LH plus-IN2 |en
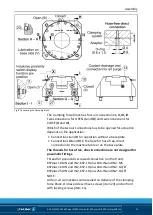
Image 2 assembling the clamping block
Assembly with clamping sleeves
Mount the clamping block on the machine table together with
clamping sleeves (item 27) and screws (item 19).
Assembly with fitting screws:
There are two fittings in the housing (item 1) that, along with the
optional fitting screws (item 9), are used to center the clamping
block on the machine table with repeat accuracy. Do not realign
the clamping block after removing it from the machine table (e.g.,
after replacing the seals). When using fitting screws (item 9), use
them instead of the clamping sleeves (item 27) and the two
corresponding screws (item 19).
Connecting the clamping block
Make sure the power supply is off when connecting the clamping
block. See chapter "Basic Safety Notes".
CAUTION
Risk of workpiece loss and damage to system due to loss of air
pressure caused by damaged pneumatic lines.
Always make sure the connections are tight, and use appropriate
protection covers to protect the pneumatic hoses and lines from
hot chips.
5.3

