background image

10

GB


INSTALLATION INSTRUCTIONS


OPERATING INSTRUCTION


READ  AND  SAVE THESE  IN-

STRUCTIONS


GENERAL

• 

Carefully  read  the  following  important  information 

regarding  installation  safety  and  maintenance.  Keep 
this information booklet accessible for further consul-
tations. 
The appliance has been designed for use in the ducting 
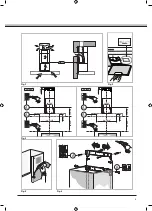
version (air exhaust to the outside – Fig.2).
- control the data plate (positioned inside the appliance) 
to ascertain that the voltage and power correspond to 
the network and the socket is suitable. If in doubt ask 
a qualified electrician (Fig.3)

.


INSTALLATION INSTRUCTIONS

•  Power Supply Connection

For connection to the power supply refer to the follows 
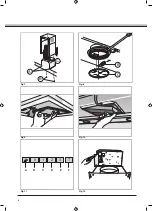
fig.12:

BLACK 


=  

line

WHITE


=  

neutral

GREEN / YELLOW


=  

ground

A double-pole switch properly rated must be installed to 
provide the range hood power supply disconnection.

The appliance must be installed at a minimum height 
of 26 inches (66 cm) from an electric cooker stove, or 
30 inches (76 cm) from gas or combined cooker stoves. 
If  a  connection  ductwork  composed  of  two  parts  is 
used, the upper part must be placed outside the lower 
part. Do not connect the range hood exhaust duct air 
to the same duct air used to exhaust hot air or fumes 
from  other  appliances  other  than  electrical.  Before 
proceeding with the assembly operations, remove the 
anti-grease filter(s) (Fig.9) so that the unit is easier to 
handle.


WARNING - TO REDUCE THE RISK OF FIRE, 

ELECTRIC SHOCK, OR INJURY TO PERSONS, OB-
SERVE THE FOLLOWING: Before making electrical 
connections  to  power  supply,  the  electrical  box 
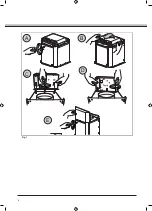
must be secured in place as indicated in fig.1
 
Before installing the appliance fix the electrical box 
as indicated in fig.1

- Remove the central screw fig.1A.
- Lift the electrical plant box fig. 1B.
- Remove the 3 fixed screws fig.1C.
- Position the electrical box so it is in line with the 
holes of the previously removed screws fig.1D and 
tighten.

- Pay attention that the tear tape of the electrical box 
is inside the slot
and then tighten screw fig.1E.

•  FIXING TO THE WALL

Drill  the  holes 

A

  respecting  the  distances  indicated 

(Fig.4). Fix the appliance to the
wall and align it in horizontal position to the wall units. 
When the appliance has been adjusted, definitely fix 
the hood using the screws 

A

 (Fig.7). For the various 

installations use screws and screw anchors suited to 
the type of wall (e.g. reinforced concrete, plasterboard, 
etc.). If the screws and screw anchors are provided with 
the product, check that they are suitable for the type of 
wall on which the hood is to be fixed. 

•  FIXING THE DECORATIVE TELESCOPIC FLUE

Take care not to scratch the duct; wear gloves when re-
moving the protective film (Fig.5). Arrange the electrical 
power supply within the dimensions of the decorative flue. 
If your appliance is to be installed in the ducting version or 
in the version with external motor, prepare the air exhaust 
opening. Adjust the width of the support bracket of the up-
per flue (Fig.6). Then fix it to the ceiling using the screws 

A

 (Fig.6) in such a way that it is in line with your hood 

and respecting the distance   from the ceiling indicated 
in Fig.4. Connect the flange 

C

 to the air exhaust hole 

using a connection pipe (Fig.4). Insert the upper flue 
into  the  lower  flue.  Extract  the  upper  flue  up  to  the 
bracket and fix it with the screws 

B

 (Fig.6). 

• FILTERING VERSION

Install the hood and the two flues as described in the 
paragraph for installation of the hood in ducting version. 
To assemble the filtering flue refer to the instructions 
contained in the kit. If the kit is not provided, order it 
from  your  dealer  as  accessory. The  charcoal  filters 
must  be  fitted  in  the  ducting  unit  located  inside  the 
hood (Fig.8).

• If the apparatus is equipped with the following con-
trols (fig.11):
A

 = LIGHT

B

 = OFF

C

 = SPEED I

= SPEED II

E

 = SPEED III

= AUTOMATIC STOP TIMER - 15 minutes

• 

If your appliance does have the 

INTENSIVE

 speed 

function, press key E for two seconds and it will be activated 
for 10 minutes after which it will return to the previously 
set speed.
When the function is active the LED flashes. To interrupt 
it before the 10 minutes have expired press key 

again.

Use and maintenance

Summary of Contents for HSB 308 IX NA

Page 1: ......

Page 2: ......

Page 3: ...Model HSB 308 IX NA HSB 368 IX NA ...

Page 4: ...4 Fig 1 ...

Page 5: ...5 Fig 5 Fig 6 Fig 2 Fig 4 Fig 3 ...

Page 6: ...6 Fig 11 Fig 7 Fig 9 Fig 12 Fig 8 Fig 10 ...

Page 7: ... Summary General 8 9 Safety precaution 10 Installation instructions 10 11 Electric Connection Fixing to the wall Fixing the decorative telescopic flue Filtering version Use and maintenance 11 Replacing halogen light bulbs Commands Service 12 Warranty 13 14 User instructions ...

Page 8: ...easy spillovers that may ignite Heat oils slowly on low or medium settings B Always turn hood ON when cooking at high heat or when flambeing foods i e Crepes Suzette Cherries Jubilee Peppercorn Beef Flambè C Clean ventilating fans frequently Grease should not be allowed to accumulate on fan or filter D Use proper pan size Always use cookware ap propriate for the size of the surface element E Keep ...

Page 9: ...O REDUCE THE RISK OF FIRE USE ONLY METAL DUCTWORK WARNING UNDER CERTAIN CIRCUMSTANCES DOMESTIC APPLIANCES MAY BE DANGER OUS A Do not check filters with hood working B Do not touch the lamps after a prolonged use of the appliance C No food must be cooked flambè underneath the hood D The use of an unprotected flame is dangerous for the filters and could cause fires E Watch constantly the fried food ...

Page 10: ... slot and then tighten screw fig 1E FIXING TO THE WALL Drill the holes A respecting the distances indicated Fig 4 Fix the appliance to the wall and align it in horizontal position to the wall units When the appliance has been adjusted definitely fix the hood using the screws A Fig 7 For the various installations use screws and screw anchors suited to the type of wall e g reinforced concrete plaste...

Page 11: ...il the light on the button stops flashing MAINTENANCE It is recommended to operate the appliance prior to cooking It is recommended to leave the appliance in operation for 15 minutes after cooking is terminated in order to completely eliminate cooking vapours and odours The proper function of the cooker hood is conditioned by the regularity of the maintenance operations The anti grease filters cap...

Page 12: ...r a service call while the appliance is under warranty if the problems are not caused by defective workmanship or materials If you do need service you can relax knowing that help is only a phone call away Call our Scholtès Technical Service Assistance Department toll free at 1 877 356 0766 Please have the model number and serial number of your appliance ready when you call This information can be ...

Page 13: ...ing plate 3 Failure of or damage to the Scholtès Product if it is altered abused misused or used for other than the intended purpose or if it is used commercially 4 Service trips to your home to provide instructions on the use of your Scholtès Product 5 Replacement of house fuses or correction of the plumbing or electric wiring in your home 6 Damage caused by neglect accident fire floods or acts o...

Page 14: ...se note that a copy of your original purchase receipt showing the purchase date and the vendor s name and address are required to obtain service under this Warranty If the Scholtès Product is located in an area where service by an Authorized Scholtès Service Center is not available you may be responsible for a trip charge or you may be required to bring the Schol tès Product to an Authorized Schol...

Page 15: ... 13 14 Conseils pour la sécurité 15 Instructions pour l installation 15 16 Connexion électrique Fixation murale Fixation des raccords télescopiques de décoration Modèle filtrant Emploi et entretien 16 Remplacement des lampes halogènes Commandes Réparation 20 Garantie 21 22 Notice d utilisation ...

Page 16: ...tuer des opérations de maintenance ou de nettoyage sur l unité débrancher le panneau de service et fermer à clef les commandes de déconnec tion afin d éviter toute mise sous tension accidentelle Au cas où les commandes de déconnection ne pour raient être fermées à clef fixer sur le panneau de ser vice un message avertissant du danger par exemple une plaque AVERTISSEMENT AFIN DE RÉDUIRE LES RIS QUE...

Page 17: ...t les normes de sécurité correspondantes telles que celles émises par l Association Nationale de Protection contre les Incendies National Fire Protection Association NFPA la Société Américaine des Techniciens de Chauffage Réfrigération et Climatisation de l Air American Society for Heating Refrigeration and Air Condi tioning Engineers ASHRAE et par les autorités locales préposées C Au cours des op...

Page 18: ...installation électrique fig 1B Enlevez les 3 vis déjà serrées fig 1C Positionnez la boîte de l installation électrique de sorte qu elle soit en axe avec les trous des vis précedemment enlevées fig 1D et serrez les Faites attention à ce que la languette de la boîte de l installation électrique se trouve à l intérieur de la fente et serrez la vis fig 1E FIXATION AU MUR A l aide d une perceuse effect...

Page 19: ...ire électronique en appuyant 5 secondes de suite sur la touche A jusqu à ce que cette dernière cesse de clignoter La fonction minuter arrêt automatique retarde l arrêt de la hotte qui continuera de fonctionner à la vitesse de service en cours au moment de l activation de cette fonction pendant 15 minutes MANTENANCE Il est conseillé d allumer l appareil avant de com mencer à cuisiner et de le laiss...

Page 20: ... service vous sera debité si l appareil en garan tie ne présente aucune défectuosité de fonctionnement des composants et materiaux de fabrication Demandez toujours l aide de techniciens agréés Ap pelez Scholtès Technical Service Assistance au 1 877 356 0766 Ayez les informations suivantes à portée de main type de problème modèle Mod numéro de série S N Ces renseignements se trouvent sur la plaquet...

Page 21: ...ts du Produit Scholtès 2 Dommages causés si le Produit Scholtès n a pas été utilisé conformément aux critères d alimentation en gaz ou en électricité figurant sur la plaque signalétique 3 Panne ou dommage causé au Produit Scholtès suite à une altération une utilisation impropre ou inadaptée ou en cas d utilisation professionnelle 4 Déplacements à votre domicile pour vous fournir des consignes quan...

Page 22: ...holtès ou par un Service technique agréé par Scholtès Pour prendre un RDV pour une intervention sous ga rantie appelez le 1 877 356 0766 ou envoyez un e mail à l adresse service scholtesamerica com Veillez à signaler le modèle de votre Produit Scholtès ainsi que le numéro de série Sachez qu une copie du reçu affichant la date d achat ainsi que le nom et l adresse du vendeur sont néces saires pour ...

Page 23: ...s 18 19 Sugerencias para la seguridad 20 Instrucciones para la instalación 20 21 Instalación eléctrica Fijar a la pared Fijar los racorestelescópicos decorativo Versión filtrante Uso y mantenimiento 21 Sustitución de las lámparas halógenas Mandos Servicio 28 Garantía 29 30 Manual de utilización ...

Page 24: ...al panel de servicio como una placa por ejemplo ADVERTENCIA PARA REDUCIR EL RIESGO QUE LA GRASA DE LA SUPERFICIE DEL HORNO SE INCENDIE Nunca deje ollas en la superficie del horno en posición alta sin supervisión Eventuales desbordamientos por el hervor pueden causar humo y rebalses de grasa que pueden encenderse Caliente el aceite lentamente en posición baja o media A ENCIENDA siempre la campana c...

Page 25: ... y Aire Acondicionado American Society for Heating Refrigeration and Air Conditioning Engineers ASHRAE y por las autoridades de códigos locales C Cuando corte o taladre en la pared o el techo no dañe el cableado eléctrico ni otras utilidades escon didas D El aparato debe estar siempre conectado a un agujero de evacuación hacia el exterior E La unidad deber ser conectada al suelo ADVERTENCIA PARA R...

Page 26: ...locar la caja planta eléctrica de modo que esté alineada con los agujeros de los tornillos que fueron quitados precedentemente fig 1D y reatornillar Prestar atención a que la lengüeta de la caja planta eléctrica esté dentro del ojal y reatornillar los tornillos fig 1E FIJACIÓN A LA PARED Con la ayuda de un taladro perfore los agujeros A respetando las distancias indicadas Fig 4 Fije el electrodomé...

Page 27: ...otón A durante 5 seg hasta que deje de centellear La función timer parada automatica retarda la parada de la campana que continuará a funcionar a la velocidad seleccionada en el momento del encendido de esta función 15 minutos MANTENCIÓN Se aconseja encender el electrodoméstico antes de cocinar y dejarlo en función por 15 minutos después de haber terminado la cocción para eliminar vapores y odores...

Page 28: ...a si los problemas no hubieran sido causados por defectos de fabricación y o de materiales defectuosos Si necesitase la asistencia técnica puede estar rela jado sabiendo que la ayuda está a solo una llamada Comuníquese con nuestro Servicio Técnico Departa mento de Asistencia Scholtes al número gratuito 1 877 356 0766 Por favor tenga a mano el modelo y número de serie de su electrodoméstico al real...

Page 29: ...os ocasionados por no usar el Producto Scholtès en cumplimiento de las especificaciones de suministro de electricidad o gas indicadas en la placa de datos 3 Daños ocasionados al Producto Scholtès o fallas de éste por alteración abuso mal uso uso distinto del previsto o uso comercial 4 Visitas de servicio a su casa para brindar instruccio nes sobre el uso de su Producto Scholtès 5 Reemplazo de fusi...

Page 30: ...tesamerica com Recuerde informar el número de modelo y el número de serie de su Producto Scholtès Tenga en cuenta que es necesario presentar una copia de su recibo de compra original con la fecha de compra y el nombre y la dirección del comercio a fin de obtener servicio bajo esta Garantía Si el Pro ducto Scholtès se encuentra en una zona donde no está disponible el servicio de un Centro de Servic...

Page 31: ......
Page 32: ...Indesit Company Viale Aristide Merloni 47 60044 Fabriano AN Italy Tel 39 0732 6611 www scholtes com 3LIK0732 ...

Reviews: