background image

PAGE 53

© 2018. All rights reserved. Used under license by Schluter-Systems L.P.

Floor limit temperatures are set under 

Menu/Installer Settings/Floor Protection

.

Note that changes made under “Sensor Application” do not influence the “Floor 
Protection” settings.

Maximum temperature depends on the floor type and temperature unit.
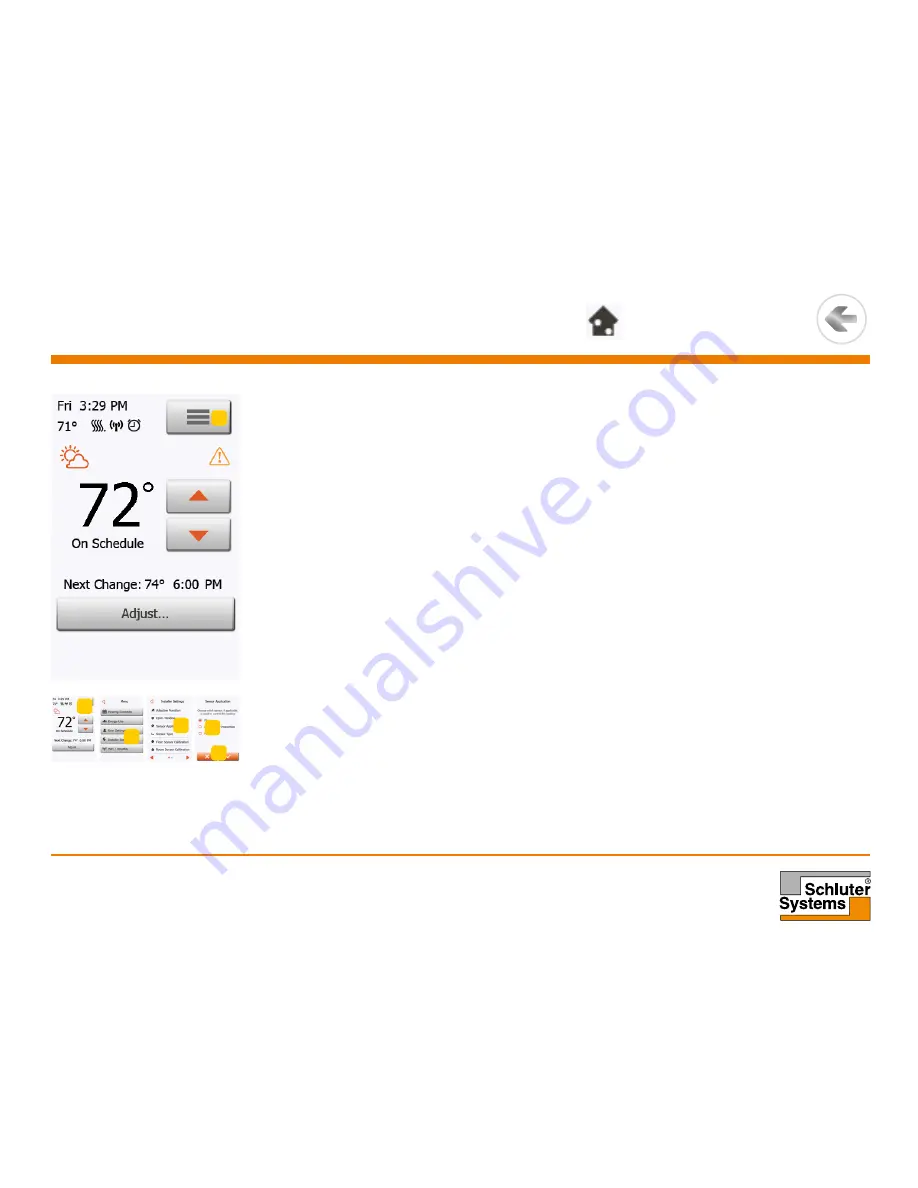
1.  Tap the “

Menu

” button on the home screen.

2.  Then tap the “

Installer Settings

” button to access the various installer settings.

3.  Tap the “

Sensor Application

” button.

4.  Tap the application that you want to use.
  •  Floor
  •  Room/Floor Protection
  •  Room
5.  Confirm your choice with “

” or discard it with “

X

”.

The thermostat will automatically return to “

Installer Settings

”.

Note that, when changing Sensor Application, certain menu options may be grayed 
out and inaccessible as they are not applicable with the current settings. 

10.4.3 Sensor Application 2/2 

1

2

3

4

5

1

2

3

5

4

5

>

<

Contents

1

2

3

4

5

1

>

<

Contents

Summary of Contents for DITRA-HEAT-E-WiFi

Page 1: ...license by Schluter Systems L P Schluter DITRA HEAT E WiFi WiFi Touch Thermostat Interactive User Manual 67752A 02 18 JRK 71 Fri 3 29 PM 2017 All rights reserved Used under license by Schluter Systems L P www schluter com Contents Contents ...

Page 2: ...le 1 2 32 10 1 Heating Schedule 2 2 33 10 2 Energy Use 34 10 3 User Settings 35 10 3 1 Child Lock 1 2 36 10 3 1 Child Lock 2 2 37 10 3 2 Display Brightness 38 10 3 3 Screen Saver 39 10 3 4 Energy Tariff 40 10 3 5 Date 41 10 3 6 Time 42 10 3 7 Daylight Saving Time 43 10 3 8 Unit 44 10 3 9 Language 45 10 3 10 Information 46 10 3 11 Support 47 10 3 12 User Reset 48 10 4 Installer Settings 49 10 4 1 A...

Page 3: ...ormation Support Adaptive Function Open Window Sensor Application Sensor Type Floor Sensor Calibration Floor Protection Factory Reset Room Sensor Calibration WiFi Weather User Reset Contents Heating Schedule Energy Use User Settings Installer Settings View Edit Schedule Reset to Factory Schedule Child Lock Display Brightness Screen Saver Energy Tariff Date Time Daylight Saving Time Unit Language I...

Page 4: ...system on at predetermined times each day of the week You can set individual temperatures for up to six separate events for each day of the week Lowering the temperature when your home is unoccupied will reduce your energy costs without reducing comfort The thermostat comes with a preset heating schedule that is suitable for most homes Unless you change the settings the thermostat will operate acc...

Page 5: ...ermostat and a power reset button is located on the right side of the thermostat Test the GFCI monthly The test has no influence on the settings data including time and date will be stored The thermostat is an intuitively operated touch thermostat in which the touchscreen is used to navigate through the menus and to change the settings 4 General Operation Contents Contents ...

Page 6: ...creen Tap the Back button to return to the previous menu Cancel is shown on the screen as a button marked X Although Cancel has the same effect as Back it also results in all the unsaved settings being discarded As soon as you leave a home screen and enter one of the menus either a Back button or a Cancel button will be shown To return to the home screen tap Back Cancel once or multiple times depe...

Page 7: ...utton to reset the GFCI The red LED will stop flashing and the display returns to normal appearance If the test fails repeat the test If it continues to fail ask an electrician to check the installation If during normal operation the GFCI trips without the TEST button being pressed there could be a ground fault To check whether it is a ground fault or nuisance tripping press Standby Reset If this ...

Page 8: ... ERROR state Try switching the power off and then back on again If the thermostat re enters ERROR state ei ther the wiring is wrong a ground neutral short exists or the unit is defective and must be replaced 4 LED lit constantly Internal microprocessor malfunction or abnormal hardware fault Try switching the thermostat off and then back on again If the LED still lights constantly the GFCI is defec...

Page 9: ...nstaller Settings WiFi Settings Child Lock Display Brightness Icon Meaning Screen Saver Energy Tariff Date Time Daylight Saving Time Unit Language Information Icon Meaning Support Adaptive Function Open Window Sensor Application Sensor Type Floor Protection Floor Sensor Calibration Room Sensor Calibration Icon Meaning Contents Contents ...

Page 10: ...tory Reset Accept Back Cancel Arrow Up Arrow Down Arrow Left Arrow Right Icon Meaning Copy to Adjust for a few days in the future is activated Heating is activated Heating is activated with adaptive mode Note Try Again WiFi connection Weather icons screen saver Icon Meaning Contents Contents ...

Page 11: ...d turned on for the first time or after you have performed a factory reset the system will run a Startup Wizard The Wizard will take you through tests which ensure that the thermostat is fully functional After the tests the Wizard leads you through a basic setup routine to ensure that you have the right settings Contents Contents ...

Page 12: ... 1 Set the language First you must set the language The chosen language will become the default language for the thermostat The language can be changed under Menu User Settings Language 1 Tap the language you prefer 2 Tap the Arrow Right button to continue 1 2 Contents Contents ...

Page 13: ...tem Test is an automatic test of the thermostat and sensors If a test results in Fail please contact your installer Note if the thermostat is to operate with an air room sensor only the floor sensor test will result in Fail being shown 1 Tap the Arrow Right button to continue 1 Contents Contents ...

Page 14: ...tton on the top of the thermostat The test is successful if the red light in the test button lights up and a Ground Fault error text is shown on the display 2 Press the power reset button on the lower right side of the thermostat to reset the GFCI 3 Tap the Arrow Right button to continue 3 3 Contents 3 Contents ...

Page 15: ...r license by Schluter Systems L P 7 4 Set the preferred temperature unit 1 Tap the temperature unit that you prefer 2 Tap the Arrow Right button to continue The temperature unit can be changed under Menu User Settings Unit 1 2 Contents Contents ...

Page 16: ...ment 1 Set whether or not the thermostat is to automatically measure the load of the underfloor heating element if set to OFF you will later have to set the floor load manually 2 Tap the Arrow Right button to continue This setting can be changed later if a factory reset is performed 1 2 Contents Contents ...

Page 17: ...load Floor load is used to calculate the energy consumed by the floor heating system 1 Set the load of the underfloor heating system to be controlled by the thermostat 2 Tap the Arrow Right button to continue This setting can be changed later if a factory reset is performed 1 2 Contents Contents ...

Page 18: ...ap the sensor type installed in the floor 2 Tap the Arrow Right button to continue If you want to use the thermostat with the room sensor only you must complete the Setup Wizard using Default as the floor sensor type before going to Menu Installer Settings Sensor Application and choosing Room 7 7 Set the sensor type 1 2 Contents Contents ...

Page 19: ... license by Schluter Systems L P 7 8 Set the date 1 Tap the Arrow buttons to change the values 2 Tap the preferred date format 3 Tap the Arrow Right button to continue The date can be changed under Menu User Settings Date 3 2 1 Contents Contents ...

Page 20: ...e Arrow buttons to change the values 2 Tap the preferred time format 3 Tap if you want to synchronize the thermostat time with that of the server which is set up under WiFi settings 4 Tap the Arrow Right button to continue The time can be changed under Menu User Settings Time 4 2 1 3 Contents Contents ...

Page 21: ... L P 7 10 Set floor protection Set the floor protection according to the floor type 1 Tap the preferred limits that are used to protect the floor 2 Tap to continue Floor protection settings can be changed under Menu Installer Settings Floor Protection 1 2 Contents Contents ...

Page 22: ...PAGE 22 2018 All rights reserved Used under license by Schluter Systems L P 7 11 Thermostat activation 1 Tap the button to activate the thermostat 1 Contents Contents ...

Page 23: ... temperature automatically according to a weekly schedule of your choice The thermostat comes with a preprogramed schedule for easy and economic heating control of most homes see 11 Factory Settings Preset Schedule The schedule can be changed under Menu Heating Schedule 8 Programed Heating Schedule Contents Contents ...

Page 24: ... under license by Schluter Systems L P 9 1 Scheduled Operation 9 2 Manual Operation 9 2 1 Manual Operation Adjust 9 2 1 1 Adjust for a few hours 9 2 1 2 Adjust for a few days 9 2 1 3 Adjust permanently 9 Operating Choices Contents Contents ...

Page 25: ...shown on the home screen varies according to the chosen operating mode Scheduled Operation home screen 1 Day and time 2 Measured temperature 3 Heating indicator If visible the underfloor heating system is currently active 4 Tap here to access the menu 5 Current target temperature setpoint 6 Tap here to increase the temperature 7 Tap here to decrease the temperature 8 Current thermostat operating m...

Page 26: ...Measured temperature 3 Heating indicator If visible the underfloor heating system is currently active 4 Tap here to access the menu 5 Current target temperature setpoint 6 Tap here to increase the temperature 7 Tap here to decrease the temperature 8 Current thermostat operating mode 9 Information on the next thermostat behavior change 10 Tap here to adjust the length of time the displayed target t...

Page 27: ... to the next event change or for a specific time period You can use the Adjust options to specify the length of time the displayed target temperature setpoint should last When the set time period has elapsed the thermostat will automatically revert to Scheduled Operation Adjust for a few hours Adjust for a few days Adjust permanently 9 2 1 Manual Operation Adjust Contents Contents ...

Page 28: ...nd up to 24 hours You can set the Hour Minutes in 15 minute intervals 00 15 30 or 45 AM or PM if 24 hour time format is selected this is not applicable 1 On the home screen adjust the temperature to the preferred level using the Arrow Up and Arrow Down buttons 2 Tap the Adjust button 3 Then tap the for a few hours button 4 Tap the Arrow buttons for the parameter that you want to change 5 Confirm y...

Page 29: ...on 3 Then tap the for a few days button 4 Tap the Arrow buttons for any parameter that you want to change for the start date 5 Confirm your choice with Arrow Right or discard it with X 6 If confirmed the end date must be set by tapping the Arrow buttons for any parameter that you want to change 7 Confirm your choice with or discard it with Arrow Left The thermostat will automatically return to the...

Page 30: ... setpoint indefinitely until you manually change the settings 1 On the home screen adjust the temperature to the preferred level using the Arrow Up and Arrow Down buttons 2 Tap the Adjust button 3 Then tap the permanently button The thermostat will automatically return to the home screen 9 2 1 3 Adjust permanently 3 1 2 2 1 3 Contents 1 2 2 1 3 Contents ...

Page 31: ...PAGE 31 2018 All rights reserved Used under license by Schluter Systems L P 10 Thermostat Setup Menu Heating Schedule Energy Use User Settings Installer Settings WiFi Settings Contents Contents ...

Page 32: ...ton to access the various schedule options Jump to step 5 4 Tap the Reset to Factory Settings button if you want to restore the factory settings This screen consists of a list of six events and four buttons Each event is num bered and the start time target temperature setpoint and activity status are dis played Back Copy to Arrow Left and Arrow Right buttons are located in the corners of the scree...

Page 33: ... discard it with X The thermostat will automatically return to Heating Schedule 10 Once the event settings for this day are as wanted you can if you wish use the same settings for other days by tapping the Copy to button in the top right corner of the screen This will allow you to copy the event settings to other days specified by you 11 If you want to set other days differently tap the Arrow Left...

Page 34: ...g each day of the past seven days will be displayed The graph shows hours per day Last 12 months A graph of usage during each month of the past year will be displayed The graph shows hours per month Energy Use Data An overview of the electricity consumption kWh and heating costs for the time periods specified above Note price per kWh must be set under Menu User Settings Energy Tariff 3 You can tog...

Page 35: ...s Under User Settings you can change the settings of the following items Note if an item is grayed out it is not available due to other settings Child Lock Display Brightness Screen Saver Energy Tariff Date Time Daylight Saving Time Unit Language Information Support User Reset Contents Contents ...

Page 36: ...at has not been operated for a few minutes it takes 15 seconds to dim the display and a further two minutes before the screen saver starts Before you can operate the thermostat again you must unlock the child lock in the following way From the idle home screen a Tap the screen to activate it Three circles containing dots will be displayed on the screen b Draw an L on the screen in a single stroke ...

Page 37: ...under license by Schluter Systems L P 10 3 1 Child Lock 2 2 Please note that the child lock will be reactivated when the thermostat returns to screen saver mode unless it is deactivated under Menu User Settings Child Lock Contents Contents ...

Page 38: ...u button on the home screen 2 Then tap the User Settings button to access the various user settings 3 Tap the Display Brightness button 4 Select one of the five levels of brightness using the Arrow Up or Arrow Down button 5 Confirm your choice with or discard it with X The thermostat will automatically return to User Settings 1 1 2 3 4 5 2 3 5 4 5 Contents 1 1 2 3 4 5 Contents ...

Page 39: ...u button on the home screen 2 Then tap the User Settings button to access the various user settings 3 Tap the Screen Saver button 4 Tap the information that you want to be shown in screen saver mode Temperature shown in large format Time and date shown in small format See example Time shown in large format Temperature and date shown in small format See example Screen Off 5 Confirm your choice with...

Page 40: ...ty consumption and the cost of heating for a given period of time 1 Tap the Menu button on the home screen 2 Then tap the User Settings button to access the various user settings 3 Tap the Energy Tariff button 4 Tap the Arrow Up or Arrow Down button to set the price that you pay per kWh 5 Confirm your choice with or discard it with X The thermostat will automatically return to User Settings 1 1 2 ...

Page 41: ... on the home screen 2 Then tap the User Settings button to access the various user settings 3 Tap the Date button 4 Tap the Arrow Up or Arrow Down button to set the date month and year 5 Tap the date format that you prefer Use DD MM YYYY Use MM DD YYYY 6 Confirm your settings with or discard them with X The thermostat will automatically return to User Settings 10 3 5 Date 1 1 2 3 6 4 6 5 2 3 4 6 5...

Page 42: ...nu button on the home screen 2 Then tap the User Settings button to access the various user settings 3 Tap the Time button 4 Tap the Arrow Up or Arrow Down button to set the hours minutes and AM PM 5 Tap the time format that you prefer Use 24 hours Use 12 hours AM PM 6 Confirm your settings with or discard them with X The thermostat will automatically return to User Settings 1 1 2 3 4 6 5 2 3 6 6 ...

Page 43: ... Menu button on the home screen 2 Then tap the User Settings button to access the various user settings 3 Tap the Arrow Right button to access the second page of User Settings 4 Tap the Daylight Saving Time button 5 Tap the OFF ON button to the setting that you prefer 6 Confirm the setting with or discard it with X The thermostat will automatically return to User Settings 1 1 2 3 4 6 5 2 3 4 6 6 5...

Page 44: ...home screen 2 Tap the Arrow Right button to access the second page of User Settings 3 Tap the Unit button 4 Tap the unit that you prefer Celsius Fahrenheit 5 Confirm your choice with or discard it with X The thermostat will automatically return to User Settings 1 2 3 4 6 5 1 2 3 4 6 6 5 Contents 1 2 3 4 6 5 1 Contents ...

Page 45: ...een 2 Then tap the User Settings button to access the various user settings 3 Tap the Arrow Right button to access the second page of User Settings 4 Tap the Language button 5 Tap the language that you prefer English French Spanish 6 Confirm your choice with or discard it with X The thermostat will automatically return to User Settings 1 2 3 4 6 5 1 2 3 4 6 6 5 Contents 1 2 3 4 6 5 1 Contents ...

Page 46: ... QR Code with a suitable device with Internet access Software supporting QR Code scanning e g an app is required Scanning the QR Code provides data which is valid at the precise time of scanning 6 If View as text is selected the data relevant for support personnel and others is displayed 7 Tap the Back button several times if necessary to return to User Settings 8 Tap the Arrow Right and Arrow Lef...

Page 47: ...his manual before calling for support If troubleshooting does not help you should contact your installer 1 Tap the Menu button on the home screen 2 Then tap the User Settings button to access the various user settings 3 Tap the Arrow Right button to access the second page of User Settings 4 Tap the Support button 5 Tap the Back button to return to User Settings 1 2 3 4 5 1 2 3 4 5 Contents 1 2 3 4...

Page 48: ...er 1 Tap the Menu button on the home screen 2 Then tap the User Settings button to access the various user settings 3 Tap the Arrow Right button to access the second page of User Settings 4 Tap the User Reset button 5 Tap the Back button to return to User Settings 6 Tap Reset Thermostat to reset all user settings to factory default A confirmation screen is displayed briefly before the thermostat r...

Page 49: ...der Installer Settings you can change the settings of the following items Note if an item is grayed out it is not available due to other settings Adaptive Function Open Window Sensor Application Sensor Type Floor Sensor Calibration Room Sensor Calibration Floor Protection Factory Reset Contents Contents ...

Page 50: ... much earlier the heating must be turned on to achieve this Select OFF if you simply want the heating to start at the beginning of an event 1 Tap the Menu button on the home screen 2 Then tap the Installer Settings button to access the various installer settings 3 Tap the Adaptive Function button 4 Tap the OFF ON button to the setting that you prefer 5 Confirm your choice with or discard it with X...

Page 51: ... window is detected 1 Tap the Menu button on the home screen 2 Then tap the Installer Settings button to access the various installer settings 3 Tap the Open Window button 4 Tap the OFF ON button to the setting that you prefer 5 Confirm your choice with or discard it with X The thermostat will automatically return to Installer Settings 6 If an open window is detected by the thermostat the Open Win...

Page 52: ...he room sensor built into the thermostat controls the heating system while the floor sensor limits heating according to the temperature limits set under Menu Installer Settings Floor Protection Room With this setting the room sensor built into the thermostat controls the heating system Note Floor Protection is not active while using the Sensor Application Room Note that certain menu options will b...

Page 53: ...ome screen 2 Then tap the Installer Settings button to access the various installer settings 3 Tap the Sensor Application button 4 Tap the application that you want to use Floor Room Floor Protection Room 5 Confirm your choice with or discard it with X The thermostat will automatically return to Installer Settings Note that when changing Sensor Application certain menu options may be grayed out an...

Page 54: ... Sensor 12 kΩ Custom 1 Tap the Menu button on the home screen 2 Then tap the Installer Settings button to access the various installer settings 3 Tap the Sensor Type button 4 Tap the type of floor sensor actually used Default 10 kΩ this is the sensor supplied with the thermostat Sensor 12 kΩ Custom 5 Confirm your choice with or discard it with X 6 If Custom is chosen you must provide resistance va...

Page 55: ...e temperatures for which resistance must be set Then repeat steps 6 7 until all four resistance values have been set 8 When all four values are set tap the Arrow Right button 9 A warning screen will be displayed Tap to confirm the use of an alternative sensor The thermostat will automatically return to Installer Settings 7 7 7 8 9 8 9 Contents 7 7 7 8 9 Contents ...

Page 56: ...or 10 C in steps of 1 F or 0 5 C in the following way 1 Tap the Menu button on the home screen 2 Then tap the Installer Settings button to access the various installer settings 3 Tap the Floor Sensor Calibration button 4 Use the Arrow Up or Arrow Down button to set the floor temperature actually measured 5 Confirm that you want to calibrate the sensor with or cancel with X If the temperature is co...

Page 57: ...r 10 C in steps of 1 F or 0 5 C in the following way 1 Tap the Menu button on the home screen 2 Then tap the Installer Settings button to access the various installer settings 3 Tap the Room Sensor Calibration button 4 Use the Arrow Up or Arrow Down button to set the room temperature actually measured 5 Confirm that you want to calibrate the sensor with or cancel with X If the temperature is confi...

Page 58: ...mum temperatures that the floor is permitted to reach The maximum temperature limit protects wooden floors from excessive heat The minimum temperature limit prevents the floor from becoming uncomfortably cold when heating is not needed e g in a bathroom with tiles The minimum temperature limit can also be used as frost protection Note that the minimum temperature function will increase energy cons...

Page 59: ...s relevant for your floor If Tile or Laminate is selected proceed to step 8 6 If Custom is chosen you must define minimum and maximum temperatures for the floor 7 Use the Arrow Up or Arrow Down buttons to set the minimum and maximum temperatures 8 Confirm your choice with or discard it with X The thermostat will automatically return to Installer Settings NOTE If the maximum floor temperature is se...

Page 60: ...button to access the various installer settings 3 Tap the Arrow Right button to access the second page of Installer Settings 4 Tap the Factory Reset button 5 Tap Back if you want to maintain your settings and return to Installer Settings 6 Tap Reset Thermostat if you want to restore the factory settings A confirmation screen will be displayed The thermostat will then be reset and the Startup Wizar...

Page 61: ...n 2 Then tap the WiFi Weather button to access the various WiFi settings 3 Choose your WiFi network from the list of available networks detected by the WiFi Touch Thermostat Jump to step 7 4 If the name of your network does not appear tap Other 5 If you choose Other you must enter your SSID 6 Confirm your SSID by tapping the button 7 If you choose X the wizard will return to step 3 8 Enter the net...

Page 62: ...to proceed 13 Enter a name for your thermostat e g Living room 14 Tap the button 15 If you choose X the wizard will return to step 3 You must now set up an account and have to provide an email address 16 Tap the button to accept this and continue 17 Enter the email address to which an activation email can be sent The email address may contain upper and lower case letters special characters and num...

Page 63: ...he thermostat connects to the server a verification screen will appear An activation email will be sent to the previously entered email address This email contains a link to a web page where you can create a user account You must have a user account if you want to access the thermostat remotely either from the WWW or through an app The web page contains a Privacy Policy Terms of Use and EULAs for ...

Page 64: ... a while and you should wait while it does so 27 Alternatively you can tap X and the wizard will return to step 22 If the location cannot be found the thermostat will tell you so You will then be given the opportunity to retype the ZIP Postal Code 28 Tap the button to return to step 22 After a few seconds your ZIP Postal Code and city name should appear on the screen 29 Tap the button The thermost...

Page 65: ...ems L P 10 5 1 Viewing the weather forecast After a few minutes a weather icon will appear in the top left corner of the home screen 1 Tap the weather icon to access the weather forecast 2 Tap the Back button to return to the home screen 1 1 2 2 Contents 1 1 2 Contents ...

Page 66: ... PM 82 F 28 C 88 F 31 C x 4 01 00 PM 74 F 23 5 C 74 F 23 5 C x 5 05 00 PM 82 F 28 C 88 F 31 C 6 11 00 PM 74 F 23 5 C 74 F 23 5 C Saturday Sunday Event Start time Laminate floor Tile floor Activated 1 08 00 AM 82 F 28 C 88 F 31 C 2 11 00 PM 74 F 23 5 C 74 F 23 5 C x 3 12 00 PM 82 F 28 C 88 F 31 C x 4 01 00 PM 74 F 23 5 C 74 F 23 5 C x 5 05 00 PM 82 F 28 C 88 F 31 C x 6 11 00 PM 74 F 23 5 C 74 F 23 ...

Page 67: ...your installer The thermostat must be replaced E2 External wired floor sensor disconnected defective or short circuited Contact your installer for reconnection or replacement E5 Internal overheating Contact your installer in order to have the installation inspected Note If any of the above mentioned errors occur the heating is shut off Three circles containing dots are shown on the screen the ther...

Page 68: ...r Systems L P 12 Troubleshooting 2 5 The floor is warming up but more slowly than expected Floor protection might be set to Laminate which prevents rapid heating of the floor The heating element might have insufficient capacity to heat the floor Contents Contents ...

Page 69: ...iFi Touch Thermostat is connected to a secure network so that hackers cannot gain control of devices in your home WiFi routers utilize two main types of protective encryption WEP and WPA WEP is the original form of encryption and it offers very little security Hackers can very easily break into your wireless network if your router is set up for WEP encryption WEP encryption was replaced with WPA e...

Page 70: ...n increase the number of simultaneous connections to your WiFi network Maybe your WiFi router requires a restart reboot The problem might be with your router even if your other wireless devices are still connected A simple restart of the router will usually resolve such problems While most routers simply have to be unplugged and then plugged back into their power source to restart them you should ...

Page 71: ... WiFi Touch Thermostat needs a user reset Restart your WiFi Touch Thermostat To restart the WiFi Touch Thermostat go to Menu User Settings User Reset and select Reset Thermostat Once your WiFi Touch Thermostat has restarted go to Menu WiFi Weather Settings and try to connect your thermostat again 12 Troubleshooting 5 5 Contents Contents ...

Page 72: ... Used under license by Schluter Systems L P 13 Contact Data Schluter Systems L P 194 Pleasant Ridge Road Plattsburgh NY 12901 Schluter Systems Canada Inc 21100 chemin Ste Marie Ste Anne de Bellevue QC H9X 3Y8 Contents Contents ...

Reviews: