Schlage NXRS100HC Installation Instructions Download Page 2

3

Verify the Door/Window Sensor is added to the Nexia Bridge


!

Remove the 9-volt battery from the Nexia Bridge, if installed.

a. 

Connect the Bridge to AC power and to your router (ethernet).

b. 

Login to your online Nexia account.

c. 

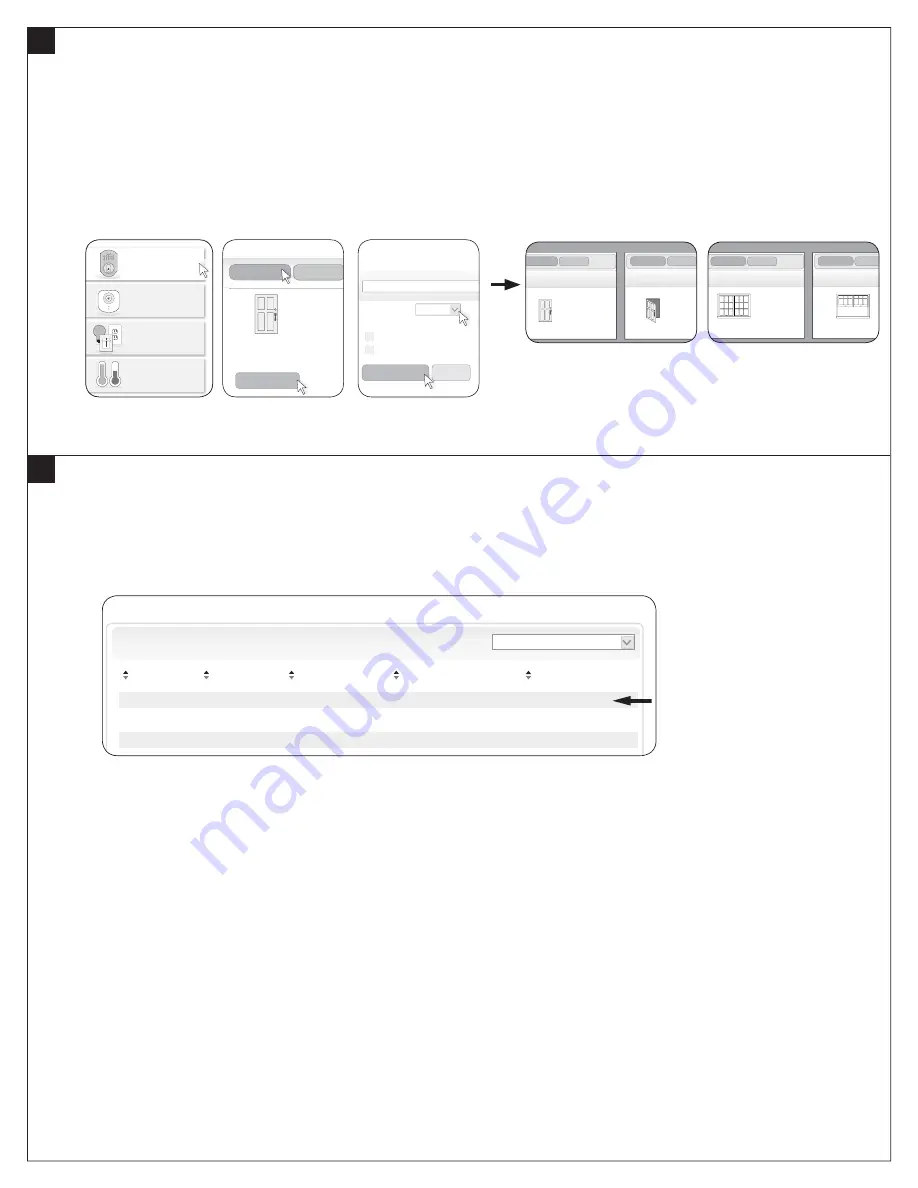
Click on “Security & Sensors”, then “Sensors”, then “Setup Device”. 

To change the icon from door to window (or from window to 

door), click “Setup Device” and choose the appropriate “Sensor Type”. (See Figures 1 – 3 below.)

d. 

Move the magnet close to and away from the Sensor to view the portal response. Check that the Nexia portal door or window icon 
responds appropriately. (Refer to examples below.)

Note: Browser feedback is not immediate. The online display may take 5 seconds to 1 minute to change. Be sure to allow time for the 
browser to refresh.

LIGHTING &
MODULES

CAMERAS

CLIMATE

SECURITY & 
SENSORS

CLOSED

Setup Device

New Sensor 3

Sensors

Locks

Security & Sensors

New Sensor

Sensor Type    Door

Alerts


Alert when opened


Alert when closed

Save Changes

Cancel

s

s

C

CLOSED

OPEN

Sensors

Locks

my sensor

Sensors

Locks

my sensor

CLOSED

OPEN

Sensors

Locks

my sensor

Sensors

Locks

my sensor

Figure 1

Figure 2

Figure 3

Door Sensor

Window Sensor


4

Test the Tamper Switch (Optional)

a. 

Press the tab on the top of the Sensor and pull forward to remove the front cover.

b. 

The Sensor will transmit the tamper condition to the Nexia Bridge.

c. 

Check that the tamper condition is indicated on the Nexia portal Event History tab. (Refer to the example below.)

d. 

Replace the Sensor cover.

Event History

Filter by:   Show All

Date Time User 

Device 

Event

02/15/2012 

12:00 PM 


New Sensor 4 

ALARM 01 11

02/15/2012 

11:30 AM 


New Sensor 4 

Closed

02/15/2012 

11:30 AM 


New Sensor 4 

Opened


Summary of Contents for NXRS100HC

Page 1: ...de The Sensor s LED will blink If the plastic tab is already removed then remove the battery for 10 seconds and replace the battery to restart enrollment mode Battery removal process shown below c The orange LED on the Bridge will blink rapidly when enrollment begins The Bridge and Sensor LEDs will light solid to indicate successful enrollment If the Bridge LED never blinks rapidly and enrollment ...

Page 2: ...or the browser to refresh LIGHTING MODULES CAMERAS CLIMATE SECURITY SENSORS CLOSED Setup Device New Sensor 3 Sensors Locks Security Sensors New Sensor Sensor Type Door Alerts Alert when opened Alert when closed Save Changes Cancel s s C CLOSED OPEN Sensors Locks my sensor Sensors Locks my sensor CLOSED OPEN Sensors Locks my sensor Sensors Locks my sensor Figure 1 Figure 2 Figure 3 Door Sensor Wind...

Page 3: ... wallboard Left hand door OR Right hand door OR The top of the magnet must be within 6 mm of the arrow on the Sensor as shown above Install the magnet no more than 19 mm away from the Sensor for optimal performance Install the Magnet with screws a Remove the base from the magnet b Use two small screws to attach the base of the magnet to the door or window c Press the magnet onto the base OR Instal...

Page 4: ... Press and release the button on the Bridge d Remove the battery from the Sensor e Leave the battery out for at least ten 10 seconds f Reinstall the battery into the Sensor g Observe lights on the Bridge The orange LED will blink rapidly while exclusion is taking place Exclusion is complete when the orange LED lights solid h Remove the battery from the Sensor after exclusion is complete For more i...

Reviews: