background image

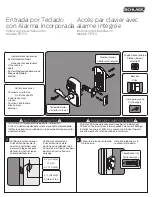
Entrada por Teclado 

con Alarma Incorporada

Instrucciones de Instalación

Modelo FE576

Accès par clavier avec 

alarme intégrée

Instructions d'installation

Modèle FE576

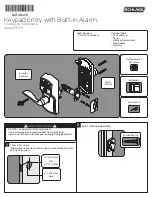
Chapa frontal alterna

Plateau à trous 

alternatif

Baterías

Piles

Llave para clavija

Clef à ergots

 REMARQUES IMPORTANTES 

•   N'utilisez PAS une perceuse électrique pour l'installation!

•   Utilisez un tournevis pour retirer le produit de son emballage.

•   Installez la serrure et faites un essai en maintenant la porte 

ouverte pour éviter d'être embarré à l'extérieur.

Coloque la placa en la jamba 

de la puerta.

Installez la gâche sur le 

montant de la porte.

Tamaño real (2)

Taille réelle (2)

 NOTAS IMPORTANTES 

•   ¡NO utilice un taladro eléctrico para la instalación!

•   Utilice un destornillador para retirar el producto del embalaje.

•   Instale la cerradura y pruébela con la puerta abierta para evitar 

quedarse afuera.

Verifique las dimensiones.

Si las dimensiones de la 

puerta no coinciden, vaya 

a www.schlage.com para 

obtener las instrucciones 

sobre la perforación.

Vérifiez les dimensions.

Si les dimensions de la 

porte ne correspondent pas, 

consultez le schlage.com pour 

obtenir les instructions de 

perçage.

2

C\,

” (60 mm)

O | OU

2

C\v

” (70 mm)

2

Z\,

” (53 mm)

Ajujero | Trou

Herramientas necesarias

•  Destornillador Phillips

Herramientas opcionales

•  Cinta métrica

•  Lápiz

•  Destornillador de cabeza plana

•   Bloque de Madera

•  Martillo

Outils nécessaires

•  Tournevis cruciforme

Outils facultatifs

•  Ruban à mesurer

•  Crayon

•  Tournevis à tête plate

•  Bloc en bois

•  Marteau

Alarma interior

Intérieur de l'alarme

Teclado Exterior

L'extérieur Clavier

Summary of Contents for FE576

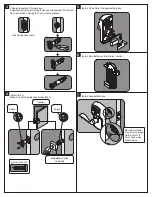
Page 1: ... Screwdriver Wood Block Hammer Important Notes DO NOT use a power drill for installation Use a screwdriver to remove product from packaging Install and test lock with door open to avoid being locked out 1 Check Dimensions If door dimensions do not match go to www schlage com for drilling instructions 2C 60 mm OR 2C v 70 mm 2Z 53 mm Hole 2 Install strike onto door jamb Actual Size 2 Alarm Interior ...

Page 2: ...smoothly through hole in latch If not check door dimensions 3 Change faceplate if necessary Choose the drawing that matches your door edge If the hole has no mortise change to the circular faceplate No change necessary 4 Install Latch Make sure latch angle faces door jamb Angle Angle Wood Block not included Interior Actual Size 2 ...

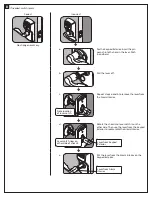
Page 3: ...peat steps a and b to remove the lever from the Alarm Interior d Rotate the chassis so lever catch is on the other side Then use the lever from the Keypad Exterior to reassemble the Alarm Interior e Put the lever from the Alarm Interior on the Keypad Exterior Note location of lever catch Lever catch now on other side of chassis Lever from Keypad Exterior Lever from Alarm Interior ...

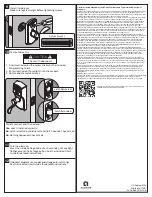
Page 4: ...plications ii used in common area applications iii used for purposes for which they are not designed or intended iv which have been subjected to alteration abuse misuse negligence or accident v which have been improperly stored installed maintained or operated vi which have been used in violation of written instructions provided by Schlage vii which have been subjected to improper temperature humi...

Page 5: ... taladro eléctrico para la instalación Utilice un destornillador para retirar el producto del embalaje Instale la cerradura y pruébela con la puerta abierta para evitar quedarse afuera 1 Verifique las dimensiones Si las dimensiones de la puerta no coinciden vaya a www schlage com para obtener las instrucciones sobre la perforación Vérifiez les dimensions Si les dimensions de la porte ne correspond...

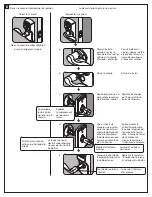
Page 6: ...s dimensions de la porte 3 Si es necesario cambie la placa frontal Elija el dibujo que coincida con el borde de su puerta Si el orificio no tiene mortaja cambie por la placa frontal circular Changez la têtière au besoin Sélectionnez le dessin qui correspond à votre bord de porte Pour un orifice sans mortaise optez pour une têtière circulaire No es necesario realizar cambios Aucun changement requis...

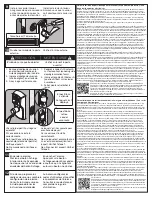
Page 7: ... que el retén de la manija esté en el otro lado Después utilice la manija del teclado exterior para volver a ensamblar la alarma interior Faites pivoter le châssis de manière à ce que le loquet du levier soit de l autre côté À l aide du levier de l extérieur du clavier rassemblez l intérieur de l alarme e Coloque la manija de la alarma interior en el teclado exterior Déplacez le levier de l intéri...

Page 8: ...ales estándar y readaptase a las cerraduras tubulares existentes Nota Las cerraduras y los elementos empotrados no se consideran estándar y no están garantizados por este programa Durante la instalación inicial si hay algún problema con el desempeño del Producto el Usuario original simplemente puede comunicarse con el Departamento de servicio a clientes de Schlage al 888 805 9837 en Estados Unidos...

Reviews: