background image

19

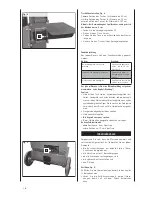
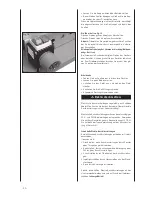
Prilagoditev višine mize, Slika 8

Zgornja pozicija mize za obdelovance do 59 cm,
Centralna pozicija mize za obdelovance do 79 cm,
Spodnja pozicija mize za obdelovance do 107 cm.

Opomba:  Če  uporabljate  cepilni  križ  je  manevrski 
prostor zmanjšan za 2 cm.

• 

Sprostite zapiralne kavlje 10.

• 

Potegnite mizo ven.

• 

Prilagodite mizo na pozicijo približno, kot je dolžina 
obdelovanca. 

• 

Privijte mizo z zapiralnimi kavlji. 

Test funkcij

Preverite vse funkcije pred vsakim pričetkom.
Delo: 

Rezultat:

Porinite obe ročici skupaj 

spodaj eno k drugi. 

Cepilni nož se spusti za 

približno 10 cm pod mizo.

Sprostite eno ročico in nato še 

drugo.

Cepilni nož se ustavi na 

želenem mestu.

Spustite obe ročici

Cepilni nož se vrne na 

zgornjo pozicijo. 

Preverite nivo olja pred pričetkom dela – poglejte poglav

-

je “Vzdrževanje“.

Cepljenje

• 

Postavite obdelovanec na mizo, držite ga z obema ro

-

čajema in pritiskajte navzdol. Takoj, ko se cepilni nož 
zarije v les, ročici potisnite navzdol in navzven hkrati. 
To prepreči, da bi les obremenil ploščo. 

• 

Cepite le ravne obdelovance. 

• 

Cepite obdelovance v vertikalni smeri. 

• 

Nikoli ne cepite horizontalno ali postrani.

• 

Med cepljenjem nosite zaščitne rokavice. 

Racionalne delovne metode

• 

Zgornja pozicija max.. 5 cm nad obdelovancem.

• 

Spodnja pozicija približno 10 cm nad mizo.

Zagon

Prepričajte se, da je stroj popolnoma in pravilno sesta

-

vljen. Pred vsakim zagonom preverite:  

• 

napetostne kable za primer napak (pokov, ureznin itd),

• 

stroj za morebitne poškodbe,

• 

pravilno lego vseh vijakov,

• 

hidravlični sistem pred spuščanjem,

• 

nivo olja.

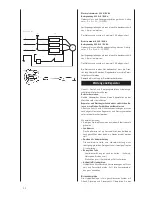
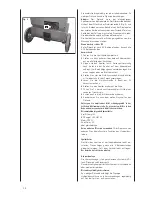
Zračenje, Slika 9

preden  pričnete  z  delom  na  cepilniku,  prezračite  hidra

-

vlični sistem. 

• 

Sprostite  ventilacijski  čep A  z  nekaj  obrati,  da  zrak 
lahko uide iz oljnega rezervoarja. 

• 

Med delovanjem pustite čep odprt.

• 

Preden cepilnim premikate, čep zaprite, da ne boste 
izgubili olja. 

Setting the table height, Fig. 8

Upper table position for logs up to 59 cm,
centre table position for logs up to 79 cm,
lower table position for logs up to 107 cm.

Note: When using the splitting cross, the clearance is re-
duced by 2 cm.

•  Release the locking hooks 10.
•  Pull the table out.
•  Fit the table in a position near the log length.
•  Secure the table with the locking hooks.

Functional test

Test the function before every use.

Action: Result:

Push both handles towards below.

Splitting knife goes 
down to approx. 10 cm 
above the table.

Let one handle loose, then the 
other.

Splitting knife stops in 
the desired position.

Let both handles loose.

Splitting knife returns to 
upper position.

Check the oil level before every use – see chapter “Mainte-
nance“.
Splitting

•  Place the log on the table, hold it with both handles, 

press the handles down. As soon as the splitting knife 
enters the wood, push the handles down and to the 
outside at the same time. This prevents the wood from 
putting pressure on the holder plates. 

•  Only split straight cut logs.
•  Split the logs in vertical position.
•  Never split in horizontal position or across.
•  Wear protective gloves when splitting.

Rational working method

-  Upper position approx. 5 cm above log.
-  Lower position approx. 10 cm above table.

Putting into operation

Make sure the machine is completely and expertly assem-
bled. Check before every use:
•  The connection cables for any defective spots (cracks, 

cuts etc.).

•  The machine for any possible damage.
•  The firm seat of all bolts.
•  The hydraulic system for leakage.
•  The oil level.

Venting, Fig. 9

Before working with the log splitter, vent the hydraulic 
system.
•  Release the venting cap A by a few revolutions so the 

air can escape from the oil tank.

•  Leave the cap open during the operation.

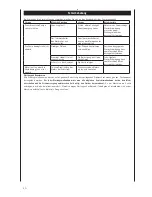
Summary of Contents for HL1000v

Page 1: ...Art Nr 3905312949 3905312002 01 2014 HL1000v D Holzspalter Original Anleitung GB Log splitter Translation from the original instruction manual SL Hidravli ni cepilnik Prevod iz originalnega priro nika...

Page 2: ......

Page 3: ...D Holzspalter 4 35 GB Log splitter SLO Hidravli ni cepilnik...

Page 4: ...er Maschine erh hen Zus tzlich zu den Sicherheitsbestimmungen dieser Be die nungsanweisung m ssen Sie unbedingt die f r den Be trieb der Maschine geltenden Vorschriften Ihres Landes beachten Bewahren...

Page 5: ...upplier immediately of any faults Later complaints cannot be considered Make sure the delivery is complete Before putting into operation familiarize yourself with the machine by carefully reading thes...

Page 6: ...Motor 18 Schutzb gel HL1000v Lieferumfang Hydraulischer Holzspalter Kleinteile Beipackbeutel Betriebsanleitung Technische Daten Ma e T B H 830 620 1520 Tischh he mm 285 580 780 Arbeitsh he mm 900 Holz...

Page 7: ...podlo ko in jih zavarujte z opornico and parts see Fig 1 to 3 Controls and parts Fig 1 2 1 Handle 2 Riving knife 3 Splitting column 4 Set screw for clamping lug 5 Adjustable clamping lug 6 Operating a...

Page 8: ...n abzulassen oder mit Abfall zu vermischen Es ist verboten Schutz und Sicherheitsvor richtungen zu entfernen oder zu ver ndern Nur der Bediener darf im Arbeitsbereich der Maschine stehen Unbeteiligte...

Page 9: ...reden pri nete z delom Pred transportom ga privijte nazaj Pozor Premikajo i se deli stroja Ne transportirajte naprave v horizontalnem polo aju Warning symbols Instructions Please read the manual befor...

Page 10: ...chlu leitungen verwenden Vor Inbetriebnahme die korrekte Funktion der Zweihand bedienung pr fen Die Bedienungsperson mu mindestens 18 Jahre alt sein Auszubildende m ssen mindestens 16 Jahre alt sein d...

Page 11: ...rsnete ali padete Delovno podro je imejte vedno urejeno Before operating the two hand control carefully read the operating instructions Additional instructions without symbols Do not remove the casing...

Page 12: ...sicherheitstech nischen Regeln m ssen beachtet werden Die Maschine darf nur von Personen genutzt gewartet oder repariert werden die damit vertraut und ber die Gefahren unterrichtet sind Eigenm chtige...

Page 13: ...poobla eni in celotnemu priro niku Already split wood and wood chips can be dangerous You can stumble slip or fall down Keep the working area tidy While the machine is switched on never put your hand...

Page 14: ...Aufstellen Bereiten Sie den Arbeitsplatz an dem die Maschine stehen soll vor Schaffen Sie ausreichend Platz um si cheres st rungsfreies Arbeiten zu erm glichen Die Maschine ist zum Arbeiten auf ebene...

Page 15: ...lni ro ici z uporabo 2 kri nih izvija ev G velja za obe objemki Transport Transport by hand Fig 3 For transport the splitting knife A must be completely moved down Slightly tilt the log splitter with...

Page 16: ...ht werden In jeder Einbauposition sind Verriege lungs haken A angebracht Setzem Sie die Tischplatte in die gew nschten Halte rungen B ein Schwenken Sie die Verriegelungshaken A auf bei den Seiten um 9...

Page 17: ...ler se ne ustavi zaradi vzmeti Ponovno pri vrstite zapiralno matico Vklopite motor Preverite zgornjo pozicijo Mounting the wheels Fig 5 Insert the wheel axle with pedal A through the two holes on the...

Page 18: ...apitel Wartung Spalten Holz auf den Tisch stellen mit beiden Handgriffen fest halten Handgriffe nach unten dr cken sobald das Spalt messer in das Holz eindringt die Handgriffe nach au en schieben bei...

Page 19: ...oljnega rezervoarja Med delovanjem pustite ep odprt Preden cepilnim premikate ep zaprite da ne boste izgubili olja Setting the table height Fig 8 Upper table position for logs up to 59 cm centre tabl...

Page 20: ...ziehen den Netz stecker Schlie en Sie die Entl ftungsschraube Allgemeine Wartungshinweise beachten m Elektrischer Anschluss Elektrische Anschlussleitungen regelm ig auf Sch den berpr fen Achten Sie da...

Page 21: ...ker je njihova izolacija po kodovana Before you move the log splitter close the cap again in order not to lose any oil If the hydraulic system is not vented the enclosed air will damage the gaskets an...

Page 22: ...ren an der Maschine selbst durchf hren Reparatur und Wartungsarbeiten an der elektrischen An lage nur von Elektro Fachkr ften ausf hren lassen S mtliche Schutz und Sicherheitseinrichtungen m ssen nach...

Page 23: ...ni del je zaprt sistem z oljnim tankom oljno r palko in kontrolnim ventilom Redno preverjajte nivo olja Single phase motor 230 V 50 Hz Mains voltage 230 V 50 Hz Extension cables must be 3 lead P N SL...

Page 24: ...ngsverm gen 5 L sen Sie die Einf llschraube A damit das l herauslaufen kann 6 Stellen Sie den Spalter wieder auf die F e 7 F llen Sie 7 Liter neues Hydraulik l mit Hilfe eines sauberen Trichters ein 8...

Page 25: ...ljno rpalko Redno preverjajte hidravli ne stike in spoje zaradi tesnje nja Po potrebi ponovno zatesnite fore every use Too low an oil level can damage the oil pump The correct oil level is approx 10 t...

Page 26: ...ine vertraut machen Die angegebene Leistungsf higkeit der Maschine darf nicht berschritten werden Die Maschine darf auf keinen Fall ihrem Zweck entfremdet werden Entsprechend den Gesetzen des Landes i...

Page 27: ...hko uporablja le gasilni aparat na prah Vode ne smete uporabljati ker lahko povzro i kra Before undertaking any maintenance or checking work the working area must be cleaned Keep the necessary tools w...

Page 28: ...normalem Wege zu entsorgenden Materialien ge baut wurde Zur Entsorgung sollte man sich an Spezialfirmen oder an qualifiziertes Fachpersonal wenden das die m glichen Risiken kennt die vorliegenden Gebr...

Page 29: ...zavrgli na pravilen na in kot to dolo ajo zakoni v va i dr avi ter is not allowed to extinct the fire because of the risk of short circuit If the fire cannot be extinct immediately pay attention to l...

Page 30: ...er der Hebel ist nicht angeschlossen Die Befestigung der Hebel kontrollieren Schnittgefahr Dieser Arbeitsgang kann vom Maschinenf hrer durchgef hrt werden Schmutz in den Schienen Die S ule reinigen Mo...

Page 31: ...el Neavtorizirano osebje se ne sme pribli ati stroju ali ga izklopiti Trouble shooting In case of any malfunctions not mentioned here contact your dealer s after sales service Malfunction Possible cau...

Page 32: ...artai straipsn LV apliecina du saska ar ES direkt vu atbilst bas un standarti du rakstu NL verklaart hierbij dat het volgende artikel voldoet aan de daarop betrekking hebbende EG richtli jnen en norme...

Page 33: ......

Page 34: ......

Page 35: ...30 4 30 1 30 9 32 30 10 30 6 30 7 30 13 30 8 31 30 3 30 2 30 11 30 5 30 14 30 15 30 12...

Page 36: ...jd av material eller tillverkningsfel F r delar som vi inte sj lva tillverkar l mnar vi endast garanti i s m tto som vi sj lva f r garanti av v ra underleverant rer Kostnaderna f r monteringen av de n...

Reviews: