31
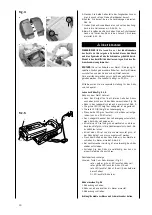
5. Encliquetez les deux côtés du panier de ramassage en-
semble et placez le couvercle dessus.
6. Veillez à ce que toutes les liaisons soient encliquetées.
Fig 4a
7. Relevez le capot pare-éclats et mettez le panier de ra-
massage en place sur les deux tétons. Fig.4b, 4c
8. Pour mettre la batterie en place, relevez le capot pro-
tecteur ver le haut et insérez la batterie dans son loge-
ment jusqu’à ce qu’elle se bloque. Fig. 4d
Mise en service
ATTENTION! Pour votre sécurité, veillez à lire l’ensemble
de cette notice ainsi que tous les conseils de sécurité qui y
sont mentionnés avant d’utiliser la machine. Si vous prêtez
la machine à des tiers, fournissez toujours la notice avec.
ATTENTION ! Toujours arrêter la machine et retirer la bat-
terie avant d’entreprendre le nettoyage, l’entretien, la véri-
fication et tout autre travail sur la machine.
La batterie doit être complètement chargée avant la pre-
mière utilisation. Le temps de charge est d’environ 90
minutes.
Tenez compte des instructions spéciales concernant la
batterie et le chargeur.
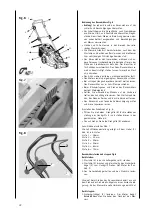
Chargement de la batterie Fig. 4d, 5
Retirez la batterie de la machine.
• Pour ce faire appuyer vers le haut sur le poussoir situé
à l’arrière de la batterie et retirer la batterie. Fig. 4d
• Pousser la batterie (9) dans le chargeur (10) jusqu’à ce
qu’elle s’encliquette. Abb. 5
• La LED verte (A) indique que la batterie est en place
dans le chargeur.
• La LED rouge (B) indique que la charge est en cours.
• Lorsque les deux LEDs sont vertes, la batterie est comp-
lètement chargée (après environ 90 minutes).
• Le chargeur arrête automatiquement la charge lorsque
la batterie est complètement chargée.
• Si une LED clignote en passant du rouge au vert et que
l’autre est verte, la température de la batterie est trop
élevée. Laissez refroidir la batterie.
• Si une LED est rouge et l’autre verte, la batterie est
défectueuse et doit être remplacée.
• Après avoir chargé la batterie, la remettre en place dans
la machine jusqu’à ce qu’elle s’encliquette. Abb. 4d
• Dès que la puissance chute, il faut recharger la batterie.
• Ne déchargez jamais la batterie complètement, cela
peut l’endommager.
Indicateur de charge de la batterie
Remarque :Appuyer sur la touche 9b de la batterie (Fig. 5)
Les LEDs rouge + verte+ jaune s’allument, la
batterie est complètement chargée.
Les LEDs rouge + jaune s’allument, la batterie
est chargée aux 2/3.
La LED rouge s’allume, la batterie est chargée
à 1/3 (bientôt recharger la batterie)
Aucune LED ne s’allume, la batterie est déchargée.
Pour mettre la batterie en place Fig. 4d
1. Relevez le capot protecteur.
2. Insérez la batterie par le haut jusqu’à ce qu’elle se bloque.
3. Refermez le capot protecteur.
5. Connect both parts of the grass box, then attach the lid.
6. Make sure all connections click into place, Fig. 4a.
7. Lift the ejector lid and attach the grass box to the retai-
ning lugs, Fig. 4b, 4c.
8. To insert the battery, lift the protective cover and insert
the battery in the slot until it clicks into place, Fig. 4d.
Initial operation
WARNING! For your own safety, please thoroughly read this
manual and the general safety instructions before turning
the device on. If you give the device to third parties, always
include these instructions.
ATTENTION! Before working on the device - cleaning, in-
spection, maintenance or other work - always turn off the
device and remove the battery from the device.
The battery must be completely charged before first use.
Charging time is approx. 90 mins.
Please follow the separate instructions for the battery and
the charger.
Charging the battery Fig. 4d, 5
Remove the battery from the device.
• To do this, push up the catch on the back of the battery
and pull out the battery. Fig. 4d
• Push the battery into the charger until it clicks into
place. Fig. 5
• The green LED (A) shows that the charger is plugged in.
• The red LED (B) shows the charging process.
• When both LEDs are green, the battery is fully charged
(after approx. 90 min.).
• The charger stops the charging process automatically
when the battery is fully charged.
• If one LED alternately flashes red and green and the
other is green, the battery temperature is too high. Leave
the battery to cool down.
• If one LED flashes red and the other is green, the battery
is faulty and needs to be replaced.
• After charging, push the battery into the device until it
clicks into place. Fig. 4d
• When the performance decreases, the battery has to be
recharged.
• Never let the battery get completely discharged. This can
damage the battery.
Battery status display
Note: Press Button 9b on the battery (Fig. 5)
red + green LEDs are flashing; battery full
red + yellow LEDs flashing; battery 2/3 full
red LED flashing; battery 1/3 full (charge the battery
soon);
0 LEDs flashing; battery empty
I
nserting the battery, Fig. 4d
1. Lift the cover.
2. Insert the battery from the top until it clicks into place.
3. Close the cover.
Warning! Keep the terminals dry and free from dirt.

