Scheppach 5903305966 Original Instruction Manual Download Page 23

23

Çalışma notları ve işlevler

Not:  Çok  ince  iş  parçalarını  taşlarken  son  derece 
dikkatli  olun.  Sadece  taşlama  için  gereken  oranda 
basınç uygulayın. 
Uyarı: İş parçası taşlama plakasının sağ tarafına te-
mas ederse güçlü bir geri tepme ortaya çıkabilir. Bu 
uyarıya uyulmaması ciddi yaralanmalara neden ola-
bilir.

Taşlama  plakası  üzerinde  dışbükey  yüzeyin 

taşlanması:

Dışbükey  yüzeyleri  taşlamak  için  daima  taşlama 
plakasını  kullanın.  İş  parçası  sol  taraftan  plakanın 
ortasına doğru itilmelidir.  
•  İş parçasını güçlü bir şekilde tutun. Parmaklarınızın 

taşlama kayışına dokunmadığından emin olun.

•  İş  parçasını  sıkıca  taşlama  plakasına  doğru 

bastırın.  Taşlama  plakasındaki  tüm  yüzeyi  kullan-
mak için iş parçasını sol tarafa doğru kaydırın. 

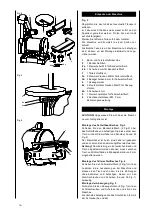
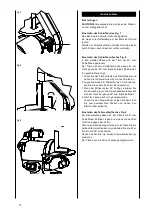
Konik yüzeylerin ve açıların taşlanması Şekil 10 

Çalışma tablası 0° ile 45° arasında serbestçe ayar-

lanabilir.

•  Bunun için, iki kilit vidasını gevşetin.
•  Tablayı  istenen  eğime  ayarlayın.  DİKKAT!!  Eğimli 

olduğunda bile, çalışma tablası ile taşlama plakası 
arasındaki boşluk asla 2mm’den fazla olmamalıdır!

•  Kilitleme vidasını tekrar sıkın.

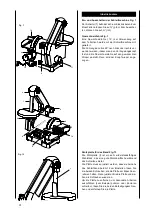
Çapraz  kesme  şablonu  ile  ön  kısımların 

taşlanması Şek. 11 ve 12

Birlikte  verilen  çapraz  kesme  şablonu  hassas 
taşlamayı  kolaylaştırır.  Bu  parçanın  (kısa)  ön 
kısımların  taşlanması  için  kullanılmasını  tavsiye 
ederiz.
Not! İş parçasını daima sol taraftan taşlama plakasının 
merkezine doğru hareket ettirin, asla ileri geçmeyin!
İş parçası fırlayabileceği için yaralanma riski!

Taşlama kayışında yüzey taşlama.

İş parçasını güçlü bir şekilde tutun. Parmaklarınıza 

dikkat edin! Yaralanma tehlikesi!

İş parçasını tablaya sıkıca bastırarak taşlama kayışı 
üzerinde eşit şekilde hareket ettirin.
DİKKAT!!  Özellikle  çok  ince  veya  uzun  malzemele-
ri taşlarken (muhtemelen aynı zamanda bir taşlama 
tablası olmadan) özellikle dikkatli olun.
Aşırı güçlü baskı uygulamayın, aksi takdirde taşlanan 
malzeme taşlama kayışından çıkmaz.

Operating notes and functions 

Note: 

Work  very  carefully  when  grinding  very  thin 

work pieces. Only apply as much pressure as neces-
sary for grinding. 

Warning: 

There  can  be  powerful  recoil  if  the  work 

piece  touches  the  right  side  of  the  grinding  plate. 
Non­compliance with this warning can cause serious 
injuries. 

Grinding a convex surface on the grinding-plate:

To  grind  convex  surfaces  always  use  the  grinding­
plate. The work piece has to be pushed from the left 
side to the centre of the plate.  
•  Keep a strong hold of the work piece. Make sure 

your fingers do not touch the grinding belt.

•  Press  the  work  piece  firmly  against  the  grinding­

plate. Slide the work piece on the left side so as to 
use the whole surface of the grinding plate. 

Grinding of bevels and angles Fig. 10

The working table can be adjusted freely, from 0° to 
45°.
To do this, loosen the two locking screws.
Set the table to the desired inclination. ATTENTION!! 
Even  when  inclined,  the  separation  between  the 
working table and the grinding­plate must never be 
more than 2mm!
Tighten the locking screws again.

Grinding fronts with the transverse cutting tem

-

plate. Fig. 11 and 12

The  transverse  cutting  template  provided  facilitates 
precise grinding. We recommend its use for grinding 
of (short) fronts.

Note! 

Always move the work piece from the left to the 

centre of the grinding plate, never beyond!

Risk of injury, as the work piece can be thrown 

off!

Surface grinding on the grinding-belt.

Keep a firm hold on the work piece. Take care of 

your fingers! Risk of injury!

Move the work piece evenly over the grinding­belt by 
pressing it firmly on the table.

ATTENTION!! 

Be  especially  careful  when  grind-

ing very thin or long material (possibly even without 
grinding table).
Do not use too strong pressure or the grinded mate-
rial will not be removed from the grinding belt.

Summary of Contents for 5903305966

Page 1: ...l TR Şerit Disk Zımpara Orijinal kullanma kılavuzundan çeviri Art Nr 5903305966 AusgabeNr 5903305850 Rev Nr 29 06 2017 www scheppach com service scheppach com 49 08223 4002 99 49 08223 4002 58 Nachdrucke auch auszugsweise bedürfen der Genehmigung Technische Änderungen vorbehalten Abbildungen beispielhaft BTS700 Made in P R C ...

Page 2: ......

Page 3: ...D Band und Teller Schleifmaschine 4 31 GB Belt and Disc Sander TR Kayışlı ve diskli zımpara makinesi ...

Page 4: ...der Maschine sicher fachgerecht und wirtschaftlich arbeiten und wie Sie Gefahren vermei den Reparaturkosten sparen Ausfallzeiten verrin gern und die Zuverlässigkeit und Lebensdauer der Maschine erhöhen Zusätzlich zu den Sicherheitsbestimmungen dieser Be die nungsanweisung müssen Sie unbedingt die für den Be trieb der Maschine geltenden Vorschriften Ihres Landes beachten Die Bedienungsanweisung in ...

Page 5: ...he operating instructions to make yourself familiar with the device prior to using it Değerli müşterimiz Yeni makinenizle çalışmaktan keyif almanızı umarız ve başarılar dileriz Bilgi Yürürlükteki ürün sorumluluğu yasasına göre bu cihazın üreticisi aşağıdaki durumlarda bu cihazın uğrayabileceği hasarlardan veya bu cihaz nedeniyle gerçekleşen hasarlardan sorumlu değildir yanlış kullanım kullanma tal...

Page 6: ...820 Tischabmessung mm Bandschleifer ø 148 mm Tellerschleifer 184 x 98 mm Schrägstellung Tisch 0 45 Gewicht kg 7 0 Antrieb Motor V Hz 230 240V 50Hz Aufnahmeleistung P1 250W Technische Änderungen vorbehalten Geräuschkennwerte nach EN 50144 Schalldruck LpA 81 2 dB A Schallleistung LWA 92 2 dB A Gehörschutz tragen Schutzbrille tragen Bei Staubentwicklung Atemschutz tragen Vor Inbetriebnahme Bedienungs...

Page 7: ...r 9 Taşlama kayışı ayar vidası 10 Plakalı taşlama için vakum bağlantısı 11 Kayışlı taşlama için vakum bağlantısı 12 Çapraz kesme şablonu Only use original parts for accessories as well as for wearing and spare parts Spare parts are avail able from your specialized dealer Specify our part numbers as well as the type and year of construction of the device in your orders Delivery Status Belt and Disc...

Page 8: ...em Arbeitsbereich fern 5 Bewahren Sie unbenutzte Elektrowerkzeuge sicher auf Unbenutzte Elektrowerkzeuge sollten an einem trockenen hochgelegenen oder abge schlossenen Ort außerhalb der Reichweite von Kindern abgelegt werden 6 Überlasten Sie Ihr Elektrowerkzeug nicht Sie arbeiten besser und sicherer im angegebe nen Leistungsbereich 7 Benutzen Sie das richtige Elektrowerkzeug Verwenden Sie keine le...

Page 9: ...l Safety Rules When using electric tools basic safety precau tions should always be followowed to reduce the risk of fire electric shock and personal injury 1 Keep your working area clean and tidy A disorderly working area can lead to acci dents 2 Be aware of the effects of the environment Do not leave electrical power tools out in the rain Do not use electrical power tools in moist or wet surroun...

Page 10: ...kzeugwechsel Kontrollieren Sie regelmäßig die Anschluss leitung des Elektrowerkzeugs und lassen Sie diese bei Beschädigung von einem anerkann ten Fachmann erneuern Kontrollieren Sie Verlängerungsleitungen regelmäßig und ersetzen Sie diese wenn sie beschädigt sind Halten Sie Handgriffe trocken sauber und frei von Öl und Fett 15 Ziehen Sie den Stecker aus der Steckdose Entfernen Sie nie lose Splitte...

Page 11: ...dıklarından ve amaçlanan şekilde çalıştıklarından emin olmak için dikkatli şekilde incelenmelidir workpieces table trestle etc in order to prevent the machine from tipping over Use clamps or a vice to grip the workpiece firmly This is much safer than holding it with your hand 14 Avoid placing your body in an unnatural posi tion Make sure that you have secure footing and always maintain your balanc...

Page 12: ... bei einer Kun dendienstwerkstatt ersetzt werden Benutzen Sie keine fehlerhaften oder beschä digten Anschlussleitungen Benutzen Sie keine Elektrowerkzeuge bei denen sich der Schalter nicht ein und aus schalten lässt 21 ACHTUNG Der Gebrauch anderer Einsatzwerkzeuge und anderen Zubehörs kann eine Verletzungsge fahr für Sie bedeuten 22 Lassen Sie Ihr Elektrowerkzeug durch eine Elektrofachkraft repari...

Page 13: ... ya ralanabilir Kullanım Amacı Makine makineler için geçerli EG kılavuz ilkelerine uygundur Kayışlı diskli zımpara makinesi taşınabilir bir ma kine olarak tanımlanır Kazaların önlenmesi için çalışma istasyonunda ve makinenin etrafında rahatsızlık verici nesneler bulunmamalıdır Damaged protective devices and parts must be properly repaired or replaced by a recog nised workshop insofar as nothing di...

Page 14: ... nur mit Originalzubehör und Ori ginalwerkzeugen des Herstellers genutzt werden Jeder darüber hinausgehende Gebrauch gilt als nicht bestimmungsgemäß Für daraus resultieren de Schäden haftet der Hersteller nicht das Risiko dafür trägt allein der Benutzer Bitte beachten Sie dass unsere Geräte bestim mungsgemäß nicht für den gewerblichen handwerk lichen oder industriellen Einsatz konstruiert wurden W...

Page 15: ...enlik talimatları Sadece yetki verilen şekilde kullanın bölümlerinde ve tüm kullanma kılavuzunda verilen talimatları izleyerek en aza indirin On principle the workpieces to be processed must be free from foreign material such as nails or screws Only operate the machine as intended in tech nically acceptable conditions considering the operating instructions and bearing safety and risk issues in min...

Page 16: ...TUNG Vergewissern Sie sich dass die Maschi ne vom Netz getrennt ist Montage des Schleifbandtisches Fig 3 Schieben Sie den Bandschleiftisch 2 Fig 2 über das Schleifband und befestigen Sie diese unter dem Tisch mit dem Klemmhebel und Scheibe 2a und 2b Fig 2 Der Klemmhebel ist durch eine Feder vorgespannt und kann durch Ziehen am Handgriff verstellt werden Achtung Damit die Finger nicht zwischen Band...

Page 17: ... makineye monte edin Ardından cıvatayı 4a ve 4d kullanarak koruyucuyu 4c takın Koruyucunun zımparalama tablasının alt kenarına ulaştığından emin olun Unpacking the Machine Fig 2 Check the delivery for possible transport damage In case of damage the carrier has to be notified im mediately Check the delivery is complete Inform the retailer immediately if there are any parts missing The machine is sh...

Page 18: ...hleifmaschine so platzieren wie sie später in stalliert sein soll und zeichnen nun die Lage der zu bohrenden Löcher auf die Werkbank Bohren Sie die Löcher durch die Werkbank Platzieren Sie die Schleifmaschine über den Lö chern und führen geeignete Schrauben von oben durch die Löcher der Schleifmaschine und der Werkbank Von unten schrauben Sie nun die Schleifmaschine mit untergelegten Beilagscheibe...

Page 19: ... zımpara maki nesi kullanılırken devrilmeyi önlemeye yeterli boyutta olmalıdır İyi kaliteli ve kalınlığı 3 4 in 19 mm olan herhangi bir kontrplak veya sunta tavsiye edilir If the sanding table is inclined the guard must be adjusted for height Mounting the rubber feet Fig 6 Mount the 4 rubber feet 1 a Fig 1 to the base plate ATTENTION If the machine has a tendency to move or tilt during operation i...

Page 20: ...e möglich nach hinten an 2 Legen Sie einen 90 Winkel auf den Tisch und las sen Sie die andere Seite am Band anstehen 3 Wenn der Winkel keine 90 beträgt justieren Sie die Schraube d mit dem Sechskantschlüssel bis sich der Tisch bei genau 90 zum Band befindet 4 Der Tisch kann nach vorn geneigt werden Lösen Sie den Klemmhebel neigen Sie den Tisch bis zum gewünschten Winkel und ziehen den Klemmhebel w...

Page 21: ...Tabla 45 ye kadar aşağıya eğilebilir Initial operation Settings ATTENTION Ensure that the machine is disconnect ed from the mains supply Adjustment of the grinding belt Fig 7 The belt has already been factory preset The correct position is for it to run in the middle of the rollers By turning the adjustment screw 9 the belt can be adjusted to the left or the right Adjustment of the grinding belt t...

Page 22: ...tstisch kann stufenlos von 0 bis 45 ver stellt werden Lösen Sie dazu die beiden Klemmschrauben Bringen Sie den Arbeitstisch in die gewünschte Neigung Achtung Der Arbeitstisch sollte auch ge neigt nie weiter als 2 mm von der Schleifscheibe entfernt sein Ziehen Sie die Klemmschrauben wieder an Schleifen von Stirnseiten mit der Querschneid lehre Fig 11 u 12 Die mitgelieferte Querschneidlehre erleicht...

Page 23: ...ı olmadan özellikle dikkatli olun Aşırı güçlü baskı uygulamayın aksi takdirde taşlanan malzeme taşlama kayışından çıkmaz Operating notes and functions Note Work very carefully when grinding very thin work pieces Only apply as much pressure as neces sary for grinding Warning There can be powerful recoil if the work piece touches the right side of the grinding plate Non compliance with this warning ...

Page 24: ...nkel einstellt Dann wird der Knopf wieder ange zogen Stützplatte für das Band Fig 13 Die Stützplatte f ist ein sehr widerstandsfähiges Stahlstück das eine gute Stützoberfläche während des Schleifens bietet Die Platte muss so justiert werden dass sie beinahe das Schleifband berührt Zum Einstellen lösen Sie die beiden Schrauben die die Platte am Maschinen rahmen halten Dann justieren Sie die Platte ...

Page 25: ... örneğin cilalama veya kenarların taşlanması plakayı çıkarmak için iki bağlantı vidasını gevşetin Initial operation Turning the grinding machine on and off Fig 1 The switch 7 is located on the terminal box To turn the machine on press I green To turn the ma chine off press O red Transverse cutting template Fig 1 A transverse cutting template 12 is provided for use on the grinding table The templat...

Page 26: ...ektrischen Ausrü stung dürfen nur von einer Elektrofachkraft durchge führt werden Wartung Achtung Bei Reinigungs und Wartungsarbeiten im mer den Netzstecker ziehen Warnung Für Wartungsarbeiten dürfen Sie aus schließlich Teile des Herstellers verwenden Die Verwendung fremder Teile kann Schäden an der Ma schine verursachen Allgemein Vergewissern Sie sich dass sich das Anschluss kabel in gutem Zustan...

Page 27: ... kutu içindeki yağlayıcıları kullanın Temizleme Motor kapağını ve makineyi temizleyin ve tozu çekin Exhaust Fig 14 There are two dust extraction connectors g h with a diameter of 38mm which can be connected easily to a vacuum system There is an exhaust device for the belt and the grinding table Electrical Connection The installed electric motor is connected ready for use The connection accords wit...

Page 28: ... von den drei Rollen 4 Installieren Sie das neue Band und setzen Sie die Haube e zurück Ziehen Sie die Sechskantschrau be a wieder an Vergewissern Sie sich dass das Band mittig läuft Bei Bedarf justieren Sie es siehe Kapitel Band führung Demontage und Montage des Schleiftellers Fig 17 Bei abgenutzter Schleifscheibe e ziehen Sie diese vom Schleifteller ab Klettverschluss Setzen Sie die neue Scheibe...

Page 29: ... push it on to the grinding plate ATTENTION Remove the grinding disc if it does not run circularly Readjust it Taşlama kayışının montajı ve sökülmesi Şekil 15 ve 16 1 Üst kapak e üzerindeki kilit vidasını 3 gevşetin 2 Yan kapağı tutan çapraz başlı vidaları b gevşetin Yan kapağı katlayın ve kaldırın makine krema yerindeki iki pim 3 Kayış c üzerindeki kılavuz düğmesini açın Taşlama kayışını d üç mak...

Page 30: ...tion Jeder Reparaturversuch kann zu Gefahren führen wenn er nicht von einem qualifizierten Fachmann durchgeführt wird Maschine wird während der Arbeit langsamer Es wird zu großer Druck auf das Werkstück ausgeübt Üben Sie weniger Druck auf das Werkstück aus Schleifband läuft von den Antriebsscheiben ab Es läuft nicht in der Spur Stellen Sie die Spur nach Holz brennt während des Schleifens a Schleif...

Page 31: ...ure on workpiece a Replace disc or belt b Reduce pressure on workpiece Sorun giderme Sorun Olası Neden Yardım Motor çalışmıyor a AÇMA KAPAMA anahtarı hasar görmüş b AÇMA KAPAMA kablosu hasar görmüş c AÇMA KAPAMA rölesi hasar görmüş d Sigorta atmış e Motor yanmış a d Makineyi yeniden kullanmadan önce tüm hasar görmüş parçaları değiştirin e Yerel servis merkezinize başvurun Kalifiye bir personel tar...

Page 32: ......

Page 33: ...Motor Running Capacitor ...

Page 34: ... atbilstības un standarti šādu rakstu NL verklaart hierbij dat het volgende artikel voldoet aan de daarop betrekking hebbende EG richtli jnen en normen RUS заявляет о соответствии товара следующим директивам и нормам ЕС PT declara o seguinte conformidade com a Direc tiva da UE e as normas para o seguinte artigo ES declara la conformidad siguiente según la direc tiva la UE y las normas para el artí...

Page 35: ...hold til det europæiske direktiv 2012 19 EU em bortskaffelse af elektriske og elektroniske produkter og gældende national lovgivning skal brugt elværktoj indsamles separat og bortskaffes på en måde der skåner miljøet mest muligt SK Kun for EU lande Elværktøj må ikke bortskaffes som allmindeligt affald I henhold til det europæiske direktiv 2012 19 EU em bortskaffelse af elektriske og elektroniske p...

Page 36: ...üre içerisinde kanıtlanabilir şekilde malzeme ya da imal hatası sonucu kullanılamaz hale gelmiş olan tüm makine parçalarını ücretsiz olarak değiştirme garantisi vermekteyiz Kendi üretmediğimiz parçalar için ancak bize mal sağlayan firmaya karşı mevcut olan teminat hakları ölçüsünde teminat verebilmekteyiz Yeni parçaların takılması işleminin masrafları alıcıya aittir Değiştirme ve indirim talep etm...

Reviews: