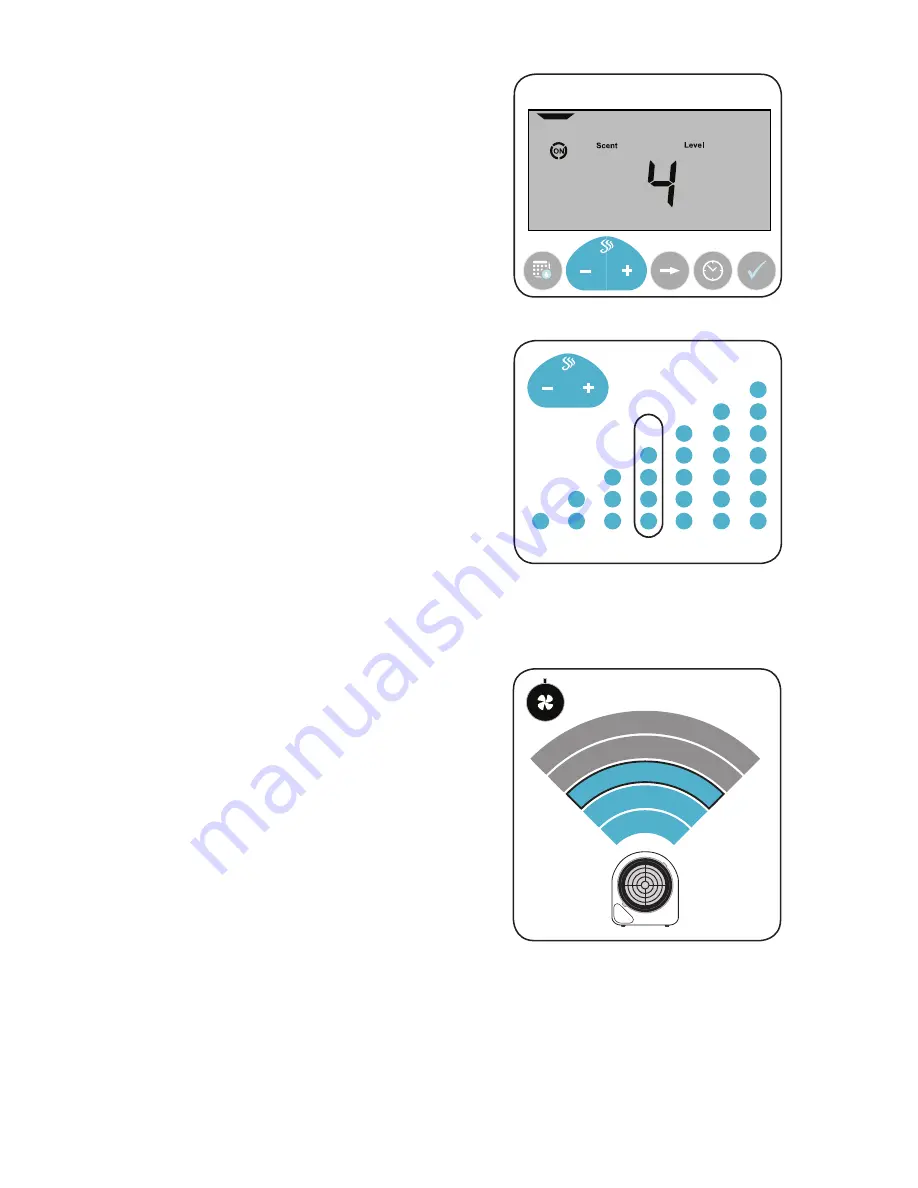
ScentAir ScentWave User Manual Download Page 6

6


SCENT LEVEL

The 

ScentWave

 uses the Scent Level to control the 

amount of fragrance that is emitted into the space. 
The Scent Level cycles a fan within the cartridge on 
and off for specific intervals.
Adjust the Scent Level to increase or decrease 
the amount of fragrance within the space. This is 
the best option for controlling the intensity of the 
fragrance within the space.
There are seven Scent Levels of fragrance intensity; 
one (1) is minimum and seven (7) is maximum. 
The default setting is four (4). The displayed Scent 
Level will be used for all scheduled Scent Events. 
Fragrance intensity changes with adjustment of the 
scent level.
The 

ScentWave 

will always display the current Scent 

Level on the display screen. When the fan is running, 
the word ON will be surrounded by a circle. 

(Fig.2)

ADJUSTING THE SCENT LEVEL:

• 

Press 

-

 or 

+

 to adjust the Scent Level. 

(Fig.3)

SCENT

EVENT

PAUSE

RUN

EVENT OVERRIDE

EVENT 

SETTINGS

NEXT

DIGIT

RUN

MODE

Fig.2:

 Scent Level main display.

4

5

6

7

3

2

1

MIN MAX

FAN SPEED

The 

ScentWave

 uses Fan Speed to control the 

coverage of the system. The Fan Speed is controlled 
with the knob at the lower right of the 

ScentWave

.

Adjust the Fan Speed to increase or decrease the 
fragrance coverage of the 

ScentWave

 system. Set 

the fan speed by turning the knob clockwise or 
counterclockwise.  

(Fig.4)

ADJUSTING THE FAN SPEED:

• 

Turning the knob counterclockwise will cause 
the fan to run slower and will fragrance the 
area closest to the 

ScentWave

. The further 

you turn it counterclockwise, the quieter the 
system will become.

• 

Turning the knob clockwise will cause the 
fan to run faster and will fragrance an area 
further from the 

ScentWave

. The further 

clockwise, the louder the system will become.

500 sq.ft. 2000

50%

25%

5%

100%

75%

MAX MIN

Fig.3:

 There are seven (7) Scent Levels to choose from. 

Fig.4:

 Adjusting the fan speed changes the overall scent 

coverage area.

Summary of Contents for ScentWave

Page 1: ...nt 3 Getting Started 4 Control Panel 5 Scent Level 6 Fan Speed 6 Run Mode 7 Scent Events 8 Time Date 10 Lockcode 11 Plate less Arm Mounting SWD1005 12 Plate less Wall Mounting SWD1005 13 Wall Mounting...

Page 2: ...ill be used for any active Scent Event There are seven 7 levels Set the system to one 1 for low fragrance intensity Set the system to seven 7 for high fragrance intensity Turn to Page 6 for more infor...

Page 3: ...ar an area of high traffic volume 3 3 Crossing the path of airflow from a duct 3 3 In a discrete location 3 3 Close to the ground when possible 3 3 Within 10 3m of a power outlet AVOID POSITIONING 2 2...

Page 4: ...1 Plug the ScentWave Cartridge cord into the connection on the inside bottom front of the ScentWave 2 Insert the ScentWave Cartridge by lining up the tabs on the cartridge and system and push in comp...

Page 5: ...IONS The ScentWave functions and settings are controlled by the six 6 buttons under the display screen Some buttons may have alternate functions when held down Specific button details are found within...

Page 6: ...the Scent Level Fig 3 SCENT EVENT PAUSE RUN EVENT OVERRIDE EVENT SETTINGS NEXT DIGIT RUN MODE Fig 2 Scent Level main display 4 5 6 7 3 2 1 MIN MAX FAN SPEED The ScentWave uses Fan Speed to control the...

Page 7: ...current run mode PAUSE During an active event PAUSE mode will cause the system to stop running for the remainder of the current Scent Event Activating the PAUSE mode before a scheduled event will caus...

Page 8: ...choose between 17 different Day Combinations 4 Press NEXT DIGIT again to move to the hours for the Off Time Press or to adjust the hour Fig 10 5 Press NEXT DIGIT to move to the minutes for the Off Ti...

Page 9: ...e deleted 3 Press EVENT SETTINGS to review or create other scheduled events or press CHECK to save and go back to the home screen SCENT EVENT PAUSE RUN EVENT OVERRIDE EVENT SETTINGS NEXT DIGIT RUN MOD...

Page 10: ...the year slot will flash 3 Press the CLOCK button one 1 more time DST will flash Fig 15 When DST is on the Month Day and Date Adv is displayed This is the day of the year that the machine will advanc...

Page 11: ...r to adjust the digit value Press NEXT DIGIT to move to the next open slot Repeat step for all open digits 2 Press CHECK to confirm and lock DEACTIVATING THE LOCKCODE 1 Press the NEXT DIGIT button The...

Page 12: ...Fig 18 Use the screwdriver to drive the screws into the holes holding the base in place 3 Attach the Mounting Arm to the ScentWave Attach the ScentWave to the pivot end of the wall mounting arm throu...

Page 13: ...the wall Fig 21 Drive the screws into the anchors leaving 5 16 7 9mm between the top of the screw and the wall 2 Attach the ScentWave to the wall Line up the slots on the ScentWave system with the scr...

Page 14: ...ter hole using the provided lock nut and screw Tighten using a screwdriver to secure the nut in place Fig 24 Attach the mounting plate assembly to the bottom of the ScentWave using the provided plate...

Page 15: ...late to the ScentWave Attach the mounting plate to the bottom of the ScentWave using the provided plate screws pilot holes slotted or hex driver Fig 27 3 Attach the ScentWave to the wall Line up the s...

Page 16: ...anada 1 704 504 2320 UK 44 1628 601 650 France 33 5 62 57 63 20 Hong Kong 852 3563 5566 www scentair com scentwave X X X X Small Opening Small Opening Large Opening Large Opening 3 13 79 5mm 2 30 58 4...

Reviews: