scandia HEAT & COOK SCX 501 Owner'S Manual Download Page 12

10.

1.

Check your flue system and the void between the firebox and the outer skin of the unit for build up of soot or creosote 
and for signs of damage to joints.

2.

To inspect the area between the firebox and the outer skin remove the hotplate and inspection plates located on the 
top and front of each unit. Using a flashlight to inspect and the wire brush provided to remove any built-up residue.

3.

On occasion during normal use and immediately after cleaning remove bottom ash pan, empty, clean and re-position.

4. 

During periods in inactivity or infrequent use, regularly alternate the position of the flue damper.

5.

The Heat 

&

 Cook firebox is lined with steel firebox liners, these are designed to expand and contract which will warp to 

some degree during use, this is normal. Replacement of the liners should be undertaken when any section of the liners 
is less than 1mm thick or any holes appear.

CLEANING INSTRUCTIONS

WARNING

Before beginning to clean your stove make sure the unit is not in use and is cold.
It is advised that you put some plastic down on the floor in front of the stove whilst cleaning to prevent 
any creosote or ash from falling on the floor.

STEP 1.

Remove rear cleaning port cover located on the top plate to the left hand side. Push the cleaning tool down 
the back of the stove moving it about to loosen any built up creosote or ash. These loose particles will fall to 
the bottom into the ash drawer.

STEP 2.

Remove hot plate and push cleaning tool down each side of the outside of the fire box past the oven, move 
cleaning tool about to loosen any built up creosote or ash. These loose particles will fall to the bottom of the 
stove.

STEP 3.

Open the oven door and remove the ash drawer and dispose of ash carefully. Make sure the ash/creosote is 
cold. If the stove was particularly full of creosote once the ash drawer is removed additional creosote may fall 
into the compartment. Scrape this out also. Make sure sides and back are clear before putting stove back into 
service.

WOOD HEATER MAINTENANCE

CHECK YOUR WOOD HEATER REGULARLY

Initially, we recommend you check your flue system at least once per month. After the first few months you will notice a pattern 
of soot and creosote build up and you can then determine an inspection interval for checking soot and creosote build up that is 
suitable for your wood heater installation.

Other checks, as listed below, should be carried out at least twice per year. If you notice anything wrong at any time it should 
be repaired immediately. Never use a wood heater that is in any way damaged or has a damaged flue.

Summary of Contents for HEAT & COOK SCX 501

Page 1: ...HEAT COOK OWNERS MANUAL Scandia Heating Aust Pty Ltd Head Office 306 South Gippsland Highway Dandenong South VIC 3175 Australia 61 3 5792 2388 info scandiastoves com au www scandiastoves com au...

Page 2: ......

Page 3: ...NCIL REQUIREMENTS Check Local Council Requirements Eg permits When installing operating and maintaining your wood heater follow the guidelines presented in these instructions and make them available t...

Page 4: ...g a chimney fire If you suspect a chimney fire close down the air controls on the wood heater if the fire persists evacuate people from the building and call the Fire Brigade To prevent the accumulati...

Page 5: ...toves com au PLEASE NOTE Hot plates can be found in Lower Ash Tray 2 BEFORE INSTALLING YOUR WOOD HEATER You need to consider the following to ensure the safe operation of your wood heater Provision of...

Page 6: ...stallation regulations This is for your safety The manufacturer is not responsible for the product if it is not installed following these recommendations These clearances may only be reduced by means...

Page 7: ...JOIST CEILING HEATER HEATER FLUE COLLAR DECORATIVE MESH WITH REAR HEAT SHIELD CERAMIC SPACERS ANGLE BRACKET CEILING COLLAR FIXED WITH SCREW WITH CERAMIC SPACERS BETWEEN CEILING COLLAR AND THE CEILING...

Page 8: ...steel heat shield up into bottom of the upper decorative flue The lower decorative flue features locating tags on the non crimped end which rest on the heater flue collar The solid heat shield sectio...

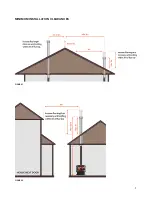
Page 9: ...MINIMUM INSTALLATION CLEARANCES FIGURE 1 FIGURE 2 7...

Page 10: ...y Air Inlet Control Provides secondary air intake directly to coal base to further regulate burn rate of fire 4 Oven Temperature Control Provides cool air to oven to further regulate oven temperature...

Page 11: ...r on the firebox base then a few small dry pieces of sticks or kindling Open the flue damper fully by pushing backwards Open both the air inlet controls Now light the paper close the fire door when th...

Page 12: ...g port cover located on the top plate to the left hand side Push the cleaning tool down the back of the stove moving it about to loosen any built up creosote or ash These loose particles will fall to...

Page 13: ...s does crack when the wood heater is lit let the fire die out Do not open the door until the wood heater has fully cooled Replace the glass with the specified replacement part before re using the wood...

Page 14: ...t easily you may need to adjust or replace the door seal 3 Check to see if the glass moves within the door frame If it does you may need to tighten the glass retainer screws 4 Check the condition of t...

Page 15: ...ing warranty period after the date of the original purchase such as to make the wood heater unfit for normal home use and you comply with the requirements below regarding making a claim then subject t...

Page 16: ...ill only be responsible for transport of the wood heater from the original place of purchase to Scandia s premises and back and replacement or repair in accordance with this Warranty Head Office 306 S...

Page 17: ......

Page 18: ......

Reviews: