background image


11

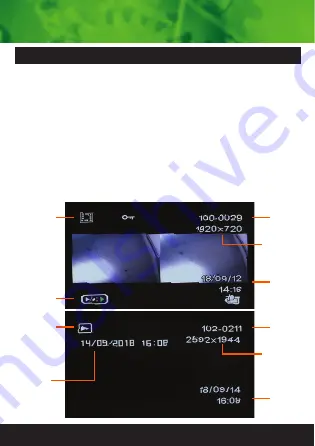
Press the E button until you see the play icon for photos, or 

the video reel icon for video recordings on the top left of the 

screen. Using the arrow buttons, you can choose between 

all your recorded videos or photos. Press the OK button to 

play or pause your recorded video. Press right arrow button 

to fast forward (Speed up) recorded footage. To skip to next 

or previous video file you must pause the video playback 

first then press arrow buttons. Press Menu button to delete 

or protect files, press again for tools menu.

Video/Photo playback & protecting files


Video

Playback

Icon

Review

options

Video

Number

Current

Date &

Time

Photo

Playback

Icon

Photo

Date &

Time

Locked file

Locked file

Photo

Number

Resolution

Resolution

Current

Date &

Time

Summary of Contents for SCADDC8

Page 1: ...HD 1080P DUAL DASH CAM Value you can trust Owners Instruction Manual PLU 564557...

Page 2: ...included Thank you for purchasing the SCADDC8 HD 1080P Dash Cam This Dash Cam is specifically designed for real time video and audio recording when driving The Dash Cam simply mounts to the windscree...

Page 3: ...h Cam 7 Instructions for video operation 9 Instructions for Photo operation 10 Video Photo playback protecting file 11 Video mode menu settings 12 Video mode tools settings 13 Video mode tools setting...

Page 4: ...SCADDC8 Suction mount bracket Car charger USB cable Package components 4...

Page 5: ...structure Camera Lens IR LEDs Speaker Menu Settings Left Right Scroll Up Down buttons LCD display Bracket mount OK Confirm Take Picture Reset Forward recording Internal recording Camera Lens Non activ...

Page 6: ...n one side of the Dash Cam This is on the drivers side to be able to record in car or the driver Having the IR side camera facing the windscreen at night will inhibit recording due to reflection of th...

Page 7: ...7 Suggested Installing the Dash Cam...

Page 8: ...t the mounting bracket and rotate the camera direction to get the best view Ensure of the vehicles bonnet is visible from the bottom of the screen for alignment for the forward facing camera 6 Turn ve...

Page 9: ...ess the OK button The red circle indicator on the LCD starts flashing when recording Press left arrow button to zoom in and right arrow button to zoom out when recording When recording press the E but...

Page 10: ...the Menu button in photo mode will allow you to enter photo settings and tools In video mode whilst not recording the Dash Cam can switch between single and dual recording modes Press hold the Menu Se...

Page 11: ...video Press right arrow button to fast forward Speed up recorded footage To skip to next or previous video file you must pause the video playback first then press arrow buttons Press Menu button to d...

Page 12: ...can be turned OFF or record 3 5 10 minute video files If you want to keep any of the files it is best to upload them to your computer Record Audio This Feature will allow you to turn the Dash Cam s re...

Page 13: ...e to record regardless This feature is useful for night driving as having the LCD on could be a distraction or illegal This feature can also be turned off Frequency This feature allows the best record...

Page 14: ...the Dash Cam s hardware Capture Mode This allows you to set a timer before taking a photo Settings are Single 2 5 and 10 seconds Resolution Resolution for taking photos are 12M 10M 8M 5M 3M 2M VGA 1...

Page 15: ...i USB interface The Mini USB cable can also be used to connect to a computer for data transfer When connecting your Dash Cam to a PC with the USB cable the Dash Cam will present Mass Storage on its sc...

Page 16: ...ash Cam Insert a fine point paper clip into reset hole on the front of the unit labeled reset Maintaining the Battery To prolong the battery life we suggest you charge your Dash Cam on a 5 volt home c...

Page 17: ...viewing angle Viewing angle G Sensor Loop recording Functions 50Hz 60Hz Frequency English Russian Chinese etc OSD Language Built in Microphone and speaker Audio Micro SD card 8 32GB Class10 Max Stora...

Page 18: ...ification showing your name address and signature may be required to process your claim This product may need to be sent to the manufacturer to assess the defect before determining any claim Faults or...

Reviews: