


Network Requirements
Savant requires the use of business class/commercial grade network
equipment throughout the network to ensure the reliability of
communication between devices. These higher quality components
also allow for more accurate troubleshooting when needed.
Connect all Savant devices to the same local area network (LAN) or
subnet as the host. Savant recommends not implementing any type of
tra
ffi
c or packet shaping in your network topology for the Savant
devices as this may interfere with performance.
Network Configuration
To ensure that the IP Address will not change due to a power outage, a
static IP Address or DHCP reservation should be configured. Savant
recommends using DHCP reservation within the router. By using this
method, static IP Addresses for all devices can be managed from a
single UI avoiding the need to access devices individually.
Setting DHCP reservation varies from router to router. Refer to the
documentation for the router on how to configure DHCP reservation.
Network Changes
After connecting to a new network, changing routers, or if the IP
Address range is changed in the current router, Savant recommends
the following steps to refresh any IP connection and ensure that the
controller is communicating with the network correctly.
To refresh the IP connection, perform one of the following steps:
•
Cycle Power
1.
Disconnect the controller from the AC power source.
2.
Wait 15 seconds and then reconnect.
•
Hot Plug the Ethernet (LAN) Connection
1.
Disconnect the Ethernet (LAN) connection from the controller.
2.
Wait 15 seconds and then reconnect.
•
Restore System Defaults
See
Restoring System Defaults
.
Restoring System Defaults
The following procedure will set the SSP-0600 network settings to the
factory default of DHCP. Any static IP Address that has been set will
be lost and will need to be reset.
1.
Power
O
ff
the SSP-0600 using the rear power switch.
2.
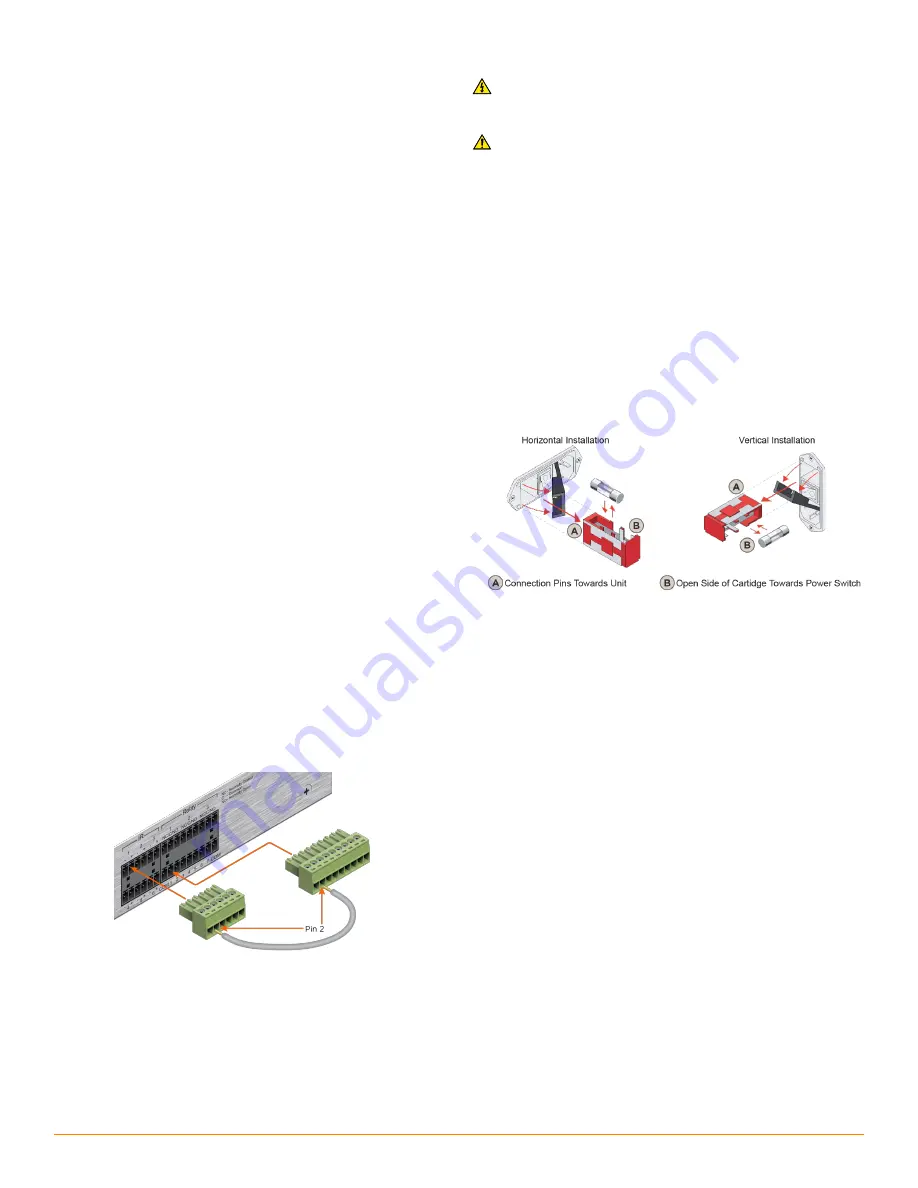
Using a jumper wire (for example, a strand from a Cat 5 cable),
connect IR 1+ to GPIO 1 (pin 2 on their respective connectors).
Note:
Remove any wire that is currently in pin 2, connect only the
jumper wire during the restore process.
3.
Insert the connectors into their respective jacks on the rear of the
SSP-0600.
4.
Power
On
the SSP-0600 using the rear power switch.
5.
The
Status
LED will blink green briefly while the firmware clears the
network settings.
6.
Remove the jumper wire from the connectors.
7.
The system will reboot and come back up.
•
If an IP address was received from the DHCP server, the status
LED will blink
Green
.
•
If a self-assigned IP Address is set, the status LED will blink
Amber
.
8.
Use
rpmembscanner
to confirm that an IP Address has been received
or to set a static IP Address.
Checking and Replacing the Fuse
ELECTRIC SHOCK HAZARD:
Disconnect the unit from AC power by removing the power cord
from the AC outlet and the unit before replacing the fuse.
IMPORTANT:
The orientation of the cartridge within the unit and location of the
fuse within the cartridge are crucial to proper operation. Make
note of the orientation of the cartridge and the fuse location
within the cartridge before removing.
1.
Disconnect the unit from AC power by removing the power cord.
2.
Open the fuse cover on the AC power input using a flat head
screwdriver or similar thin flat head tool. This will allow access to the
fuse cartridge.
3.
Using a flat head screwdriver or similar thin flat head tool, gently
loosen the cartridge and pull the cartridge out of the unit slowly. As
the cartridge is removed, make note of the orientation as it is
important to proper operation.
Tip:
Mark the chassis and fuse holder with a marker in order to align when
replacing.
4.
Remove the old fuse from the cartridge and discard.
5.
Gently place the new fuse in the cartridge and place the cartridge
part way into the receptacle aligning it as defined in the diagram.
6.
Gently press on the cartridge the rest of the way until it seats into the
terminals at the rear of the slot.
Note:
If any resistance is encountered during seating the cartridge, DO NOT
apply more pressure. Stop pressing on the cartridge, remove it, verify the
orientation, and repeat step.
Additional Information
Refer to the following documents located on the
Savant Community
for additional information.
•
SmartMediaPro (SSP-1200, 1200R, SSP-0600) Deployment Guide
SSP-0600-00 | 009-0404-05 | 150318
SSP-0600-00 | 009-0404-05 | 150318
45 Perseverance Way, Hyannis, MA 02601
Copyright © 2015 Savant Systems, LLC
4 of 4
savant.com
| 508.683.2500


