background image

CS-9018


O

PERATOR

G

UIDE


54


CS-9018 Operator’s Guide


6.2. K

EYBOARD 

O

VERLAYS


Summary of Contents for CS-9018

Page 1: ...CS 9018 Cutter Stacker Operator s Guide Part No 9386295 01 February 2021...

Page 2: ...Inside front cover...

Page 3: ...n February 12 2007 rev 01 The material in this Guide is for informational purposes only and is subject to change without notice SATO America LLC SATO assumes no responsibility for any errors that may...

Page 4: ...THIS PAGE INTENTIONALLY LEFT BLANK...

Page 5: ...COVER FROM AN EMERGENCY STOP 25 2 7 RESTARTING AFTER A NO USE SHUT DOWN 26 2 8 END OF FORMS 26 2 9 IF YOUR UNIT HAS LOOP CONTROL 26 2 10 CHANGING SETTINGS WHILE RUNNING 27 2 10 1 CUT REGISTRATION 8 AN...

Page 6: ...LENGTH REFERENCE TABLE 40 3 6 INCHES FRACTION CONVERSION TABLE 41 4 TROUBLESHOOTING 43 4 1 CLEARING A JAM 43 4 1 1 TICKETS WILL JAM AT THE SLITTER CARTRIDGE ASSEMBLY IF 43 4 1 2 TICKETS WILL JAM AT TH...

Page 7: ...the user s premises For transport to other premises or for return shipment the machines must be packed and provided with the same markings Meanings of Symbols The following symbols and designations a...

Page 8: ...cord extension cord or plug is damaged Liquid has been spilled or an object has fallen into the product The product has been exposed to water The product has been dropped or damaged in any way There a...

Page 9: ...es To prevent access to areas containing hazardous energy levels and mechanical parts in movements this product has enclosures and safety covers The closure of the covers is detected by switches All t...

Page 10: ...ted on continuous forms generally with 3 to 17 tickets running horizontally across the width of the form The cutter stacker will slit and cut tickets precisely to any length and width in the specified...

Page 11: ...conveyor Assuming the forms were printed on a SATO laser printer special separator tickets will be easily visible between batches simplifying the job of separating the batches when you remove the tic...

Page 12: ...ssing cuts a single row of tickets Pressing will also align the forms with the oscillating knife when forms are first loaded After the vacuum is ready approximately 5 seconds and the forms have been a...

Page 13: ...pter 3 3 2 When the sign is flashing a password has been entered successfully see chapter 2 11 1 5 ft m is the rate in feet per minute the forms are being processed 6 Ct h is the number of cuts per ho...

Page 14: ...e ticket counter This is non resettable unless the RAM is drained The number next to it is a resettable counter This counter is reset by pressing and holding RESET while pressing 1 and then 2 Counts d...

Page 15: ...width Moving both tractors left right slightly however will allow for the fine registration of the forms with the slitter knives On the left tractor there is an optical sensor that detects both the l...

Page 16: ...just the right tractor to compensate for form width changes WARNING USE EXTREME CAUTION IN THIS AREA THE SLITTERS ARE EXTREMELY SHARP SLITTING GUIDE REMOVED Each assembly is factory set for a specific...

Page 17: ...ed through the keyboard during setup see Chapter 3 3 5 Cut Length There are no mechanical adjustments required for this assembly Occasionally it may be necessary to remove the blade cartridge to help...

Page 18: ...or should be made when the tickets are not landing perpendicular to the green belt This will help the stacking performance A stacking conveyor carries the tickets away and will stop when the stack rea...

Page 19: ...programmed through the setup feature Chapter 3 3 8 Vacuum explains how to do this The vacuum filter can be accessed through the side cabinet door on the operator side and should be changed periodicall...

Page 20: ...CS 9018 OPERATOR S GUIDE 20 pn 9386295 01 THIS PAGE INTENTIONALLY LEFT BLANK...

Page 21: ...been setup already For information on how to setup a job refer to Chapter 3 Job Setup Read the Changing Jobs section shown later in this chapter first if the CS 9018 hasn t been setup to run the curre...

Page 22: ...sen the right tractor knob and adjust the right tractor position so the form paper holes are centered on the sprockets Lock the knob Avoid having the paper too tight loose between the tractors Close t...

Page 23: ...essing can not begin until this occurs Press again Note The form will reverse direction to find the leading edge of the sheet and then advance to the edge of the oscillating knife blade This sets the...

Page 24: ...stacker Press and to resume 2 5 RESTARTING AFTER GROUP SIZE HAS BEEN MET CS 9018 automatically stops after a pre defined group size has been met The counter on the display will display XXXXX where the...

Page 25: ...should not be stopped by lifting a cover except in an emergency Lifting a cover will require the reloading of forms Close the cover Press and refer to Chapter 2 1 for further instructions 2 6 2 To rec...

Page 26: ...splayed on the screen 2 9 IF YOUR UNIT HAS LOOP CONTROL Loop Control is an option that is used to coordinate the flow of forms from a form feeding device such as a printer to the CS 9018 Without this...

Page 27: ...the job setup Refer to Chapter 3 for information on how to lock in changes 2 10 1 Cut Registration 8 and 9 Use to fine adjust the oscillating blade cross cut to the perf line Pressing the 8 key while...

Page 28: ...speed Press the key to increase the Tractor speed To make this adjustment permanent for this job refer to Chapter 3 3 2 Tractor Speed 2 10 5 Tighten Loosen Stack or Run Stacking Conveyor 1 and 4 Pres...

Page 29: ...lect a different job Press and hold the current job number will appear Job Num 01 Release the key Press to scroll through and select one of the available jobs See Chapter 3 Job Setup for instructions...

Page 30: ...Adjust the rear deflector plate if necessary The top of the rear deflector plate is normally set flush with the top plate of the oscillating blade cartridge assembly as shown below For longer wider ti...

Page 31: ...the ticket width adjustment knob until the correct width of the ticket appears in the window NOTE The vertical position of the stacker should be set so that there is approximately 1 16 1 6 mm between...

Page 32: ...securing screws counter clockwise far enough to rotate the slitter cartridge locks 90 Lift the slitter cartridge out by placing your hands at the outer ends of the slitter cartridge being very carefu...

Page 33: ...ul tool in the event of a loss of machine memory 3 1 ENTERING THE OPERATOR SETUP SCREENS Press the key Enter Password 12345 for Operator Mode Press again to set the password Press and hold the current...

Page 34: ...etting for any screen 3 3 1 Description Enter a description for a job by scrolling though the numeric keypad to select the desired character see chart below and pressing the key Job descriptions may h...

Page 35: ...1 8 will give the best results Press the key to go to the next parameter 3 3 4 Paper load offset Use this setting when using the chip removal feature When paper is first loaded it will advance past t...

Page 36: ...ssary to program additional Cut Lengths The Cut Length for the chip removal must be the last length programmed An additional Cut Length must be programmed for each ticket between the perforations Exam...

Page 37: ...am in CUT LENGTH 01 for the length of the ticket NOTE THERE IS NO CUT LENGTH 05 IN THIS EXAMPLE AFTER THE CHIP THE CYCLE STARTS OVER WITH CUT LENGTH 01 NOTE PAPER LOAD OFFSET AT THE START OF FORM IS S...

Page 38: ...s once a predefined number of tickets has been reached Entering a multiple of number of tickets across works best Enter the desired number of tickets to run before shutdown group size Press the key to...

Page 39: ...rovided in the following chart and while running fine tune from there by pressing 2 to create a tighter stack or 3 to loosen the stack Once you have determined the ideal conveyor speed displayed as St...

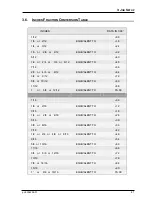
Page 40: ...48 2 9 16 2 563 02 54 2 5 8 2 625 02 60 2 11 16 2 688 02 66 2 3 4 2 750 02 72 2 13 16 2 813 02 78 2 7 8 2 875 02 84 2 15 16 2 938 02 90 3 3 000 03 00 3 1 16 3 063 03 06 3 1 8 3 125 03 12 3 3 16 3 188...

Page 41: ...2 EQUIVALENT TO 64 3 4 or 9 12 72 5 6 or 10 12 EQUIVALENT TO 80 11 12 88 1 or 6 6 or 12 12 EQUIVALENT TO 01 00 1 16 06 1 8 or 2 16 EQUIVALENT TO 12 3 16 18 1 4 or 2 8 or 4 16 EQUIVALENT TO 24 5 16 30...

Page 42: ...CS 9018 OPERATOR S GUIDE 42 CS 9018 Operator s Guide THIS PAGE INTENTIONALLY LEFT BLANK...

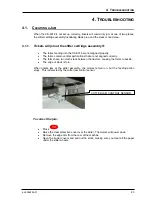
Page 43: ...tical perforations that are not aligned correctly The forms have too much slack between the tractors causing the forms to buckle The edge of stock is torn When tickets jam at the slitter assembly the...

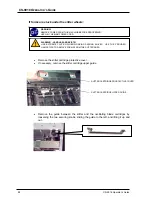
Page 44: ...slitter and the oscillating blade cartridges by loosening the two securing knobs sliding the guide to the left and lifting it up and out WARNING REMOVE POWER FROM THIS MACHINE BEFORE PROCEEDING UNPLUG...

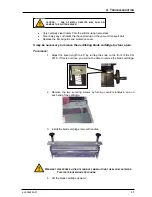
Page 45: ...ove 1 Adjust the ticket length to 4 5 by turning the knob on the front of the CS 9018 If this is not done you will not be able to remove the blade cartridge 2 Remove the two securing screws by turning...

Page 46: ...rt belt is not tracking properly When tickets jam in the hood the stacker sensor will detect the problem and stop the motors An error message STACKER JAM will alert you to the problem To correct the j...

Page 47: ...instructions NOTE Pressing will cause the unit to complete the current cycle before shutting down Similarly a stacker jam or stacker full condition will allow the unit to complete the current cycle Wh...

Page 48: ...de Bad information on display 1 Unknown reason for lockup or bad information 1 Power CS 9018 off and back on No Loop Not Ready on display 1 Check Setup 1 Check and adjust form loop 2 Is cutter off lin...

Page 49: ...e current job 2 There are no cut lengths above programmed 1 Review job settings 2 At least one cut length must be greater than A019 PAPER LOAD ERROR time out CHECK PAPER POSITION and LOAD SENSOR 1 Pap...

Page 50: ...form A046 STACKER COVER OPEN CLOSE and START AGAIN 1 Stacker cover open 1 Close cover A048 CUTTER COVER OPEN CLOSE AND START AGAIN 1 Cutter safety cover open 1 Close the cover A049 EMERGENCY STOP REMO...

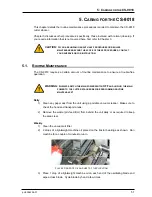
Page 51: ...utine maintenance to ensure a trouble free operation WARNING ALWAYS SWITCH THE MAIN POWER SWITCH OFF AND UNPLUG THE MAIN POWER TO THE CUTTER STACKER BEFORE PERFORMING ROUTINE MAINTENANCE Daily 1 Clean...

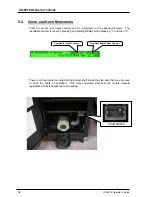
Page 52: ...settable counter is reset by pressing and holding RESET while pressing 1 and then 2 There is an hour meter mounted on the bottom shelf inside the side door that may be used to track the hours of opera...

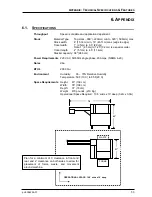
Page 53: ...5 11 4cm Stacker capacity 38 96 5cm Power Requirements 220 VAC 50 60Hz single phase 20 Amps NEMA 6 20 Noise dba BTU s 2000 btu Environment Humidity 35 70 Relative Humidity Temperature 50 F 10 C to 85...

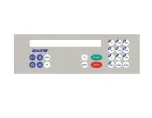
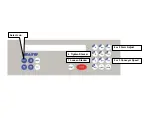
Page 54: ...CS 9018 OPERATOR S GUIDE 54 CS 9018 Operator s Guide 6 2 KEYBOARD OVERLAYS...

Page 55: ...Job Selected Tickets processed since last group completed Target Group Size Tractor Speed Vacuum Setting Stacking Conveyor Speed Tractor Speed form speed in feet per minute Number of Cuts per Hour...

Page 56: ...8 or 9 Cut Registration 5 or 6 Vacuum Adjust 2 or 3 Conveyor Speed or Form Feed Speed 7 Cycle Oscillating Blade JOB SETUP PASSWORDS PARAMETERS DIAGNOSTICS 1 Loosen Run Stacker 4 Tighten Stacker...

Page 57: ......

Page 58: ...8 or 9 Form Adjust 2 or 3 Conveyor Speed 1 Loosen Stacker 4 Tighten Stacker Select Job...

Page 59: ...6 3 JOB SETUP SHEET JOB DESCRIPTION TRAC SPEED STRP PAPER LOAD CUT 1 CUT 2 CUT 3 CUT 4 CUT 5 TCK GROUP SIZE VAC CONV STEP...

Page 60: ...CS 9018 Operator s Guide THIS PAGE INTENTIONALLY LEFT BLANK...

Page 61: ...Inside back cover...

Page 62: ...CS 9018 Cutter Stacker Operator s Guide Part No 9386295 01 Ver A February 2021 www satoamerica com...

Reviews: