background image

Menu Settings

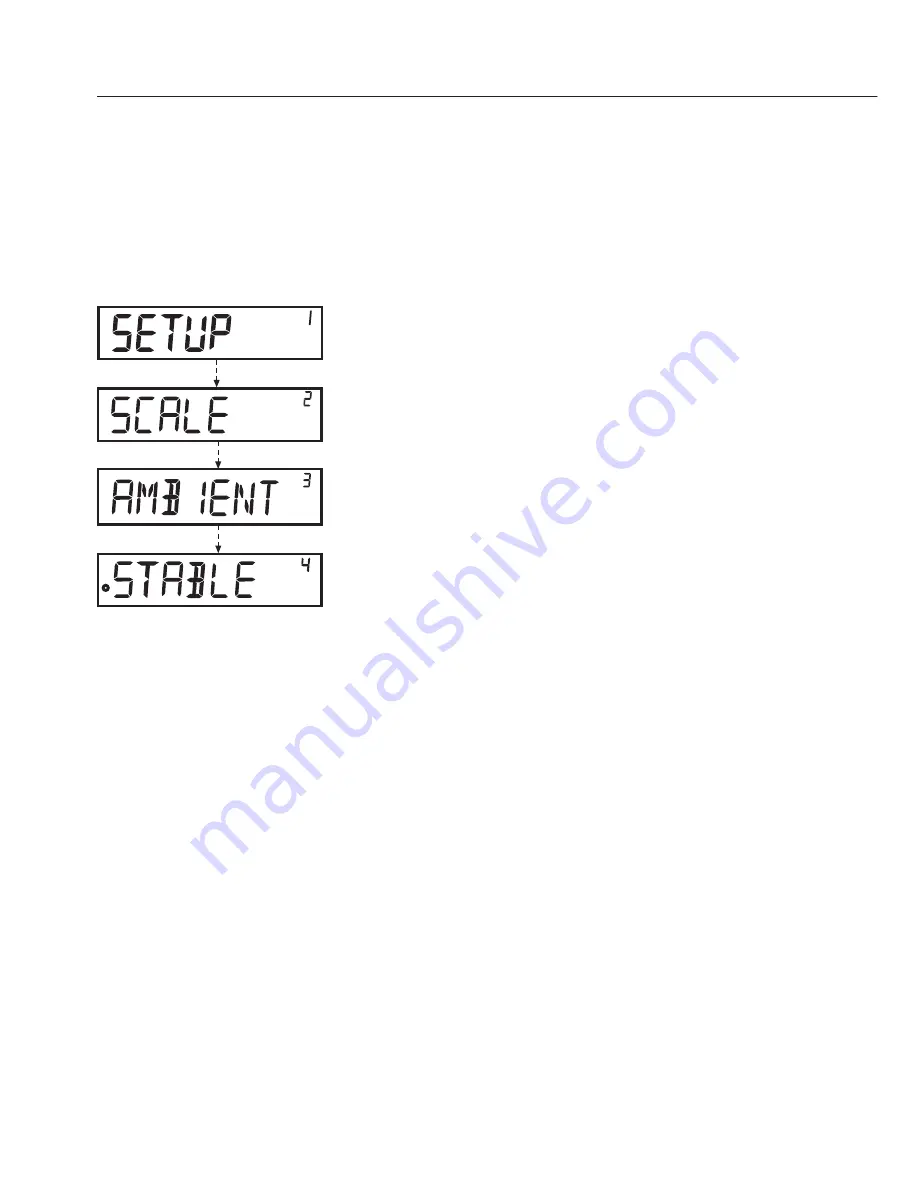
  Navigating the SETUP Menu

 Example:

  Menu Item: Adaptation to ambient conditions 

§

  Hold down the 

L

 key [ENTER] for approx. 2 sec.  

“SETUP” will appear on the display (Level 1). 

Use the 

RS

 keys to select the desired menu item  

in the first level. 

§

  Press the 

L

 key [ENTER] to select the second level  

(Level 2).

§

  Use the 

RS

 keys to select the desired menu item  

in the second level.

§

  Press the 

L

 key [ENTER] to select the third level 

(Level 3).  

The menu items in the third level (Level 3) will be 

displayed  

Use the 

RS

 keys to select the desired menu item.

§

  Press the 

L

 key [ENTER] to select the fourth level  

(Level 4). 

§

  Call up the menu item desired in the fourth level.  

Use the 

RS

 keys to select the desired menu item.

  (We have come to the end of our example.)

§

  Press the 

L

 key [ENTER]. “o” will appear.  

The new code is stored. 

§


Press the 

c

 key (Clear) several times to exit the 

menu.

Note:

To obtain a detailed list of the menu codes, please 

ask your nearest Sartorius office.

14

Summary of Contents for PMA 7501-X

Page 1: ...98648 014 43 Installation Instructions Sartorius PMA Quality PMA 7501 X PMA 7501 X00V1 PMA 7501 X00W Electronic Paint mixing Scales for Zone 1...

Page 2: ...ng applications 8 c key Clear and REC key for paint mixing applications 9 L key ENTER and MEM key for paint mixing applications 10 Display 11 Weighing pan 12 Interfaces D Sub plug 9 contact 13 Connect...

Page 3: ...rk on the equipment The standards regulations occupational safety requirements and environmental protection laws valid in your country must be observed It is important that all personnel using the equ...

Page 4: ...mitted The bore hole is marked by a ground symbol If a bore hole is provided use a stainless steel screw and nut to connect the grounding conductor The wire used for the ground ing conductor should ha...

Page 5: ...nd EN 60529 The casing on all connecting cables as well as the casing on wires inside the equipment housing is made of PVC The casing of the power cable is made of rubber Do not expose the scale to ag...

Page 6: ...shipment Equipment Supplied Scale Weighing pan Power supply Setting Up the Scale Choose a suitable place to set up the scale Avoid exposure to drafts heat moisture and vibration Make sure to read the...

Page 7: ...tomer Service for information on the legal regulations applicable in your country Use only genuine Sartorius power supplies The use of power supplies from other manufacturers even if these units have...

Page 8: ...nents until the desired weight of your formula is reached Remove the filled paint can from the weighing pan Never use a hammer to close the lid of a paint can while it is still on the weighing pan Oth...

Page 9: ...symbol appears in this case g Pour in additional components until the desired weight of your formula is reached Remove the filled paint can from the weighing pan Important Note If you zero the displa...

Page 10: ...rtant Note The flashing arrow n on the display means that the weight value shown is not verified for use in legal metrology not legal for trade Example As you pour in the components of your formula th...

Page 11: ...S key 4 When you then press the L key MEM 9 the scale will automatically calculate and display the amounts of paint in g to add for each of the other components that you already poured in This mode t...

Page 12: ...es to correct the value to 200 0 g 10 Press the L key MEM 9 COR 01 11 1 Add the first component C1 is displayed 1 5 g 12 Pour in paint until 0 0 g is displayed 0 0 g 13 Press the L key MEM 9 COR 02 14...

Page 13: ...r connection to AC power and before each calibration adjustment allow the scale to warm up for approx 30 min Hold down the U key 5 for 2 sec When 5000 is displayed release the key Center the calibrati...

Page 14: ...l Press the L key ENTER to select the third level Level 3 The menu items in the third level Level 3 will be displayed Use the RS keys to select the desired menu item Press the L key ENTER to select th...

Page 15: ...evel 1 Level 2 Level 3 Level 4 SETUP Press the L key ENTER APPLICATION RS keys select APPLICATION L key press ENTER Program RS keys select PROGRAM WIEIGH L key ENTER o TOGGLE RS keys select TOGGLE Pre...

Page 16: ...enting further weighing operations The LOCK function is configured in the EXTRAS menu Level 1 Level 2 Level 3 Level 4 SETUP Press the L key ENTER EXTRAS RS keys select EXTRAS Press the L key ENTER LOC...

Page 17: ...W will automatically appear You can now enter a new password or confirm each blinking dash by pressing the L key ENTER Blank spaces are then displayed Level 1 Level 2 Level 3 Level 4 INPUT RS keys sel...

Page 18: ...t first be entered Level 1 Level 2 Level 3 Level 4 SETUP Press the L key ENTER RESET RS keys select RESET Press the L key ENTER MENU RS keys select MENU Press the L key ENTER YES Use the RS keys to se...

Page 19: ...a changes constantly Too much vibration or Access the menu to select the scale is exposed to draft the appropriate code to adapt the scale to the particular weighing environment refer to Menu Settings...

Page 20: ...longer ensured when There is visible damage to the power supply The equipment no longer functions properly The equipment has been stored for a relatively long period under unfavorable conditions The...

Page 21: ...information about disposal and recycling options please contact your local service staff The partners listed on the following website can be used for disposals within the EU 1 Go to http www sartorius...

Page 22: ...3 3 Calibration weight kg 5 class F2 or better Power consumption VA Average 8 maximum 16 Interface RS 232C Format 7 bit ASCII 1 start bit 1 or 2 stop bits Parity Even odd or no parity Transmission rat...

Page 23: ...23 Accessories Order no In use dust cover YDC01PMA EX power supplies EC 609308 011 UK 609308 211 USA CDN 609308 61...

Page 24: ...24...

Page 25: ...25...

Page 26: ...26...

Page 27: ...27...

Page 28: ...28...

Page 29: ...29...

Page 30: ...30...

Page 31: ...31...

Page 32: ...ductor 230 Vac Vo 12 6 V Io 230 mA Po 2 9 W Co 575 nF Lo 420 H 230 Vac 100 240 Vac Vi 8 7 V Ii 185 mA Pi 1 61 W Ci 5 6 F Li 0 Vo 8 7 V Io 185 mA Po 1 61 W Co 10 F for IIB Lo 5 H for IIB Sartorius cabl...

Page 33: ...01 Y 1 Vo 11 8 V 2 Vi 12 6 V 2 23 6V 3 25 2 V 3 Io 123 mA Ii 131mA Po 361 mW Pi any Co 1 5 F 2 Ci 0 5 nF 129nF 3 Lo 2 mH Li 0 8 H Lo Ro 98 H ohm 2 98 H ohm 3 YDI05 Z Interface converter II 2 GD EEx ib...

Page 34: ...Ex link box max length 100m RS 232 data output port1 Vi 12 6 V Vo 12 0 V Ii 132 mA Io 128 mA Pi 412 mW Po 376 mW Ci 2 nF Co 9 F Li 0 Lo 50 mH RS 232 data output port1 Vi 12 6 V 2 Vo 12 0 V 2 25 2 V 3...

Page 35: ...35...

Page 36: ...36...

Page 37: ...37...

Page 38: ......

Page 39: ......

Page 40: ...y means without the prior written permission of Sartorius The status of the information specifications and illustrations in this manual is indicated by the date given below Sartorius reserves the righ...

Reviews: