English
- 9 -
Using Digital Multimedia
Connectors
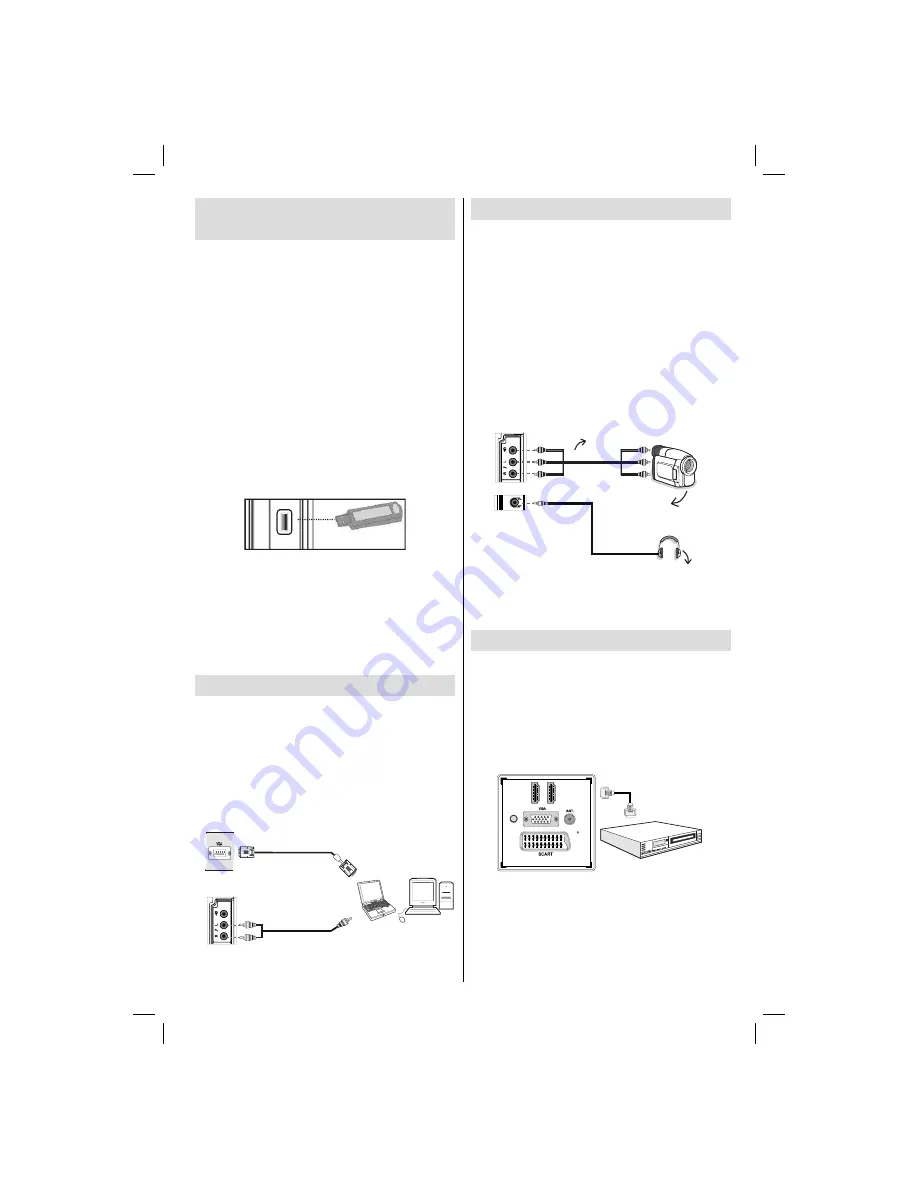
You can connect USB devices to your TV by using
•
the USB input of the TV. This feature allows you to
display/play JPG, MP3 and video
fi
les stored in a
USB stick.
It is possible that certain types of USB devices (e.g.
•
MP3 Players) may not be compatible with this TV.
You may back up your
fi
les before making any
•
connections to the TV set in order to avoid any
possible data loss. Note that manufacturer will not
be responsible for any
fi
le damage or data loss.
Do not pull out USB module while playing a
fi
le.
•
CAUTION: Quickly plugging and unplugging USB
devices, is a very hazardous operation. Especially,
do not repeatedly quickly plug and unplug the
drive. This may cause physical damage to the USB
player and especially the USB device itself.
SIDE VIEW USB MEMORY
5Vdc
Max:500mA
USB
USB Memory Connection
IMPORTANT: The TV should be switched off while
plugging or unplugging a USB device.
Plug your
USB devices to the USB input of the TV. You can
connect a usb device to your TV by using the USB
input of the TV.
Note: It is possible certain types of hard disk drives
are not supported.
Connecting the LCD TV to a PC
For displaying your computer’s screen image on your
LCD TV, you can connect your computer to the TV set.
Power off both computer and display before making
any connections. Use 15-pin D-sub display cable to
connect a PC to the LCD TV. When the connection
is made, switch to PC source. See “Input selection”
section. Set the resolution that suits your viewing
requirements. Resolution information can be found
in the appendix parts.
PC Input
(back)
Side AV Input
PC VGA Cable
(Not supplied)
PC Audio Cable
(Not supplied)
Or
Using Side AV Connectors
You can connect a range of optional equipment to your
LCD TV using side connectors of the TV.
For connecting a camcorder or camera , you should
•
use
AV
socket (side). To do this, you must use the
supplied
video/audio connection cable
. First, plug
single jack of the cable to the TV’s
AV IN
socket
(side). Afterwards, insert your camera cable’s (
not
supplied
) connectors into the plural part of the
video/
audio connection cable
. Colours of the connected
jacks should match. See illustration below.
Afterwards, you should switch to
•
Side AV
source. See
the section
Input selection
in the following sections
for more information.
Camera
AVCable
(notsupplied)
Headphone
To listen the TV sound from headphones, you
•
should connect headphones to your TV by using the
HEADPHONE
jack as illustrated above.
Connecting to a DVD Player via HDMI
Please refer to your DVD player’s instruction book
for additional information. Power off both the TV and
the device before making any connections.
Note: Not all cables shown in the illustration are
supplied.
If your DVD player has an
•
HDMI
socket, you can
connect via
HDMI
for better video and audio quality.
HDMI
1
DM
HI
2
SPDIF
Coax.OUT
External device
(not
supplied)
HDMI Cable
When you connect to DVD player as illustrated above,
•
switch to the connected
HDMI
source. See,
Input
Selection
section for more information on changing
sources.
01_MB60_[GB]_3902UK_IDTV_NICKEL16_26843W_10073039_50189445.indd 9
01_MB60_[GB]_3902UK_IDTV_NICKEL16_26843W_10073039_50189445.indd 9
03.05.2011 09:06:57
03.05.2011 09:06:57
Summary of Contents for Walker WP26F11LCD
Page 32: ...50189858 ...


