4
Model Number
Window Type
Trim Ring Color
VSE-6300DSB
Dome, Smoked
Black
VSE-6300DSW
Dome, Smoked
White
VSE-6300FSB
Flat, Smoked
Black
VSE-6300FSW
Flat, Smoked
White
Model Number
Maximum Camera and Lens
Weight
VSE-6300DSB
7.5 L x 3.0 W x 3.0 H in
(190 x 76 x 76 mm)
~2 lbs. (0.9 kg)
VSE-6300DSW
7.5 L x 3.0 W x 3.0 H in
(190 x 76 x 76 mm)
~2 lbs. (0.9 kg)
VSE-6300FSB
5.2L x 3.0W x 3.0H in
(132 x 76 x 76mm)
~2 lbs. (0.9 kg)
VSE-6300FSW
5.2L x 3.0W x 3.0H in
(132 x 76 x 76mm)
~2 lbs. (0.9 kg)
Note: A right angle BNC is recommended
Camera Mounting:
A two-arm camera support bracket, adjustable forward and
backward, is included with each unit.
Window: Lightly tinted acrylic.
Construction: Housing is constructed of aluminum. The
lower domed window has a silk-screened window with a
lightly tinted viewing area. The lower flat window is lightly
tinted with no silk screened areas.
MECHANICAL SPECIFICATIONS
4
INSTALLATION
Attention: Installation should be performed by quali-
fied service personnel only, in accordance with the
National Electrical Code or applicable local codes.
Refer to applicable installation section.
4.1
Suspended Ceiling Mounting
CAUTION:These units must be properly and
securely mounted to a supporting structure capable
of sustaining the unit weight. Use care when selecting
mounting hardware (not supplied) for installation
The mounting surface and unit's weight should be
carefully considered.
Mount the unit in a suspended ceiling grid using the existing
ceiling tile as follows:
1. Remove tile at desired location
2. Move adjacent tiles for access as required.
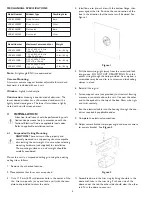
3. Cut a 172 mm (6.75 in) diameter hole in the center of the
tile. Use two pencils (or a pencil and a nail) with the tem-
plate tool provided to draw the circle.
Figure 1
5. Pull the drawstring tight (away from the screw) and lock
into groove. DO NOT CUT DRAWSTRING Push the
excess string through the hole provided. As an option, a
screwdriver may be used to turn screws and lock ceiling
clamps in place.
6. Reinstall tile in grid.
7. Fasten support wire (not provided) to structural framing,
masonry, or concrete above the unit. Connect the other
end to the eyebolt in the top of the box. Draw wire tight
and twist securely.
8. Run the electrical cable into the housing through the con-
duit as required by applicable codes.
9. Complete the electrical connections.
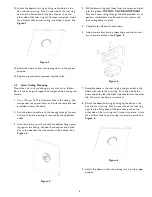
10. Adjust camera bracket to proper angle and mount camera
to camera bracket. See Figure 2.
Figure 2
11. Assemble dome in the trim ring by lining the slots in the
dome with tabs in the trim ring. Push one side of the
dome under the tab; the other side should clear the other
tab. Turn the dome to secure it.
4. Install box into pre-cut tile with the bottom flange, then
press against the tile. Position the round section of the
box in the direction that the camera will be aimed. See
Figure 1.


