– 5 –
1. OPERATING INSTRUCTIONS
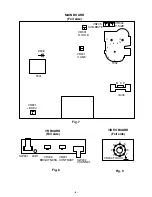
1-1. FRONT PANEL CONTROLS
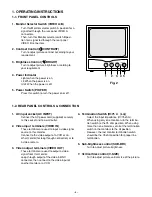
Fig. 2
1. Monitor Selector Switch (VIDEO A/B)
Turn this Monitor selector switch A position for a
signal fed through the rear panel VIDEO A
connectors.
Then, turn this Monitor selector switch B posi-
tion for a signal fed through the rear panel
VIDEO B connectors.
2. Contrast Control ( CONTRAST)
Turn to adjust picture contrast according to your
requirement.
3. Brightness Control ( BRIGHT)
Turn to adjust picture brightness according to
your requirement.
4. Power Indicator
Lights when the power is on.
Lit: When the power is on.
Unlit: When the power is off.
5. Power Switch (POWER)
Press this switch to turn the power on or off.
1-2. REAR PANEL CONTROLS & CONNECTION
1. AC input socket (AC INPUT)
Connect the AC power cord (supplied) securely
to this socket and to a wall outlet.
2. Video input terminals (VIDEO IN)
These terminals are used to input a video signal
source to this monitor.
Connect to the video output of a VCR or an-
other monitor (for loop through connection) or to
a video camera.
3. Video output terminals (VIDEO OUT)
These terminals are used to output a video
signal from this monitor.
Loop-through output of the video in BNC
connector, then connect to the video input of
another monitor or a VCR.
4. Termination Switch (HI/75
Ω
(Lo))
Select the input impedance (HI/75 ohm).
When using only one monitor, turn the termina-
tion switch to the 75 ohm position. When using
more than one monitor, set all of the termination
switch to the monitors to the HI position.
However, the last monitor termination switch
should be the 75 ohm position for proper line
termination.
6. Sub-brightness control (SUB-BRI)
Turn to adjust picture brightness.
7. Vertical Size control (V-SIZE)
Turn to adjust picture vertical size of the picture.
5
4
3
2
1

