10
Need help?
Visit our Web site at
www.sanyoctv.com
or Call
1-800-877-5032
ANALOG AV CONNECTIONS
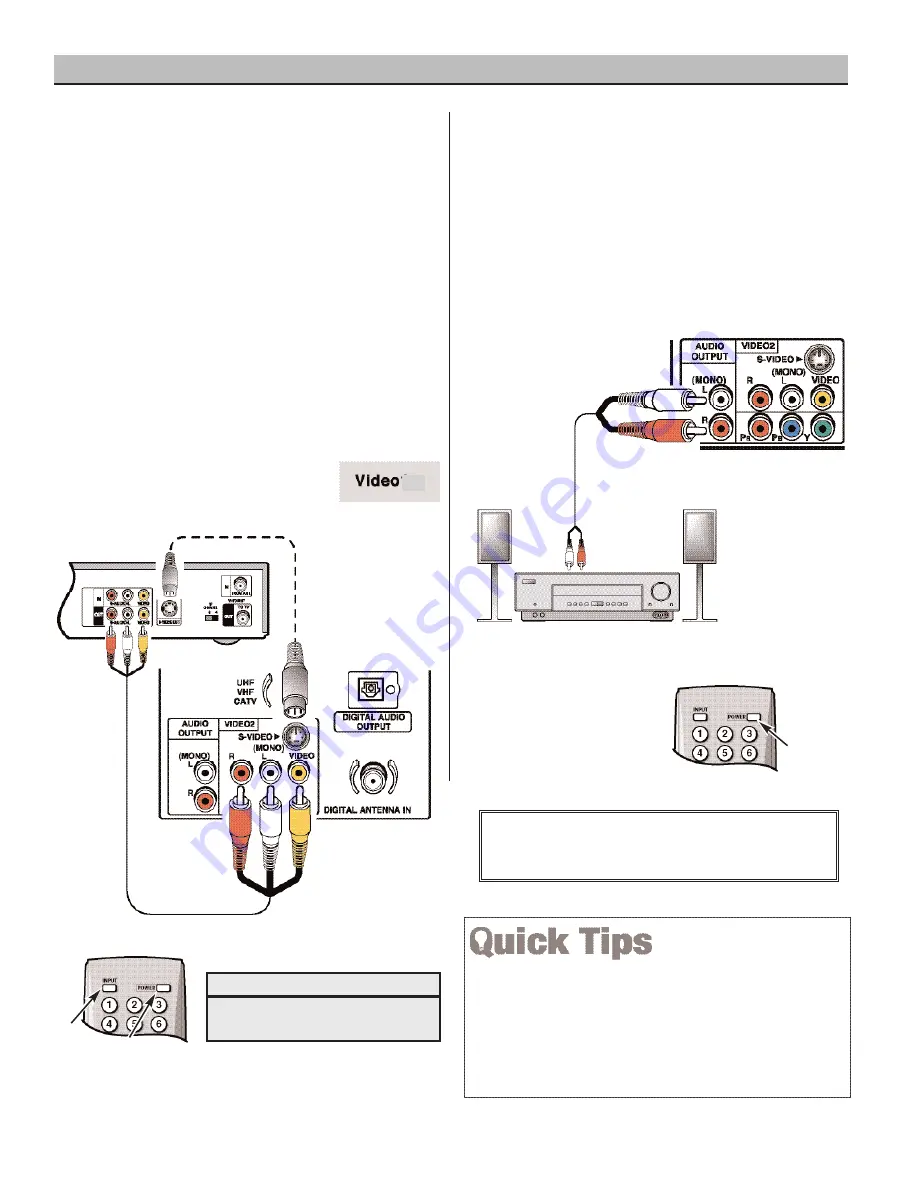
USING THE BACK VIDEO AND AUDIO
INPUT JACKS TO CONNECT A VCR
(OR OTHER ANALOG DEVICE)
Switch off DTV and external equipment before connect-
ing cables.
(Cables are not supplied.)
BACK VIEW
OF VCR
DTV VIDEO2
AV INPUT
JACKS
1
Connect VCR’s Audio Video Out to the DTV’s
VIDEO2 Video In jacks.
NOTE: For Mono VCR (Single Audio Jack), connect VCR
Audio Out to DTV Audio (L) Input.
2
2
Optional
Connect VCR’s S-Video Out to the DTV’s S-Video In
Jack.
NOTE: S-Video jack connection overrides Video jack con-
nection (VIDEO2).
3
Press
POWER
to turn on the DTV, then turn on exter-
nal equipment.
4
Press
INPUT
to select
Video2 to
view the VCR program.
What you will need for connections:
Audio Video Cable – 1
S-Video Cable – 1
S-VIDEO
JACK
2
2
1
REMOTE CONTROL
4
3
2
“No Signal” will appear randomly on the screen when no signal is
detected at the VIDEO2 input jack.
Press the INPUT key after connecting cables to access the AV
inputs. There is NO need to tune to a blank channel.
Position your DTV at least 2 feet from stereo speakers. The magnets
in the speakers may affect the picture quality.
CONNECTING ANALOG AUDIO OUT
JACKS TO A STEREO AMPLIFIER
Switch off DTV and external equipment before connecting
cables.
(Cables are not supplied.)
STEREO AMPLIFIER
BACK VIEW
OF DTV
1
Connect the DTV Audio Out (L / R) to the Stereo
Amplifier In (L / R).
2
Press
POWER
to turn on the DTV, then turn on
external equipment.
NOTE:
Do not
connect external speakers directly to the DTV.
1
REMOTE CONTROL
2
IMPORTANT NOTE FOR MONITOR USE:
If you did not connect an antenna, you
must
run All
Channel Search twice before you can select the AV inputs.


