background image

PARTS NAMES

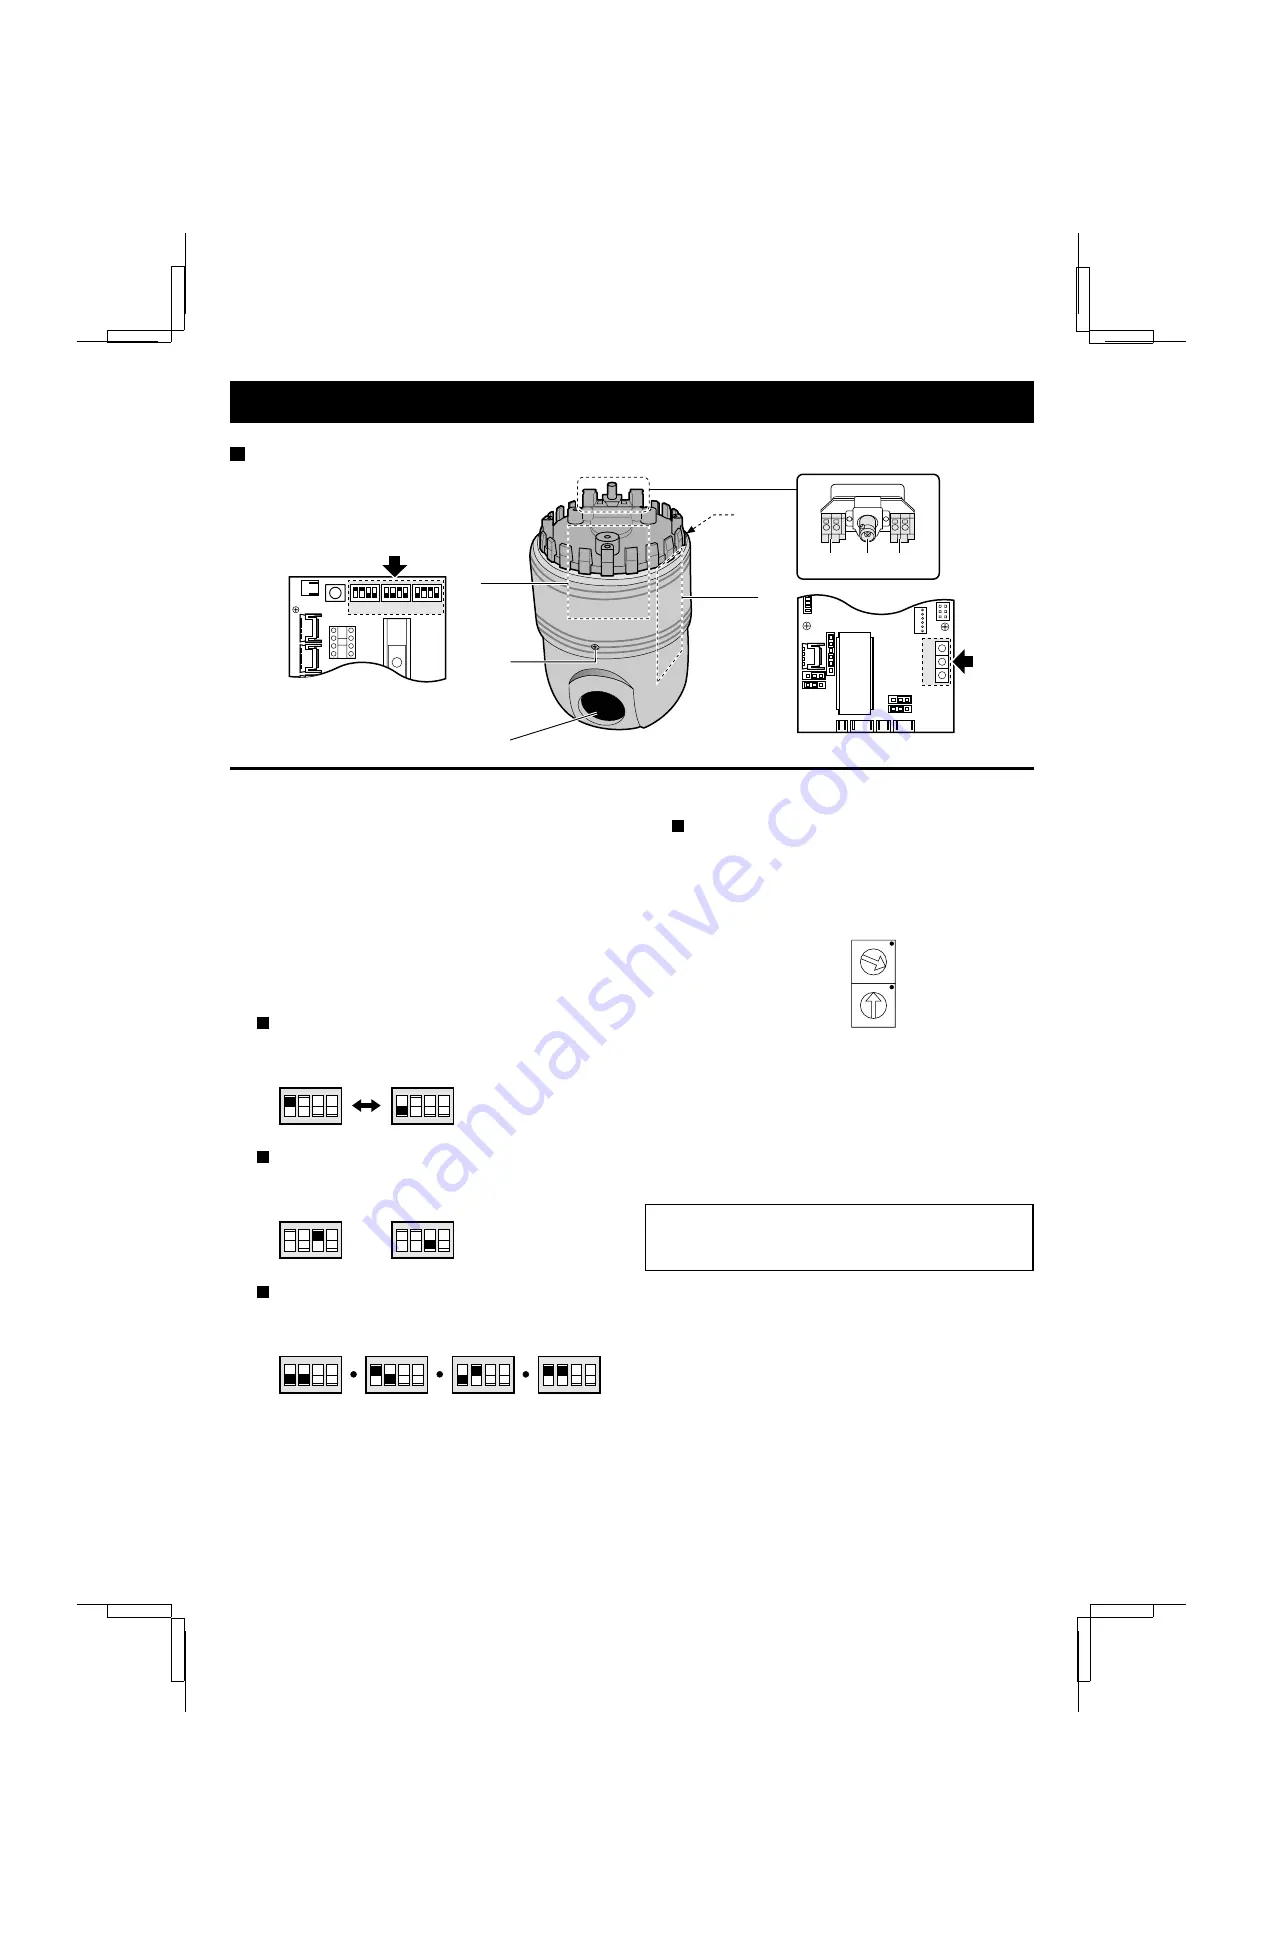
Camera

1

24V AC power input terminals (AC24V)

Connect the camera power input terminals to the power unit
output terminals (AC24V OUT).

2

Video output terminal (BNC connector)

To connect this camera to a device such as a monitor or
timelapse VCR.

3

RS-485 serial signal input terminals (RS485)

Make the connection between the RS-485 terminals of the
camera, power unit, system controller, using twisted-pair
cables or modular cables (sold separately).

4

External sync control circuit board

Termination setting (SW1)
Set the termination ON/OFF using DIP switch No. 1 of
switch SW1. The default setting in : “ON

Sync setting (SW2)
Set the internal sync or line-lock using DIP switch No. 3
of switch SW2. The default setting in : “ON (INT)”

Data transmission speed setting (SW3)
Set the data transmission speed using DIP switch No. 1
and 2 of switch SW3. The default setting in : “19200

5

Control circuit board

Address setting

When using the camera with a power unit, the address
for both must be the same.
Assign the hexadecimal (base 16) address using
switches SW1 and SW2. Address settings are from 1 to
127. Refer to “ADDRESS SETTING TABLE” on page
11, for details. The default setting in : “1

6

Cover attaching screw

Loosen the two screw the remove the cover to access the
external sync control circuit board and address setting
panel. Make sure to turn off the power to the camera before
removing the cover.

7

Lens

Always be sure to turn off the power supply before
changing any of the switch settings on the external sync
control circuit board or the control circuit board.

CN5

SW1

SW2

SW3

RS485

AC24V

A

B

R

N

SW1

SW2

SW3

3

2

1

5

4

6

7

(External sync control circuit board)

(Control circuit board)

6

SW1

(Terminater ON)

1

2

3

4

O

F

F

(Terminater OFF)

1

2

3

4

O

F

F

(Internal sync)

1

2

3

4

O

F

F

SW2

1

2

3

4

O

F

F

SW2

(Line-lock)

SW3

(2400 bps)

1

2

3

4

O

F

F

1

2

3

4

O

F

F

(4800 bps)

1

2

3

4

O

F

F

(9600 bps)

1

2

3

4

O

F

F

(19200 bps)

0 1 2

3

4

5

6

78

9A

B

C

D

E

F

0 1 2

3

4

5

6

78

9A

B

C

D

E

F

SW1

SW2

L53Y4/XE (VCC-9250P GB) 2000. 11. 28

2

Summary of Contents for VCC-9250P

Page 1: ...mera VCC 9250P About this manual Before installing and using this unit please read this manual carefully Be sure to keep it handy for later reference This manual gives basic connections and operating instructions L53Y4 XE VCC 9250P GB 2000 11 28 ...

Page 2: ...quid gets inside the camera disconnect the power cord immediately and consult your dealer or a Sanyo Authorized Service Centre Be careful to protect the camera from rain sea water etc Be careful when handling the unit To prevent damages do not drop the camera or subject it to strong shock or vibration Install away from electric or magnetic fields If installed close to a TV radio transmitter magnet...

Page 3: ...tting When using the camera with a power unit the address for both must be the same Assign the hexadecimal base 16 address using switches SW1 and SW2 Address settings are from 1 to 127 Refer to ADDRESS SETTING TABLE on page 11 for details The default setting in 1 6 Cover attaching screw Loosen the two screw the remove the cover to access the external sync control circuit board and address setting ...

Page 4: ...setting is ON 5 Address Terminate setting switch RS 485 ADDRESS TERMINATE Address setting SW1 to SW7 Set the power unit address See the table on page 12 for details Termination setting SW8 The power unit termination must be set The default setting is all OFF up 6 RS 485 control terminal RS 485 DATA Make the connections between the RS 485 terminals of the camera power unit system controller etc usi...

Page 5: ...at the alarm input terminals the camera will move to its corresponding preset position 8 TERMINATE 12V DC IN POWER ON OFF RS485 GND 1 0 A A B B ADDRESS TERMINATE 1 2 3 RS485 AC24V A B R N RS 485 BAUD RATE RS 485 RS 485 DATA ADDRESS 1 4 1 7 OFF OFF A B A B G ALARM IN 1 2 3 4 5 6 7 8 G POWER AC24V IN AC24V OUT Multiplexer sold separately Timelapse VCR sold separately To signal B To signal A AC 24 IN...

Page 6: ...aisy chain 8 TERMINATE 8 TERMINATE 8 TERMINATE RS 485 BAUD RATE RS 485 RS 485 DATA ADDRESS 1 4 OFF OFF A B A B G ALARM IN 1 2 3 4 5 6 7 8 G POWER AC24V IN AC24V OUT AC 24 INPUT RS 485 BAUD RATE RS 485 RS 485 DATA ADDRESS 1 4 OFF A B A B G ALARM IN 1 2 3 4 5 6 7 8 G POWER AC24V IN AC24V OUT AC 24 INPUT RS 485 BAUD RATE RS 485 RS 485 DATA ADDRESS 1 4 OFF A B A B G ALARM IN 1 2 3 4 5 6 7 8 G POWER AC...

Page 7: ...the camera on a vertical plane to a surveillance position Auto pan function The auto pan function allows you to have the camera move back and forth automatically at a preset speed between the 2 preset camera positions memorised in numbers 7 start position and 8 end position Before this function can be used the auto pan start position No 7 and the auto pan end position No 8 must be preset When the ...

Page 8: ...on White balance adjustment can be carried out to compensate for the type of lighting daylight incandescent lighting etc Depending on the lighting conditions true colours may not always be obtained Zoom function The filming range can be set using the zoom function Wide angle zoom Telephoto zoom Backlight compensation function BLC The backlight compensation is used when the background is bright and...

Page 9: ...d SW2 of the control circuit board The address default setting is 01 Power unit Set the address using switches DIP switches No 1 to 7 of the RS 485 ADDRESS switch System controller Set the address using the ADDRESS DIP switches on the system controller rear panel Note Address settings are from 1 to 127 See the tables on pages 11 and 12 for details on setting the addresses for the camera and the po...

Page 10: ...larm is triggered another alarm will not be received for 5 seconds The default settings are ON 5 sec Displaying the alarm list This is done using DIP switch No 4 of the RS 485 BAUD RATE switch The default setting is ON alarm list displayed if set to OFF the alarm list will not be displayed Power supply synchronization setting L L Make this adjustment if the image on monitor rolls vertically 1 Sele...

Page 11: ... form on metal parts inside the unit and that may cause corrosion and other damages Maintaining safety This camera unit is designed to be used hanging from a ceiling It is therefore very important to ensure safety by carefully reading the mounting bracket instruction manual and making sure it is secure and that there is no risk of the bracket falling down Filming results Ghosting If a light source...

Page 12: ...5 4 1 66 4 2 67 4 3 68 4 4 69 4 5 70 4 6 71 4 7 72 4 8 73 4 9 74 4 A 75 4 B 76 4 C 77 4 D 78 4 E 79 4 F 80 5 0 81 5 1 82 5 2 83 5 3 84 5 4 85 5 5 Address camera number Switch number 86 5 6 87 5 7 88 5 8 89 5 9 90 5 A 91 5 B 92 5 C 93 5 D 94 5 E 95 5 F 96 6 0 97 6 1 98 6 2 99 6 3 100 6 4 101 6 5 102 6 6 103 6 7 104 6 8 105 6 9 106 6 A 107 6 B 108 6 C 109 6 D 110 6 E 111 6 F 112 7 0 113 7 1 114 7 2 ...

Page 13: ...ON 64 ON 65 ON ON 66 ON ON 67 ON ON ON 68 ON ON 69 ON ON ON 70 ON ON ON 71 ON ON ON ON 72 ON ON 73 ON ON ON 74 ON ON ON 75 ON ON ON ON 76 ON ON ON 77 ON ON ON ON 78 ON ON ON ON 79 ON ON ON ON ON 80 ON ON 81 ON ON ON 82 ON ON ON 83 ON ON ON ON 84 ON ON ON 85 ON ON ON ON Address camera number Switch number 86 ON ON ON ON 87 ON ON ON ON ON 88 ON ON ON 89 ON ON ON ON 90 ON ON ON ON 91 ON ON ON ON ON 9...

Page 14: ... 120 s Preset position 1 255 Lens functions Focal length f 5 4 to 64 8 mm X12 zoom Aperture ratio F 1 1 8 wide angle to 1 2 7 telephoto Iris range F1 8 F28 Picture angle Horizontally 48 8 wide angle to 4 3 telephoto Vertically 37 6 wide angle to 3 3 telephoto Minimum distance 10 mm wide angle to 800 mm telephoto Communication method RS 485 operation via SSP Communication speed band rate 2400 4800 ...

Page 15: ...ligations N P FRONT ø105 33 19 6 ø130 ø120 ø125 54 22 5 17 116 5 55 1 5 61 135 196 54 A A Three 10 mm holes for M4 tapping screws are provided B Four 8 mm holes for M3 tapping screws are provided C 17 ventilation holes with diameters of 5 mm are provided B C 184 140 0 3 185 210 180 0 3 4 5 188 2 185 82 L53Y4 XE VCC 9250P GB 2000 11 28 14 ...

Page 16: ...SANYO Electric Co Ltd 1AC6P1P2289 L53Y4 XE 1000KP DSP Printed in Japan L53Y4 XE VCC 9250P GB 2000 11 28 ...

Reviews: