— 4 —
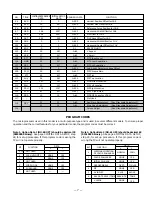
INITIAL BUS DATA SETUP (Cont.)
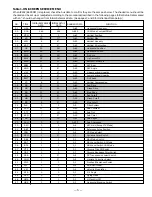
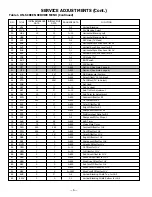
23. Select NO. 33 DCO (Dynamic Color Switch) with
▲
or
▼
key. Adjust the data with + or – key for 0.
24. Select NO. 39 DCR (DC Reset) with
▲
or
▼
key. Adjust the data with + or – key for 3.
25. Select NO. 40 YGM (Y Gamma Correction) with
▲
or
▼
key. Adjust the data with + or – key for 2.
26. Select NO. 51 HBR (H Blanking Right) with
▲
or
▼
key. Adjust the data with + or – key for 0.
27. Select NO. 60 OPT (SA Option 1) with
▲
or
▼
key. Adjust the data with + or – key for 32.
28. Select NO. 61 OP2 (SA Option 2) with
▲
or
▼
key. Adjust the data with + or – key for 82.
29. Select NO. 62 HR (OSD Position) with
▲
or
▼
key. Adjust data with + or – key for 34.
30. Select NO. 63 SCA (Sub Color) with
▲
or
▼
key. Adjust data with + or – key for 2.
31. Select NO. 64 STA (Sub Tint Offset) with
▲
or
▼
key. Adjust the data with + or – key for 254.
32. Select NO. 67 SBT (Sub Tint) with
▲
or
▼
key. Adjust the data with + or – key for 5.
33. Select NO. 68 SBL (Sub Color) with
▲
or
▼
key. Adjust the data with + or – key for 12.
34. Select NO. 70 RTN (Tint Offset for RF) with
▲
or
▼
key. Adjust the data with + or – key for 0.
35. Select NO. 71 RCL (Color Offset for RF) with
▲
or
▼
key. Adjust the data with + or – key for 0.
36. Select NO. 74 PPR (Preshoot/Overshoot Ratio for RF) with
▲
or
▼
key. Adjust the data with + or – key for 1.
37. Select NO. 79 DTN (Tint Offset for YUV) with
▲
or
▼
key. Adjust the data with + or – key for 4.
38. Select NO. 80 DCL (Color Offset for YUV) with
▲
or
▼
key. Adjust the data with + or – key for 16.
39. Select NO. 92 EVB (Vertical Blanking Width Top for 16:9) with
▲
or
▼
key. Adjust the data with + or – key for 2.
40. Select NO. 95 EVA (Vertical Size Offset for 16:9) with
▲
or
▼
key. Adjust the data with + or – key for 22.
41. Select NO. 97 SED (H Width Offset for 16:9) with
▲
or
▼
key. Adjust the data with + or – key for 255.
42. Select NO. 98 SEA (Pin Offset for 16:9) with
▲
or
▼
key. Adjust the data with + or – key for 255.
43. Select NO. 103 VAP (Vertical Aspect) with
▲
or
▼
key. Adjust the data with + or – key for 26.
44. Select NO. 104 VSR (Vertical Scroll) with
▲
or
▼
key. Adjust the data with + or – key for 31.
45. Select NO. 105 ATT (MTS Input Level) with
▲
or
▼
key. Adjust the data with + or – key for 6.
46. Select NO. 106 WDB (MTS Low Separation) with
▲
or
▼
key. Adjust the data with + or – key for 31.
47. Select NO. 107 SPC (MTS Hi Separation) with
▲
or
▼
key. Adjust the data with + or – key for 21.
48. Select NO. 109 PCO (PIP Chroma Gain) with
▲
or
▼
key. Adjust the data with + or – key for 40.
49. Select NO. 110 PTI (PIP Tint) with
▲
or
▼
key. Adjust the data with + or – key for 40.
50. Select NO. 111 PUV (PIP Top Location) with
▲
or
▼
key. Adjust the data with + or – key for 26.
51. Select NO. 113 PLH (PIP Left Location) with
▲
or
▼
key. Adjust the data with + or – key for 13.
52. Select NO. 114 PRH (PIP Right Location) with
▲
or
▼
key. Adjust the data with + or – key for 105.
53. Select NO. 115 PCN (PIP Y Signal Gain) with
▲
or
▼
key. Adjust the data with + or – key for 43.
54. Press the MENU key to turn off the Service Menu display.
SERVICE ADJUSTMENTS (Cont.)


