background image

2

Need help? 

www.sanyoctv.com              

1-800-877-5032

1. Read these instructions.

2. Keep these instructions.

3. Heed all warnings.

4. Follow all instructions.

5. Do not use this apparatus near water.

6. Clean only with dry cloth.

7. Do not block any ventilation openings. Install in 

accordance with the manufacturer’s instructions.

8. Do not install near any heat sources such as radiators,

heat registers, stoves, or other apparatus (including
amplifiers) that produce heat.

9. Do not defeat the safety purpose of the polarized or

grounding-type plug. A polarized plug has two blades with
one wider than the other. A grounding-type plug has two
blades and a third grounding prong. The wide blade or the
third prong are provided for your safety. If the provided
plug does not fit fully into your outlet, consult an electri-
cian for replacement of the obsolete outlet.

10. Protect the power cord from being walked on or

pinched particularly at plugs, convenience receptacles,
and the point where they exit from the apparatus.

11. Only use attachments/accessories specified by the 

manufacturer.

12. Use only with the cart, stand, tripod,

bracket, or table specified by the 
manufacturer, or sold with the appara-
tus. When a cart is used, use caution
when moving the cart/apparatus com-
bination to avoid injury from tip-over.

13.Unplug this apparatus during lightning storms or when

unused for long periods of time.

14. Refer all servicing to qualified service personnel. Servicing

is required when the apparatus has been damaged in any
way, such as power-supply cord or plug is damaged, liquid
has been spilled or objects have fallen into the apparatus,
the apparatus has been exposed to rain or moisture, does
not operate normally, or has been dropped.

15. If an outside antenna is connected to the television

equipment, be sure the antenna system is grounded so
as to provide some protection against voltage surges
and built up static charges. In the U.S. Selection 810-21
of the National Electrical Code provides information with
respect to proper grounding of the mast and supporting
structure, grounding of the lead-in wire to an antenna
discharge unit, size of grounding conductors, location of
antenna discharge unit, connection to grounding elec-
trodes, and requirements for the grounding electrodes.

16. An outside antenna system should not be located in the

vicinity of overhead power lines or other electrical light
or power circuits, or where it can fall into such power
lines or circuits. When installing an outside antenna
system, extreme care should be taken to keep from
touching such power lines or circuits as contact with
them might be fatal.

17. Wall or Ceiling Mounting—The product should be

mounted to a wall or ceiling only as recommended by
the manufacturer.

18. Apparatus shall not be exposed to dripping or splashing

and no objects filled with liquids, such as vases, shall be
placed on the apparatus.

19. Where the Mains plug is used as the disconnect device,

the disconnect device shall remain readily operable.

20. A warning that an apparatus with Class1 construction

shall be connected to a Mains socket outlet with a 
protective earthing connection.

EXAMPLE OF ANTENNA GROUNDING ACCORDING
TO NATIONAL ELECTRICAL CODE, ANSI/NFPA 70

CAUTION

RISK OF ELECTRIC SHOCK   DO NOT OPEN!

CAUTION: TO REDUCE THE RISK OF ELECTRIC SHOCK, DO NOT REMOVE COVER 
(OR BACK). NO USER-SERVICEABLE PARTS INSIDE. REFER SERVICING TO QUALIFIED
SERVICE PERSONNEL.

THIS SYMBOL INDICATES THAT DANGEROUS VOLTAGE CONSTITUTING A
RISK OF ELECTRIC SHOCK IS PRESENT WITHIN THIS UNIT.

THIS SYMBOL INDICATES THAT THERE ARE IMPORTANT OPERATING AND
MAINTENANCE INSTRUCTIONS IN THE LITERATURE ACCOMPANYING THIS
UNIT.

WARNING: TO REDUCE THE RISK OF FIRE OR ELECTRIC SHOCK, DO NOT EXPOSE THIS APPLIANCE
TO RAIN OR MOISTURE.

IMPORTANT SAFETY INSTRUCTIONS

“Note to CATV system installer:
This reminder is provided to call the CATV system installer’s attention to
Article 820-40 of the NEC that provides guidelines for proper grounding
and, in particular, specifies that the cable ground shall be connected to
the grounding system of the building, as close to the point of cable entry
as practical.”

Summary of Contents for DP50741

Page 1: ......

Page 2: ...ode provides information with respect to proper grounding of the mast and supporting structure grounding of the lead in wire to an antenna discharge unit size of grounding conductors location of antenna discharge unit connection to grounding elec trodes and requirements for the grounding electrodes 16 An outside antenna system should not be located in the vicinity of overhead power lines or other ...

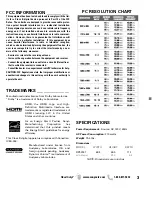
Page 3: ...r Connect the equipment into an outlet on a circuit different from that to which the receiver is connected Consult the dealer or an experienced radio TV technician for help CAUTION FCC Regulations state that improper modifications or unauthorized changes to this unit may void the user s authority to operate the unit As an Energy Star Partner Sanyo Manufacturing Corporation has determined that this...

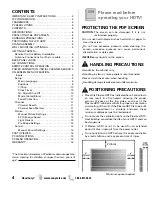
Page 4: ...TION The screen can be damaged if it is not maintained properly Do not use hard objects such as hard cloth or paper to clean the screen Do not use excessive pressure when cleaning the screen excessive pressure can cause permanent discoloration or dark spots NEVER spray liquids on the screen HANDLING PRECAUTIONS Handle by the cabinet only Handling by two or more people is recommended Never touch th...

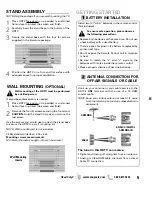
Page 5: ...ries ANTENNA CONNECTION FOR OFF AIR SIGNALS OR CABLE ANTENNA CABLE ANALOG DIGITAL ANTENNA IN BATTERY INSTALLATION NOTE Skip these steps if you are wall mounting the TV 1 Place HDTV face down on a padded or cushioned flat surface to protect the screen and finish 2 Carefully insert the stand base to the bottom of the HDTV 3 Secure the stand base with the four 4 screws supplied in the literature pack...

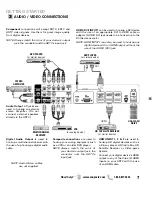
Page 6: ...I INPUT1 INPUT2 and INPUT3 An all digital AV interface that can accept uncom pressed video signals for the very best picture possible NOTE A DVI connection is possible via the HDMI DVI INPUT1 jack using a DVI to HDMI cable or an appropriate adapter and connecting the audio to the AUDIO DVI jack Analog Digital Antenna Input USB Input View pictures stored in a USB flash drive Composite Component NOT...

Page 7: ...og device MULTICHANNEL RECEIVER NOTE Audio Video cables are not supplied HD SATELLITE RECEIVER or similar device DVI HDMI INPUT1 2 3 are used to hookup HD digital devices such as a Blu ray player HD Cable Box HD Satellite Receiver or Video game System Connect your digital device s HDMI output to any of the three 3 HDMI inputs on your HDTV with the use of an HDMI cable DVD PLAYER or similar device ...

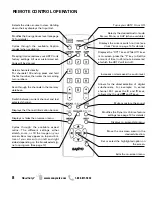
Page 8: ...s and hold the first number then enter the remaining two numbers Scan through the channels in the memory database Increases or decreases the audio level Allows for the direct selection of digital subchannels For example to select channel 39 1 press the 3 and 9 keys followed by the dash and 1 keys Switch between current channel and last selected channel Mute or restore the sound Displays the Channe...

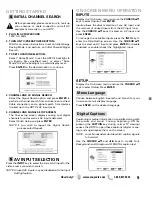
Page 9: ...LECTION Press the INPUT key to select the correct AV input for the video source you wish to watch NOTE Unused AV inputs may be disabled with the Input Setting feature INPUTS ON SCREEN MENU OPERATION Display the On Screen menu and use the CURSOR keys to select Inputs Press ENTER Inputs allows the direct selection of any AV input and the removal of unused inputs from the AV input loop Use the CURSOR...

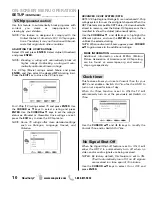
Page 10: ...IP SYSTEM RRT5 RRT5 V Chip Regional Ratings 5 is an advanced V Chip ratings system for over the air digital channels When the HDTV detects compatible RRT5 data it s downloaded stored in memory and the Setup V Chip screen is then modified to show the Adjust Advanced option Use the CURSOR and keys to highlight the different options and use the ENTER key to block or unblock the selected rating NOTE W...

Page 11: ...To help avoid this situation use the Picture Rotation function If an afterimage occurs use the White Pattern feature immediately to repair the panel The more severe the afterimage the longer the curing process may take The default on time for White Pattern is 30 minutes NOTE The sooner you remove a still picture and activate White Pattern the more likely it is that the panel can be repaired Exit t...

Page 12: ...ns PICTURE ON SCREEN MENU OPERATION Display the On Screen menu and use the CURSOR keys to select Picture Press ENTER You may choose a Picture Mode between Standard Vivid Theater and Stadium which have predetermined fixed picture parameter values or choose the Custom option for personalized picture settings NOTE Each AV input can have its own picture mode predetermined or custom MANUAL CUSTOM PICTU...

Page 13: ...images on right are for a 16 9 transmission SOUND ON SCREEN MENU OPERATION Display the On Screen menu and use the CURSOR keys to select Sound Press ENTER You may choose a Sound Mode between Standard Dynamic Theater and Clear Voice which have predeter mined fixed picture parameter values or choose the Custom option for personalized picture settings MANUAL CUSTOM SOUND SETTINGS The Manual option pro...

Page 14: ...h different display modes between the laptop and the HDTV Modes may include displaying only on the laptop screen on both the laptop and the HDTV or displaying only on the HDTV NOTE Fn key and function key symbols on the laptop s keyboard may vary from one brand to another Hold down and press PC OR LAPTOP HDTV BACK RGB Monitor cable Stereo mini audio cable NOTE Sanyo recommends using a monitor cabl...

Page 15: ...ow Browse Photo STARTING A SLIDE SHOW The slideshow displays one picture after another auto matically in a timed and sequential manner Pressing the 1 key will trigger the slideshow starting from the highlighted thumbnail picture NOTE Use the Slideshow Setup option to enable or disable the Shuffle and Quick Change features USB JPEG VIEWER MENU Press MENU when in Full View or Slideshow mode to displ...

Page 16: ...il purchase Sanyo Manufacturing Corporation will replace any defective TV via exchange at the retailer To ensure proper warranty application keep the original dated sales receipt for evidence of purchase Return the defective TV to the retailer along with the receipt and the included accessories such as the remote control The defective TV will be exchanged for the same model or a replacement model ...

Page 17: ... caiga 13 Desconecte este aparato en caso de tormenta eléctrica o cuando no se use por un periodo de tiempo prolongado 14 Refiera todas las reparaciones a personal de servicio califi cado Se requiere de servicio cuando el aparato se ha daña do de cualquier forma como si el cordón de potencia se dañara de alguna forma se ha derramado líquido sobre el aparato o algún objeto le ha caído encima el apa...

Page 18: ...eceptor Conectar el equipo a un enchufe en un circuito difer ente al cual esté conectado el receptor Consultar al vendedor o a un técnico de radio y tele visión con experiencia para más ayuda PRECAUCIÓN Regulaciones de la FCC advierten que modificaciones inadecuadas o cambios no autorizados a esta unidad pueden anular la autorización del usuario para operar la unidad RESOLUCIONES DE PC MARCAS REGI...

Page 19: ...REMOTO 22 BÚSQUEDA INICIAL DE CANALES 23 OPERACIÓN DEL MENÚ EN PANTALLA Entradas 24 Configuración 24 Lenguaje del menú 24 Subtítulos 24 V Chip 25 Reloj temporizador 25 Apagado por inacitivdad 25 Modo Hogar Tienda 26 Protección del panel 26 Canales 26 Búsqueda de canales 26 Memoria de canales 26 Imagen 27 Configuración manual de imagen 27 ECO Ahorro de energía 27 Sensor de luz 27 Configuración de P...

Page 20: ...or o humedad Asegúrese que las marcas y de las baterías correspondan con las del control remoto Deshágase apropiadamente de baterías gastadas Conecte su antena o servicio de cable a la entrada ANT de su HDTV utilizando un cable coaxial 75 OHM NOTA Mantenga su antena para interiores al menos a un 1 metro de distancia tanto de su HDTV como de cualquier otro aparato electrónico Esta HDTV puede sinton...

Page 21: ...es al 99 mantenga presionado el primer número suéltelo y presione los dos números restantes Navegar los canales en la base de datos de la memoria Aumentar o disminuir el nivel del volumen Permite la selección directa de canales y subcanales digitales Por ejemplo para seleccionar el canal 39 1 presione las teclas 3 9 seguidas del guión y 1 Cambiar entre el canal actual y el último canal o entrada a...

Page 22: ...INPUT1 INPUT2 ó INPUT3 Interfase completamente digital que acepta señales de video sin compresión hasta de 1080p paraobten er la mejor calidad de imagen posible NOTA Una conexión DVI es posible por medio de la entrada HDMI DVI INPUT1 utilizando un adaptador apropiado y conectando el audio al conector estéreo mini Entrada de Antena digital análoga o Cable Entrada USB Despliegue fotos en pantalla de...

Page 23: ...o reproductor Blu ray decodifi cador de Cable HD receptor satelital HD o consola de video juegos Conecte la salida de HDMI de su aparato digital a cualquiera de las tres entradas HDMI de su HDTV con el uso de un solo cable HDMI HDMI La Salida de Audio Análogo L R se utiliza para conectar un amplificador estéreo externo No conecte boci nas externas directamente a la HDTV La conexión COMPUESTA es ut...

Page 24: ...resione la tecla INPUT para elegir la entrada de video correcta que desee NOTA Las entradas de Video no utilizadas pueden ser deshabilitadas en el menú de Entradas ENTRADAS ON SCREEN MENU OPERATION Despliegue el menú en pantalla Use las teclas CURSOR para seleccionar Entradas Presione ENTER Entradas le permite elegir cualquier entrada directa mente y quitar del ciclo de entradas INPUT aquellas que...

Page 25: ...cia SISTEMA AVANZADO V CHIP RRT5 RRT5 V chip Regional Ratings 5 es un sistema avanza do de clasificación para canales digitales por aire Cuando la HDTV detecta datos RRT5 compatibles se descargan y almacenan en memoria entonces la pan talla de configuración V Chip es modificada para mostrar la opción de Ajustar Avanzado Utilice las teclas CURSOR y para seleccionar las diferentes opciones Use ENTER...

Page 26: ...uando busque canales de Cable la base de datos de canales digitales será borrada Usted sólo podrá recibir aquellos canales ClearQAM decodificados provistos por su compañía de cable CONFIGURACIÓN CONT USO DEL MENÚ EN PANTALLA Utilice la opción de Modo Hogar Tienda si desea cam biar el Modo de Ahorro de Energía inicial seleccionado al prender la TV por primera vez Modo Hogar Configurado para el ahor...

Page 27: ...stes Modifique los valores del parámetro utilizando las teclas de CURSOR NOTA Las teclas de CURSOR seleccionan al siguiente o previo parámetro sin regresar a la pantalla anterior Una vez terminados los ajustes presione la tecla EXIT para salir del menú OPCIONES DE IMAGEN ECO AHORRO DE ENERGÍA Control del brillo de las lámparas del panel para reducir el consumo de energía Nivel 1 Ahorrador de Energ...

Page 28: ...las del lado derecho de transmisión 16 9 Despliegue el menú en pantalla Utilice las teclas CURSOR para seleccionar Sonido Presione ENTER Puede elegir un modo de imagen entre Estándar Dinámico Cine y Voz clara los cuales tienen parámet ros con valores predeterminados o elija Personalizado para configurar los valores a su gusto CONFIGURACIÓN MANUAL DE SONIDO La opción de Manual incluye varios paráme...

Page 29: ... F8 etc apropiada deberá ciclar los modos de despliegue entre la laptop y la HDTV Los modos pueden incluir el desplegar la imagen sólo en la laptop tanto en la laptop como la HDTV o desple gar sólo en la HDTV NOTA Los símbolos de las teclas Fn y de función en el teclado de la laptop pueden variar entre una marca y otra Sostenga y presione PC o LAPTOP PANEL TRASERO HDTV Cable de monitor RGB Cable e...

Page 30: ...ta completa Use las teclas CURSOR para cambiar de foto Presione ENTER para mostrar el menú de opciones Rotar Ampliar Reducir Mover Configuración Explorar fotos PRESENTACIÓN DE DIAPOSITIVAS La presentación de diapositivas muestra las fotos de manera secuencial Al presionar la tecla 1 iniciará la presentación desde la imagen seleccionada NOTA Use la opción de Configuración de diapositivas para habil...

Page 31: ...quier televisión defectuosa vía el vendedor original Para asegurar la apropiada aplicación de la garantía conserve el recibo original de compra fechado como evidencia de compra Regrese la TV defectuosa al vendedor junto con su recibo de compra además de todos los accesorios incluídos como el control remoto La TV defectuosa será cambiada por una del mismo modelo o un modelo equivalente o de igual v...

Page 32: ...x écoulements ou aux éclaboussures et aucun objet ne contenant de liquide tel qu un vase ne doit être placé sur l objet La prise du secteur est utilisé pour déconnecter le sys tème La prise du secteur ne doit pas être obstruée ou doit être facilement accessible pendant son utilisation Pour être complètement déconnecté de l alimentation d entrée la prise doit être débranchée du secteur Lisez attent...

Page 33: ...le système d emission de Guide V canadien donc les instructions ne sont pas fournies pour cette fonction Fabriqué sous licence de Dolby Laboratories Dolby est une marque de commerce de Dolby Laboratories En tant que partenaire d ENERGY STAR MD Sanyo Manufacturing Corporation a déterminé que ce produit répond pour son rendement énergétique aux normes d ENERGY STAR MD Cet appareil numérique de la cl...

Page 34: ... maniement ne sont pas couverts par la garantie PROTECTION DE L ÉCRAN D AFFICHAGE PRECAUTION L écran est susceptible d être endom magé s il n est pas entretenu conven ablement NE PAS utiliser d objets durs tels qu un chiffon rugueux ou du papier rigide NE PAS appuyer trop fort en nettoyant l écran une pression excessive peut causer une décoloration permanente ou des taches d ombre Ne jamais pulvér...

Page 35: ... une connexion directe de TV par câble BRANCHEMENT D ANTENNE AÉRIENNE OU CÂBLE CÂBLE ANTENNE RF POUR COMMENCER L assemblage sur le mur doir être effectué par une personne avec expérience Si on a besoin de retirer la base 1 Placez le téléviseur face en bas sur une surface mate lassée pour protéger l écran et le fini de l appareil 2 Enlevez les quatre 4 vis qui maintiennent la base de support PRECAU...

Page 36: ...érique qui accepte des signaux vidéos sans compression pour obtenir la meilleure qualité d image possible REMARQUE Un branchement de DVI est possible en utilisant l entrée HDMI DVI INPUT1 avec un adaptateur approprié et en reliant l audio à l entrée AUDIO DVI Entrée pour antenne analogique ou numérique Entrée USB Voir des photos sauvegardées dans un dispositif USB 7 8 9 REMARQUE Les branchements d...

Page 37: ...epteurs HD ou con soles de jeux vidéo Reliez la sortie de HDMI de votre appareil numérique à n importe quelle des trois entrées HDMI de votre HDTV avec l utilisation d un seul câble HDMI HDMI Les sorties d Audio G D sont utilisés pour brancher un amplificateur stéréo externe ne branchez pas des haut parleurs externes directement à la TVHD L entrée de vidéo Composite est utilisée pour brancher des ...

Page 38: ... directement Pour des chaînes 100 et supérieures main tenir appuyée sur la touche numérique et puis entrer les autres nombres Se déplacer entre les chaînes sauveg ardées dans la mémoire Augmenter ou réduire le niveau d audio Il permet de choisir directement une chaîne ou subchaîne numérique Par exemple pour choisir le canal 39 1 appuyer sur la touche 3 9 et 1 Changer entre les deux dernières chaîn...

Page 39: ...s à votre HDTV SÉLECTION D ENTRÉE AV Appuyer sur la touche INPUT pour choisir l entrée de vidéo que vous souhaitez voir REMARQUE Les entrées non utilisées peuvent être dés activées avec la fonction de configuration d entrées ENTRÉES Montre le Menu dans l écran et choisir Entrées Appuyez sur ENTER FONCTIONNEMENT DU MENU Entrées permet de choisir n importe quelle entrée directement et permet supprim...

Page 40: ...itial choisi en allumant la TV la première fois Mode Maison Configuré pour l économie d énergie et réduction de consommation Mode Magasin Configuré pour une haute luminosité et contraste pour exposition dans des magasins REMARQUE Seulement le Mode Maison qualifie pour Energy Star Appuyer sur ENTER dans le mode souhaité Mode Maison Magasin Les périodes prolongées de temps avec une image fixe sur l ...

Page 41: ...éterminées Choisisez Personnalisé pour configurer les valeurs à votre goût RÉGLAGES MANUELS DU SON Paramètres d ajustement Manuel Bas et Aigus Bass booster Audyssey Dynamic Volume 1 Ajustement en détail Égaliseur Utilise un Égaliseur á 4 Bandes pour per sonnaliser les ajustements de son SON FONCTIONNEMENT DU MENU AJUSTEMENT DE PARAMÈTRES DE SON Utilisez les touches de CURSEUR pour choisir le param...

Page 42: ...écran d ajustements Modifiez les valeurs du paramètre en utilizant les touches de CURSEUR REMARQUE Les touches CURSEUR choisissent le paramètre suivant précédent sans re tourner à l écran du menu précédent Si vous avez fini les ajustements appuyez sur la touche EXIT pour sortir du menu OPTIONS D IMAGE ECO ÉCONOMISEUR D ÉNERGIE Control del brillo de las lámparas del panel para reducir el consumo de...

Page 43: ...4 3 et celles du côté droit de 16 9 EN OUVRANT LE REPRODUCTEUR D IMAGES Montrez le menu dans l écran et utilisez les touches de curseur pour choisir Photo Appuyez sur ENTER REMARQUE Si vous reliez une mémoire USB à la HDTV l option de Photo sera automatiquement choisie FONCTIONNEMENT DU LECTEUR DES PHOTOS Utilisez les touches CURSEUR Utilisez les touch es curseur pour choisir une image disponible ...

Page 44: ...ors limite s il vous plait changez la résolution de votre PC à une compatible avec votre TVHD REMARQUE Si l ordinateur a seulement une sortie DVI un adaptateur DVI à RGB sera nécessaire adaptateur non fournis Écran PC portable Si vous utilisez votre TV HD Sanyo pour voir l image d un PC portable il faut d appuyer sur la touche Fn ou FN plus la touche de la fonction appropriée F5 F7 F8 etc dans le ...

Page 45: ...chez le détaillant Pour assurer une applica tion correcte de la garantie veuillez conserver l original du reçu de vente faisant apparaître la date comme preuve d achat Retournez le téléviseur défectueux au détaillant accompagné du reçu et de tous les accessoires inclus tels que la télécommande Le téléviseur défectueux sera échangé contre un appareil du même modèle ou d un modèle de remplace ment d...

Page 46: ...46 Besoin d aide www sanyoctv com 1 800 877 5032 NOTES ANOTACIONES ANNOTATIONS ...

Page 47: ...47 Besoin d aide www sanyoctv com 1 800 877 5032 NOTES ANOTACIONES ANNOTATIONS ...

Page 48: ......

Reviews: