background image

24

To turn the unit on and listen to the last received station, press the
TUNE/BAND button.

Automatic/Manual tuning

1. Press the TUNE/BAND button to select the band (FM or AM TUNER).
2. Automatic tuning

Press the TUNE “+” or “–” button for at least 1 second to tune in a
station. The unit will scan up or down the band and receive the next
receivable station. Press the button again to continue.
Manual tuning
Press the TUNE “+” or “–” button briefly until the desired frequency is
displayed.

To preset stations

Up to 24 FM and 12 AM stations can be preset.

Automatic presetting (APT)
1. Press the TUNE/BAND button to select the band.
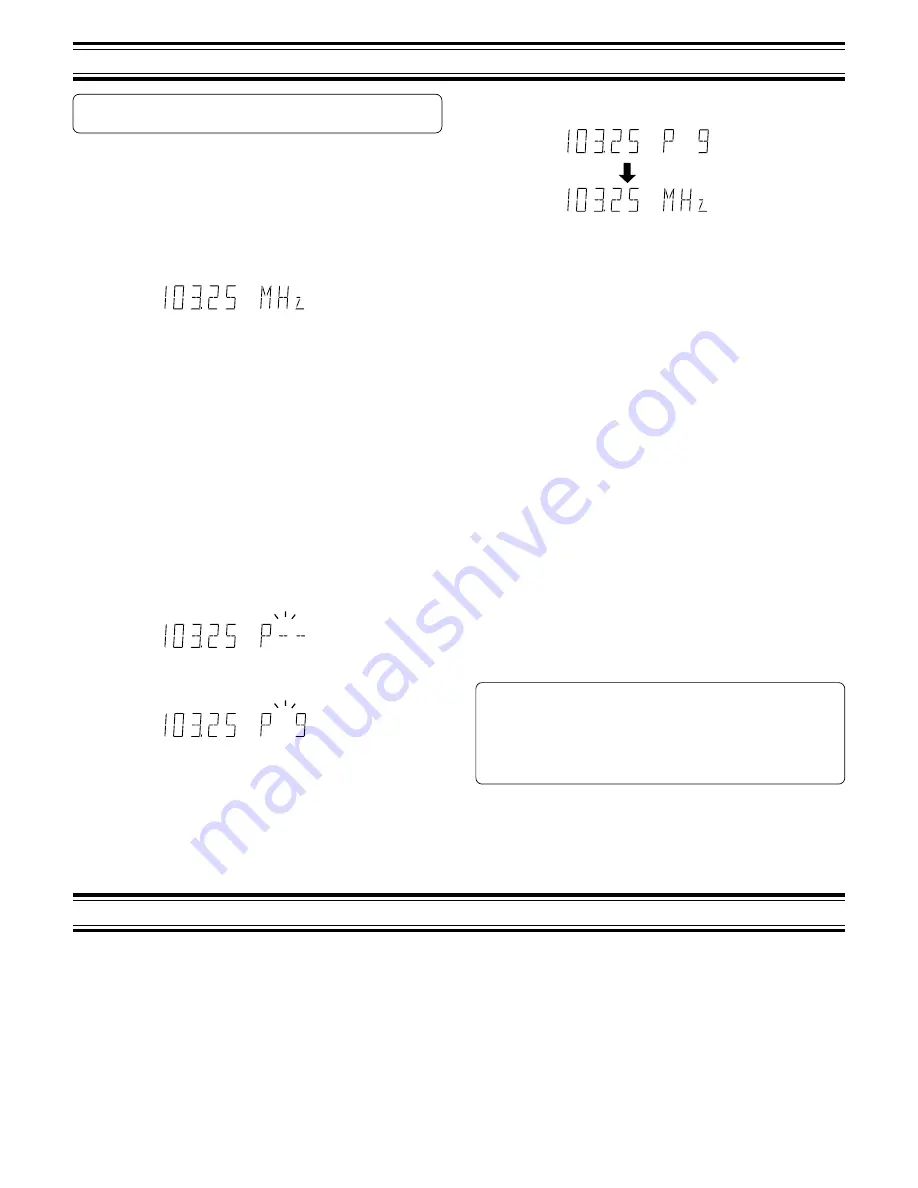
2. Press the PROGRAM/RANDOM button for at least 3 seconds.

“P - -” then “APT” blinks. The automatic tuning mode is set and
automatic presetting begins from the low end of the band.
When 24 FM or 12 AM stations have been preset or the high end of
the band is reached, automatic presetting stops. “APT” disappears
and the station memorized on the preset number 1 will be heard.

3. To preset stations on the other band, follow steps above.

Note:
If APT is activated, all previously programmed stations of the band will be
cleared and new stations will be programmed.

Manual presetting
1. Tune in the station to be preset.
2. Press the PROGRAM/RANDOM button.

3. While “P - -” is blinking, press the PRESET “+” or “–” button to select

the number to be preset.
-

The number buttons can also be used. Example: Press 9.

4. While it is blinking, press the ENTER button.

LISTENING TO THE RADIO

-

In this example, “FM 103.25 MHz” is preset on the preset number
9.

5.

Repeat steps above to add more preset stations.

-

When presetting a new station, the previous preset station is cleared.

Listening to preset stations

1.

Press the TUNE/BAND button to select the band.

2.

Press the PRESET “+” or “–” button briefly to select the preset number.
-

The number buttons can also be used. Example: Press 9 then
ENTER.

Preset scan tuning
1.

Press the TUNE/BAND button to select the band.

2.

Press the PRESET “+” button for at least 1 second. The preset number
appears. Each of the preset stations is tuned in for 5 seconds.

3.

When the desired station has been tuned in, press the PRESET “+”
button again to keep the reception locked at that station.

To receive FM stereo broadcasts

Make sure that “M” is not displayed. If “M” appears, press the FM MODE
button to turn the “M” indication off.
You enjoy FM stereo sound when an FM stereo broadcast is received.
-

If the receiving condition is not good, press the FM MODE button to
change to monaural (M) mode. The reception may be improved but
not in stereo mode.

When beat interference is heard

A high-pitched noise called “beat” is sometimes heard during reception of
radio broadcasts. If this occurs;
While pressing the 

n

 button on the main unit, press the TEST button on the

remote control to select “bc-A” or “bc-B”. Select the setting that gives the
best results.

Changing the AM reception frequencies
It is not necessary to perform this procedure in the Europe.
1.

Press the TUNE/BAND button to select “AM TUNER”.

2.

While pressing the 

n

 button on the main unit, press the PROGRAM/

RANDOM button on the remote control.

522 - 1611 kHz (9 kHz steps) 

wv

 520 - 1610 kHz (10 kHz steps)

LISTENING TO OTHER SOURCES

Listening to the TV connected to the AV EURO (RGB OUT)/TV
(AUDIO) IN socket
1.

Press the FUNCTION button to select “TV”.

2.

Follow the instructions supplied with the TV.

Listening to the audio/video equipment connected to the VIDEO
(AUDIO) IN sockets
1. Press the FUNCTION button to select “VIDEO”.
2. Follow the instructions supplied with the audio/video equipment.

Summary of Contents for DC-TS780

Page 1: ...INSTRUCTION MANUAL DVD Home Theatre System DC TS780 REMOTE CONTROLLER RB TS780 JCX TS780 DVD Receiver SX TS780W Subwoofer SX TS780S Satellite speaker Problems with set up Call freephone 0870 240 7475 ...

Page 2: ... unit Thisproductincorporatescopyrightprotectiontechnologythatisprotected by method claims of certain U S patents and other intellectual property rights owned by Macrovision Corporation and other rights owners Use of this copyright protection technology must be authorized by Macrovision Corporation and is intended for home and other limited viewing uses only unless otherwise authorized by Macrovis...

Page 3: ...Either the main unit or remote control can be operated However for convenience this instruction manual explains operation using the remote control Note This handling description is printed prior to product development When a part of the product specification must be changed to improve operability or other functions priority is given to the product specification itself In such instances the instruc...

Page 4: ...12 Directional arrow buttons 4 a 5 b 13 On screen display button ON SCREEN 14 Play button a 15 Stop button n Remote sensor Inserting batteries Install two R6 HP 7 batteries Remote control range Note Remove the batteries if the remote control is not to be used for a month or more Batteries left in the unit may leak and cause damage Within approx 6 meters 16 Skip Next Previous buttons f e 17 Subtitl...

Page 5: ...er wire Use Positive polarity FRONT R Red Front right speaker FRONT L White Front left speaker CENTER Green Centre speaker REAR R Gray Surround right speaker REAR L Blue Surround left speaker SUBWOOFER Violet Subwoofer Note The SPEAKERS sockets are designed for use only with the supplied speakers Do not use with other speakers Connecting other speaker may damage the speaker and or the unit If usin...

Page 6: ... speaker directly above the TV Thefront centre andsurroundspeakersshouldbeplacedatapproximately the same distance from the listening position The surround left right speakers and subwoofer do not have build in magnetic stray field compensation Keep enough distance between the subwoofer and the TV so as not to garble the TV screen Place the surround speakers either sides of the listening position o...

Page 7: ...to a transmitter the simple indoor aerial is sufficient to receive broadcasts Extend the aerial wire as straight as possible and while listening to the sound from the system secure it in a position which yields minimal distortion and noise In fringe areas or where reception is distorted or noisy an FM external aerial not supplied should be connected instead of the simple indoor aerial Consult your...

Page 8: ...h to COMPONENT An LCD video projector with NTSC colour system capability can also be connected Audio Video equipment connection Connect an audio lead between the VIDEO AUDIO IN sockets of the unit and the audio output sockets of the audio video equipment Headphones Connect stereo headphones not supplied to the PHONES socket for monitoring or for private listening The speakers are automatically dis...

Page 9: ...o lead not supplied Aerial Aerial lead not supplied JCX TS780 TV Aerial Aerial lead not supplied EURO AV SCART lead not supplied EURO AV SCART lead not supplied Aerial lead not supplied JCX TS780 VCR Audio lead not supplied EURO AV SCART RGB input facility EURO AV SCART Audio monitor out Audio equipment such as MD deck etc ...

Page 10: ... lead not supplied Aerial lead not supplied JCX TS780 Audio lead not supplied Aerial lead not supplied VCR VCR Set Top Box not supplied Aerial lead not supplied Aerial lead not supplied Audio equipment such as MD deck etc EURO AV SCART Audio monitor out Audio equipment such as MD deck etc EURO AV SCART lead not supplied EURO AV SCART lead not supplied EURO AV SCART lead not supplied EURO AV SCART ...

Page 11: ...D CD v TV v VIDEO v FM TUNER v AM TUNER v When the function selection is changed disc play is automatically stopped Adjusting the volume Press the VOLUME or button or turn the VOLUME control on the main unit The volume level appears on the display VOLUME 0 VOLUME MAX To reduce the volume temporarily Press the MUTE button MUTE blinks on the display To restore the previous volume setting press the M...

Page 12: ...et the mode to 2 1ch ST The sound quality may improve VARIOUS ADJUSTINGS Adjusting the speaker volume balance This unit is set to the standard level before shipping from the factory You may not need adjustment However depending on the size of the room and the placement of the speakers you may need a fine adjustment In this case follow the steps below Please use the remote control at the listening ...

Page 13: ...layed This unit is to be used exclusively with the PAL or NTSC colour system discs SECAM system discs cannot be used with this unit For DVD discs The video output signal format can be selected PAL 60 or NTSC when playing back the NTSC discs For MP3 CD please see Page 22 For Picture JPEG CD please see Page 23 Notes on handling discs Do not expose the disc to direct sunlight high humidity or high te...

Page 14: ...sive scan TV with NTSC skip this section 1 Turn on the power TV and this unit 2 Press the FUNCTION button to select DVD CD 3 In the no disc mode press and hold down the e button on the main unit until Progressive appears briefly on the TV screen If you want to switch the setting back again press and hold down the e button until Interlace appears briefly 4 Select NTSC Disc NTSC on Setting display s...

Page 15: ...lease this function press the q button until UNLOCKED appears on the display If a menu appears on the TV screen Press the 4 a 5 or b button or the number buttons to select the menu then press the ENTER button Playback of the selected menu starts Note For more details please refer to the jacket or case of the disc Stopping play DVD VCD Press the n button once When you press the a Play button play s...

Page 16: ...r search DVD 1 Press the SEARCH MODE button twice during play Example 2 Press the number buttons to enter the chapter number 3 Press the ENTER or a Play button Play starts from the selected chapter Track search VCD CD Press the number buttons to enter the track number then press the ENTER or a Play button Play starts from the selected track Time search 1 Press the SEARCH MODE button three times DV...

Page 17: ...Each time the button is pressed the repeat mode changes as follows TV screen Operation DVD Chapter Repeat of chapter being played Title Repeat of title being played Off Repeat off mode VCD CD 1 Repeat of track being played All Repeat all tracks Off Repeat off mode During programmed play VCD CD Program 1 Repeat of track being played Program All Repeat all programmed tracks Off Repeat off mode Desig...

Page 18: ...on which multiple subtitle languages are recorded 1 PresstheS T ON OFFbuttonduringplay Thesubtitlelanguagemark appears on the screen Example 1 3 en If Off appears press the button again 2 PresstheS T CHbuttonrepeatedlyuntilthedesiredsubtitlelanguage appears on the screen Example After few seconds disappears Note In some cases the subtitle language is not changed to the selected one When a disc sup...

Page 19: ...lecting on screen information Press the ON SCREEN button repeatedly to show the disc information Title Chapter Title elapsed playing time Language etc Example for DVD 1 Press the ON SCREEN button during play 2 Press the ON SCREEN button again 3 Press the ON SCREEN button again to close the disc information Track number Title elapsed playing time Subtitle language Camera angle Chapter remaining pla...

Page 20: ...reen when wide screen disc is played picture may be slightly distorted In some discs even if 4 3 PS is selected the black bands may remain on the screen NTSC Disc Select the video output signal format to PAL 60 or NTSC when playing back the NTSC discs Cut off INITIAL SETTINGS Once the initial settings have been completed the unit can always be operated under the same conditions The settings will b...

Page 21: ...te DVD discs may or may not respond to the parental lock settings Make sure this function works with your DVD discs Setting audio Thesoundfromspeakerscanreachthelisteningpositionatdifferenttimes depending on the speaker placements You can allow for this difference by changing the delay time of the centre and surround speakers You also can change the dynamic range control DRC 1 Press the SETUP butt...

Page 22: ...t Lithuanian 7686 lv Latvian Lettish 7771 mg Malagasy 7773 mi Maori 7775 mk Macedonian 7776 ml Malayalam 7778 mn Mongolian 7779 mo Moldavian 7782 mr Marathi 7783 ms Malay 7784 mt Maltese 7789 my Burmese 7865 na Nauru 7869 ne Nepali 7876 nl Dutch 7879 no Norwegian 7967 oc Occitan 7977 om Afan Oromo 7982 or Oriya 8065 pa Punjabi 8076 pl Polish 8083 ps Pashto Pushto 8084 pt Portuguese 8185 qu Quechua...

Page 23: ...4 1kHz of sampling frequency and 128kbps of constant bit rate Limitations on display Availablelettersfordisplayarethefollowing capitalorsmallalphabets of A through Z and numbers of 0 through 9 Other letters than those above are replaced in hyphen Note The CD has no music data or non MP3 files cannot be played back The WMA files cannot be played back MP3 CD play 1 Load the MP3 CD FILE LIST appears ...

Page 24: ...e for this unit to read JPEG files depending on its structure This unit can recognize up to 256 files or folders per disc The CD with 257 files or folders and over is not available to this unit JPEG CDs may not be played in the recorded order JPEG files must have the extension letters JPG or jpg JPEG resolution is up to 5760 x 3840 KODAK Picture CD play With KODAK Picture CD it is easy to turn fil...

Page 25: ...red Listening to preset stations 1 Press the TUNE BAND button to select the band 2 PressthePRESET or buttonbrieflytoselectthepresetnumber The number buttons can also be used Example Press 9 then ENTER Preset scan tuning 1 Press the TUNE BAND button to select the band 2 PressthePRESET buttonforatleast1second Thepresetnumber appears Each of the preset stations is tuned in for 5 seconds 3 When the de...

Page 26: ...le disc Check the disc logo type colour system and regional code The disc is loaded with the label side down Load the disc correctly The disc is dirty Clean the disc or replace it Parental is set Cancel the parental lock function or change the rating level Reset it after play The operation or display is not normal The memory must be reset 1 Disconnect the mains lead 2 Reconnect the mains lead 3 Re...

Page 27: ...PB PR 0 7 Vp p 75 Ω PHONES 8 32 Ω DVD player Playback standard PAL or NTSC Laser Semiconductor laser wavelength 650 790 nm Laser output Continuous wave max 0 5 mW Signal to noise ratio More than 105 dB Wow and flutter Below measurable level Tuner Reception frequency FM 87 5 108 MHz AM 522 1611 kHz General Power requirements AC 230 V 50 Hz Power consumption 150 W Less than 2 W standby mode Dimensio...

Page 28: ... the statutory rights available to the purchaser of this equipment Note This guarantee supersedes any other form of guarantee that may inadvertently have been enclosed with or attached to the product August 1978 Thank you for buying Sanyo This equipment should give you many years of pleasure and faithful service but in the event that a fault occurs the following notes for your guidance may be help...

Reviews: