background image

User Manual 

SVS-3001 

_________________________________________________________________________________ 


- 10 - 


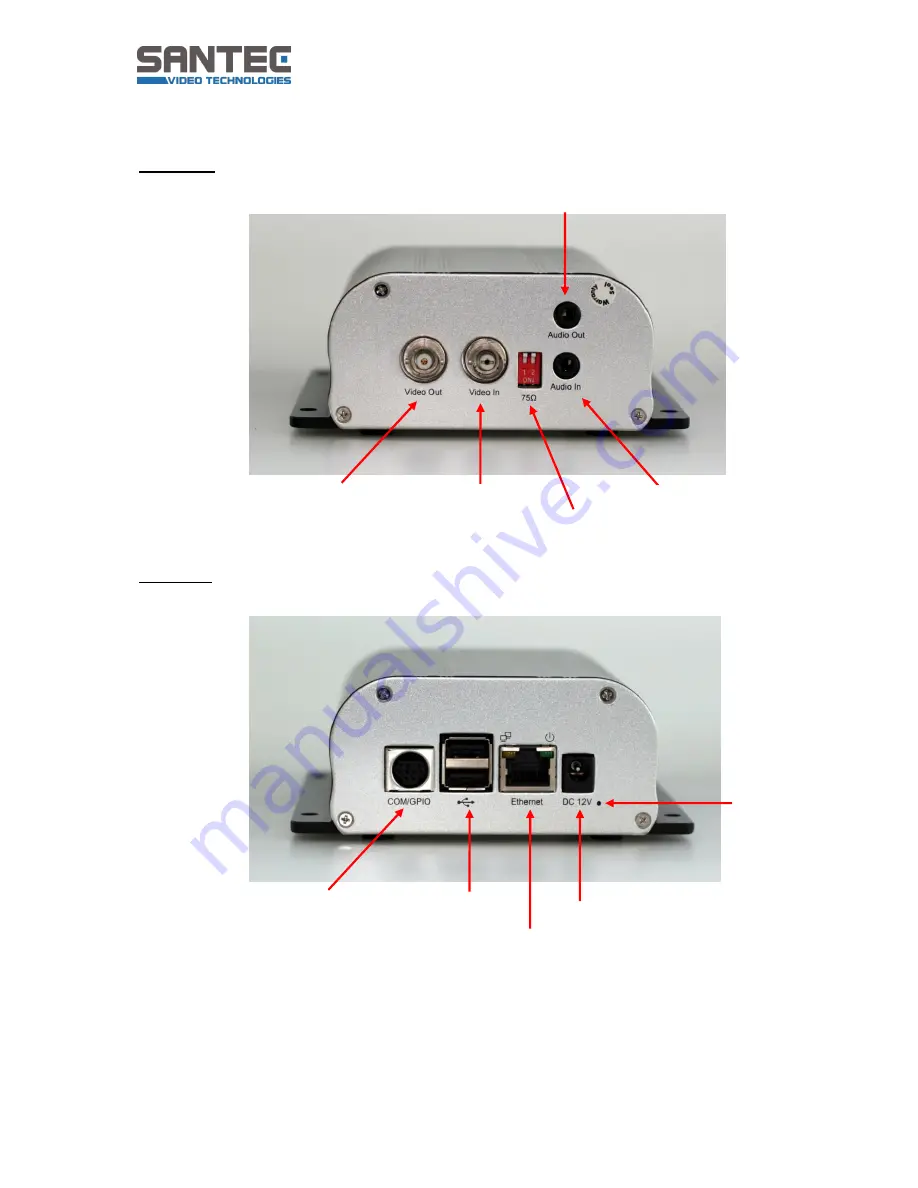
2. Connectors and ports 

 
Front view: 


Rear view: 


Video output 

Video input 

Audio input 

Audio output 

Terminator 

Com/GPIO 

2x USB ports 

LAN port 

Power (12 V DC) 

Reset 

Summary of Contents for SVS-3001

Page 1: ...Version 1 0sfi 0312 engl A6 USER MANUAL 1 Channel IP Video Server Model SVS 3001...

Page 2: ...may not be reproduced stored in a retrieval system or transmitted in any form or by any means electronic mechanical photocopying recording or otherwise without the written prior permission of Sanyo V...

Page 3: ...ded items 9 1 2 System requirements 9 2 Connectors and ports 10 3 Connection of hardware components 11 4 Technical specifications 12 Appendix Setup Internet security 13 PART II CONFIGURATION AND CONTR...

Page 4: ...______ 4 2 6 Schedule 28 2 6 1 General 28 2 6 2 Storage 29 2 7 Network 30 2 7 1 General 30 2 7 2 Advanced 31 2 7 3 SMTP e mail 32 2 7 4 DDNS 33 2 8 System 34 2 8 1 Information 34 2 8 2 User 35 2 8 3 D...

Page 5: ...sufficient magnitude to constitute a risk of electric shock to a person Warning This symbol is intended to alert the user to the presence of important operating and maintenance servicing instructions...

Page 6: ...only be operated from the type of power source indicated on the marking label If you are not sure of the type of power supplied at the installation location please contact your local dealer An applian...

Page 7: ...ion outshine of the entire image on the monitor This artifact is not an error but a particularity of semiconductor CCDs when they are directly exposed to a powerful light source If the camera is opera...

Page 8: ...to the video server if required Note The video server comes with a default IP address Default IP address 192 168 1 168 or DHCP if available User name admin Password 9999 Please refer to the following...

Page 9: ...der and user manual 1x Quick installation guide 1x Power adapter 1x Breakout cable 1 2 System requirements To control the video server via the web browser please ensure your PC has a good network conn...

Page 10: ..._______________________________________________________________________ 10 2 Connectors and ports Front view Rear view Video output Video input Audio input Audio output Terminator Com GPIO 2x USB port...

Page 11: ...while 4 Release the pin when the LED starts quick flashing The video server is now restored to factory default 3 Connection of hardware components 1 Prepare a PC laptop with an Ethernet link to the n...

Page 12: ...n Yes Audio inputs outputs 1 1 3 5 mm phone jack Digital inputs outputs No No RS 485 interface Yes PTZ control Yes Design Desktop Number of Ethernet ports 1 Ethernet standards 10Base T 100Base TX Ethe...

Page 13: ...Controls Internet security level Customized 1 Open the Internet Options menu 2 Select Security 3 Click on Custom level 4 Enable the following options All previously unused ActiveX Controls run without...

Page 14: ...IP address 192 168 1 168 or DHCP assigned address if available see IP Finder Default username admin Default password 9999 If a security window pops up please click on install The live view of the came...

Page 15: ...view page you can select your language by clicking on the respective flag icon English or German Admin button To exit the Live view and to make changes to the camera set up click on the Admin button...

Page 16: ...Click on this button to mute activate the audio function Note This function is only open to a user who has been granted this privilege by the administrator Snapshot Click on this button and a JPEG JP...

Page 17: ...nabled see chapter 2 4 2 PTZ Pan tilt arrows Click to move the image and Click to zoom in out PTZ presets List of presets Alternatively instead of using the PTZ control panel you may simply click into...

Page 18: ...can be found under the path Video General Video general setting The video stream can be enabled or disabled Stream1 is enabled by default Maximum 3 streams can be concurrently enabled for different c...

Page 19: ...he resolution describes an image size counted by width and height referring to pixel resolution The 1st and 2nd stream can be set to 720x576 or 352x288 Stream 3 has a fixed resolution of 352x288 Video...

Page 20: ...n MJPEG GOP GOP group of pictures describes how the different types of frames are arranged The frame types implemented here are I frame full image information and P frame motion compensated difference...

Page 21: ...al setting Brightness Luminance of image Hue Color hue can be modified Saturation Intensity of a specific color Contrast Difference in color and light between parts of an image Audio setting Audio ena...

Page 22: ...The following protocols are supported Pelco D Pelco P Li Lin Li Lin New Dynacolor Device ID Set the ID for the video server 1 63 Speed only applicable if speed domes are used Adjust the speed of the...

Page 23: ...vent server Motion detection I O ports and Event configuration 2 5 1 Event server The event setting can be found under the path Event Event server Add FTP Name Name the FTP server Network address Ente...

Page 24: ..._______________________________________________________________ 24 Add HTTP Name Enter the name of the HTTP server URL Enter the network address of the HTTP server User name password Enter the user na...

Page 25: ...to this window area 3 Select the trigger level and the sensitivity level for this detection window 0 100 4 Select a color for the detection window by clicking on the color palette 5 Click in the pictu...

Page 26: ..._______________________________________________________________________ 26 2 5 3 I O ports The I O port setting can be found under the path Event I O ports This video server supports 2 photo coupled r...

Page 27: ...vent trigger follow these steps 1 Click on Add and the setup panel will be expanded as shown above 2 Give a name to this event 3 Set the time interval between the triggers 4 Set the time period for th...

Page 28: ...w to set a schedule 1 Check the Enabled box 2 Select the video stream to be recorded 3 Define the size of each sliced file MB 4 Define the day of the week and the time by hour of the day of the schedu...

Page 29: ..._____ 29 2 6 2 Storage The schedule setting can be found under the path Schedule Storage Here information on the storage status is displayed A message is displayed when a recording is currently runnin...

Page 30: ...and DDNS 2 7 1 General The network setting can be found under the path Network General On this page the IP configuration is displayed including DHCP and static IP setting Enable ARP ping enables the...

Page 31: ...rver HTTP setting Users may set the HTTP port that will be applied for web access Default port 80 RTSP setting Users may set the RTSP video port for video data transmission Default port 554 UPnP notif...

Page 32: ...found under the path Network SNTP e mail Configure an e mail host for the camera which will send e mails on behalf of the configured e mail account to a specified mail address also see the chapter 2 5...

Page 33: ...le for dynamic DNS configuration Host name Assigned name that will be used for accessing the video server User name password Account authentication for logging on to this service Update time Periodica...

Page 34: ...tab System there are submenus including Information User Date time Server maintenance and Log service 2 8 1 Information The system setting can be found under the path System Information On this page...

Page 35: ...__________________________________ 35 2 8 2 User Check the box Enable anonymous login if you don t wish to have a user name displayed 2 8 3 Date time On this page users may configure the system date a...

Page 36: ..._________ 36 2 8 4 Server maintenance This page provides some tools for system maintenance such as firmware information and upgrades backup and upload settings 2 8 5 Log service Most system operations...

Page 37: ...nfirm with OK 6 Click on Next 7 Click on Finish to complete the installation For Windows Vista and Windows 7 Please proceed as follows to install UPnP for Windows Vista and Windows 7 By default the wi...

Page 38: ...User Manual SVS 3001 _________________________________________________________________________________ 38 Notes...

Page 39: ...User Manual SVS 3001 _________________________________________________________________________________ 39 Notes...

Page 40: ...__________________________________________________________________________ www santec video com Your local distributor...

Reviews: