background image

17 

EN

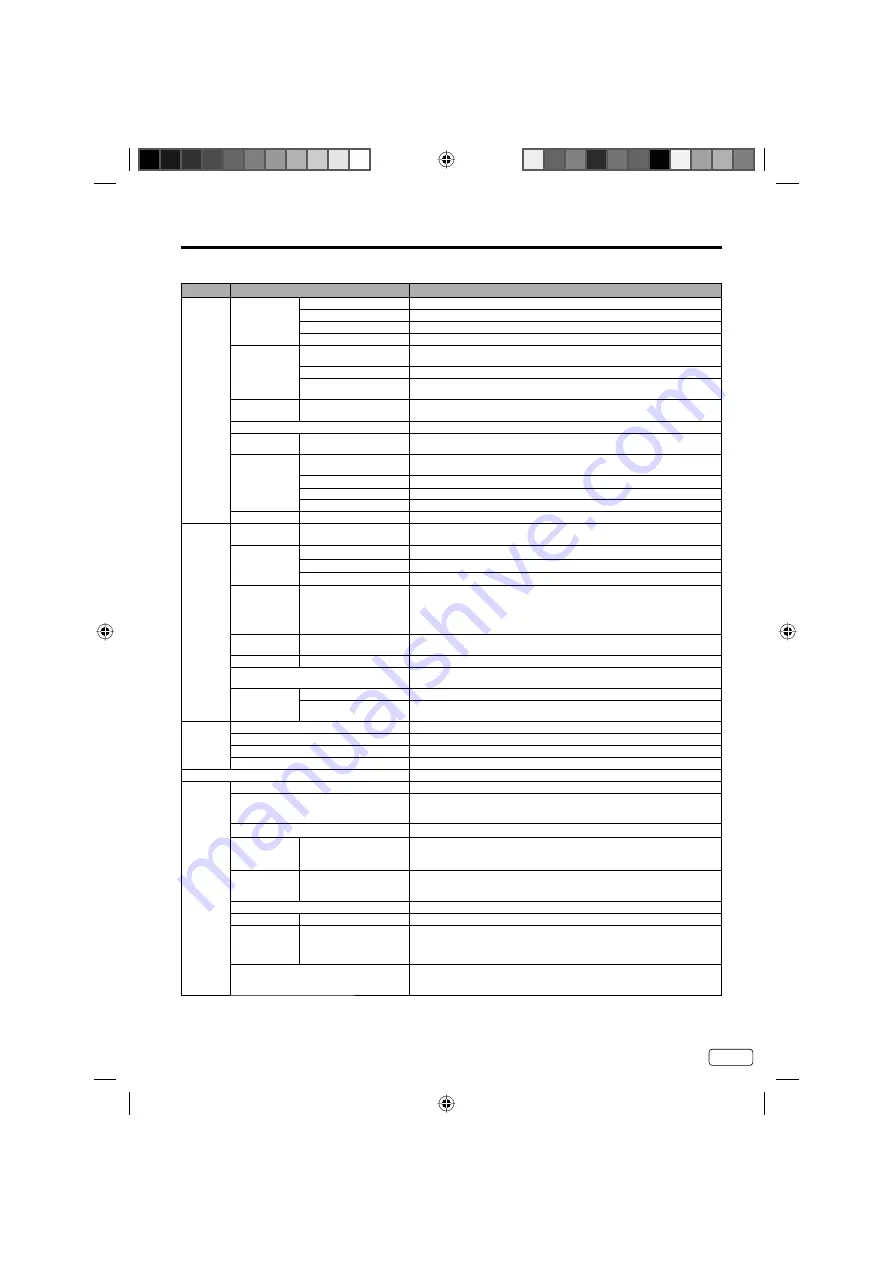
Convenience functions

You can change the default settings by pressing the 

MENU

 button on your remote, then select the one of the icons at the left 

of the menu - follow the On-Screen prompts to set your preferences.

Icon

Selected Items

Setup hint

Picture Picture 

Preference

Sports

Bright and dynamic picture (factory-set)

Standard

Standard picture quality (factory-set)

Movie

Movie-like picture setting (factory-set)

Memory

Your personal preferences (set by you; see “Picture Setting”)

Picture Setting Brightness /Contrast / 

Sharpness / Color / Tint

You can adjust the picture quality to your preference.

Color Temperature

Cool (Bluish) / Standard (Neutral) / Warm (Reddish)

Backlight

The Backlight feature adjusts the screen brightness for improved 

picture clarity.

DBC

On/Off

Use this feature to change the Black level automatically according to the 

brightness of an image. The Black level will become dark in a dark scene.

Picture Size

See page 22.

Film Mode

On/Off

A smoother motion may be obtained by setting the Film Mode to “On” 

(480i only).

PC Setting

Hor Position / 

Ver Position

To adjust the horizontal / vertical position of the image on the PC monitor 

screen. Each video standard will require a different value for this setting.

Clock

To minimize any vertical bars or stripes visible on the screen background.

Phase

This must be adjusted after the frequency has been set optimize picture quality.

Auto Adjust

To adjust the all PC settings automatically.

DNR

On/Off

DNR (Digital Noise Reduction) can reduce the roughness of the picture.

Audio

Equalizer Mode Standard/Music/Movie/

News/Memory/Flat

You can adjust the Equalizer Mode to your preference.

Audio Setting Bass/Treble

You can adjust the sound quality to your preference. (Flat mode only)

Equalizer Setting

100Hz/250Hz/500Hz/1kHz/2kHz/4kHz/10kHz (Not available in Flat mode)

Balance

You can adjust the sound quality to your preference.

MTS

Stereo / SAP / Mono

The multi-channel TV sound (MTS) feature provides high-fidelity 

stereo sound. MTS also can transmit a second audio program (SAP) 

containing a second language or other audio information.

When the TV receives a stereo or SAP broadcast, the word “Stereo” or 

“SAP” displays on-screen every time you press 

DISPLAY

.

Surround

On/Off

The dynamic presence and sound created offers a thoroughly 

enjoyable listening experience.

Auto Volume

On/Off

Volume level can be adjusted automatically by the sound level.

Audio Language

When two or more audio languages are included in a digital signal, you can select 

one of the audio languages. (This function is available only for digital broadcast.)

HDMI Audio

HDMI

When you connect the HDMI device to the TV, select this setting.

DVI

When you connect the DVI device to the TV with analog audio cords, 

select this setting.

Channel Add / Delete

See page 18.

DTV Signal

See page 19.

Auto Ch Memory

See page 18.

Ch Label

See page 19.

Lock

See page 20.

Setup

Closed Caption

See page 21.

Language

You can choose from three different languages (English, Français (French) and 

Español (Spanish)) for the on-screen displays.

Select the language you prefer first, then proceed with the other menu options.

Video Label

See page 19.

On Timer

Off / 0h30m / 1h00m 

/ 1h30m / 2h00m / 

3h00m

⋅⋅⋅

12h00m

You can set the On Timer to automatically turn on the TV. To cancel the 

On Timer select “Off”.

Auto Shut Off* On/Off

If the Auto Shut Off feature is On, a station being viewed stops 

broadcasting and the TV is not operated, the TV will automatically shut 

itself off after 15 minutes.

Auto Setup

See page 15.

Power On LED On/Off

When you turn on the TV, Power indicator on the front of the TV will light.

PC Standby

On/Off

In PC mode, if no signal is received or no operation performed  for 1 

minute, the TV will turn to standby mode automatically (LED light will 

flash red). When an input signal is received or an operation performed 

on the  PC, the TV will return to the on mode.

Reset

The Reset function returns your Picture/Audio settings to the factory settings. 

“Picture Size”, “MTS” , “Audio Language” and “HDMI Audio” cannot be 

reset by this function.

NOTE:

*  If there is no input signal in the PC mode, after 1 minute Auto Shut Off will be activated. In PC mode the 

“PC Standby” setting takes precedence.

3KX0121A_EnFr.indb   17

3KX0121A_EnFr.indb   17

1/13/12   9:28:01 AM

1/13/12   9:28:01 AM

Summary of Contents for SLED1937

Page 1: ...Signal Type est en mode Cable c blodistribution Si vous n utilisez pas la c blodistribution s lectionnez l option Air Before operating the unit please read this manual thoroughly Avant de faire foncti...

Page 2: ...off and on the user is encouraged to try to correct the interference by one or more of the following measures Reorient or relocate the receiving antenna Increase the separation between the equipment...

Page 3: ...iquid into the unit 19 If an outside antenna or cable system is connected to the unit be sure the antenna or cable system is grounded to provide some protection against voltage surges and built up sta...

Page 4: ...s If you have any doubts about your ability to safely install your flat panel display contact your retailer about professional installation Make sure that the wall where you are mounting the display i...

Page 5: ...nd consult with your doctor Also if the liquid gets in your eyes or touches your skin consult with your doctor after rinsing for at least 15 minutes or longer in clean water Possible Adverse Effects o...

Page 6: ...e bottom plate with 2 screws supplied 3x10mm 1 8 x 25 64 inches as indicated by the arrows in Figure 2 Be sure to follow the instructions Insufficient tightening or incorrect installation of the stand...

Page 7: ...to insert the cord securely at both the TV and the wall outlet The AC cord has a polarized type AC line plug If the supplied AC cord does not match your AC outlet contact a qualified electrician WARNI...

Page 8: ...TV operation Starting setup 15 TV operation 15 Quick guide for menu operation 16 Convenience functions 17 Memorizing channels 18 Checking the digital signal strength 19 Labeling channels 19 Labeling...

Page 9: ...ay the menu screen CH CHANNEL buttons VOL VOLUME buttons and INPUT ENTER button can be used to select the desired setting during the menu screen operations AC INPUT jack PC DVI AUDIO IN jack VIDEO IN...

Page 10: ...utton This button is used when selecting digital channels 4 SLEEP Button To set the TV to turn off after a preset amount of time use the SLEEP button on the remote control 5 CH CHANNEL CURSOR Buttons...

Page 11: ...rvice with scrambled premium channels If you subscribe to a Cable TV service in which basic channels are unscrambled and premium channels require the use of a Converter Descrambler box you may wish to...

Page 12: ...upplied Component video cord not supplied To AUDIO IN Left of the unit To COMPONENT IN To Audio OUT NOTE Component Video input of the unit are for use with a device which output 480i 1080i interlaced...

Page 13: ...rate as the computer monitor Monitor Display modes MODE Resolution Refresh rate VGA 640x480 60 72 75 Hz VGA 720x400 70Hz SVGA 800x600 56 60 72 75 Hz XGA 1024x768 60 70 75 Hz WXGA 1280x768 60Hz WXGA 12...

Page 14: ...ment NOTE When using HDMI DVI IN to connect your HDMI or DVI devices you must select the corresponding audio input source HDMI or DVI on the menu screen see page 17 Otherwise you will only see the ima...

Page 15: ...e indicated on the screen by green bars As the volume level increases so do the number of bars If the volume decreases the number of green bars also decreases 3 Set the Signal Type option to the appro...

Page 16: ...After a few seconds DISPLAY screen will return to normal TV operation automatically SLEEP To set the TV to turn off after a preset amount of time press SLEEP on the remote control The clock will count...

Page 17: ...containing a second language or other audio information When the TV receives a stereo or SAP broadcast the word Stereo or SAP displays on screen every time you press DISPLAY Surround On Off The dynam...

Page 18: ...nly be accomplished while a station is broadcasting a digital signal to set that channel into memory If you are unsure of the digital channels available in your area you may visit www antennaweb org t...

Page 19: ...ant appears in the first space Label Clear Ch Label Channel Number 15 1 Ch Label CH 1 CH The characters rotation as follows SPACE If the character which you desire appears press ENTER Repeat this step...

Page 20: ...ove TV MA 17 years old and above When you select TV Y7 TV PG TV 14 or TV MA press DISPLAY to explain the rating Genre D Dialogue L Language S Sex V Violence FV Fantasy Violence Movie Rating Movie Rati...

Page 21: ...ed Caption mode for both Digital and Analog Caption 5 Press or to select CC Priority then press or to select Digital CC or Analog CC NOTE Depending on the broadcast signal some Analog Captions will fu...

Page 22: ...image will display the size of standard 4 3 with a black side bar Cinema Wide1 for 4 3 format programs To fill the screen the right and left edges are extended however the center of the picture remain...

Page 23: ...s display will appear USB Memory Information Delay Time 00 02 09 Message Now Play View Playback status PLAY STOP PAUSE SKIP SKIP Recording Delayed time from the current program or Playing time in the...

Page 24: ...normal when you adjust the CONTRAST or BRIGHTNESS settings Most types of television interference can be remedied by adjusting the height and position of the VHF UHF antenna Outdoor antennas are recomm...

Page 25: ...sound Station or Cable TV experiencing problems tune to another station Check sound adjustments VOL or MUTE Check for sources of possible interference Poor picture or no picture Station or Cable TV ex...

Page 26: ...e Frequency synthesized Inputs Video RCA 1 V p p 75 ohms Audio RCA 8 dBm 50k ohms Component video Y 1 V p p 75 ohms Pb Pr 0 7 V p p 75 ohms HDMI HDMI compliant type A connector HDCP compliant E EDID c...

Page 27: ...y does not cover a Damage to equipment not properly connected to the product b Costs incurred in the shipping of the product to an ORION authorized Independent Service Center or ORION Factory Service...

Page 28: ...OC ELECTRIQUE NE PAS OUVRIR ATTENTION Le symbole repr sentant un clair dans un triamgle quilat ral a pour but d avertir l utilisateur du danger pr sent par des pi ces non isol es l int rieur de l appa...

Page 29: ...doit pas tre expos des gouttements d eau ou des claboussures et de plus aucun objet rempli de liquide tel que des vases ne doit tre plac sur I appareil 16 L antenne ext rieure ne doit pas tre plac e p...

Page 30: ...pas les conseils de s curit suivants LE PROBL ME L exp rience du cin ma maison se r pand et les gens ach tent des crans plats de plus en plus grands Cependant les crans plats ne sont pas toujours pos...

Page 31: ...ci apr s aucun recours la garantie d usine ne pourra tre r clam L cran ACL cristaux liquides de ce t l viseur est constitu de cellules minces et est le fruit d une technologie tr s pr cise Bien que le...

Page 32: ...s la figure 1 Comment enlever le socle Pour transporter ce produit d montez le socle et posez le plat contre l arri re de l appareil dans le carton Pour d monter le socle proc dez aux tapes dans l ord...

Page 33: ...du cordon CA dans la prise d entr e CA de l appareil Connectez le cordon CA une prise CA 1 2 Fabriqu sous licence de Dolby Laboratories Le terme Dolby et le sigle double D sont des marques commerciale...

Page 34: ...ent du t l viseur Configuration au d marrage 15 Fonctionnement du t l viseur 15 Guide rapide pour les op rations menu 16 R glages personnalis s 17 Mise en m moire des canaux 18 V rification de la forc...

Page 35: ...menu des fonctions l cran du t l viseur Touchez les boutons CH CHANNEL boutons VOL VOLUME et bouton INPUT ENTER peuvent servir s lectionner le r glage d sir l int rieur du menu des fonctions du t l vi...

Page 36: ...e la s lection de canaux num riques 4 Bouton SLEEP Pour programmer le t l viseur pour qu il s teigne automatiquement apr s une p riode pr d termin e utilisez la touche SLEEP sur la t l commande 5 Bout...

Page 37: ...tes abonn un service de c blodistribution dont les canaux de base ne sont pas brouill s et les canaux payants exigent l utilisation d un convertisseur d brouilleur il est recommandable d utiliser un s...

Page 38: ...tie Vid o Audio C ble Vid o Audio non compris Vers l entr e VIDEO AUDIO Vers la sortie en composantes C ble Audio non compris C ble de Vid o en composantes non compris Vers l entr e AUDIO Gauche de l...

Page 39: ...ur a t v rifi peut appara tre en fonction de l ordinateur utilis Dans ce cas le r glage Auto Adjust ou les autres fonctions d ajustement de la position peuvent chouer corriger la position de l image P...

Page 40: ...ri re et gauche de l appareil C ble adaptateur HDMI DVI connecteur HDMI de type A non compris C ble HDMI connecteur de type A non compris Vers la sortie DVI Vers la sortie HDMI Dispositif HDMI Disposi...

Page 41: ...il passe au vert Une image appara t l cran au bout d environ 10 secondes 2 R glez le volume au niveau d sir en appuyant les touches de r glage du VOL ou Le niveau d intensit de la reproduction sonore...

Page 42: ...ores Stereo SAP ou Mono R solution Appuyez de nouveau sur DISPLAY pour faire dispara tre les informations l cran REMARQUE Au bout de quelques secondes l cran DISPLAY r tablit automatiquement le foncti...

Page 43: ...donn es sonores Lorsque le t l viseur re oit une mission st r ophonique ou en SAP le mot Stereo ou SAP est affich chaque fois qu on appuie sur DISPLAY Surround On Off La pr sence dynamique et sonore...

Page 44: ...le il faut qu une station diffuse au m me moment un signal num rique de canal Si vous n tes pas certain quels canaux num riques sont offerts dans votre r gion vous pouvez consulter www antennaweb org...

Page 45: ...p t e sur ou jusqu ce que le caract re que vous souhaitez apparaisse dans le premier espace Label Clear Ch Label Channel Number 15 1 Ch Label CH 1 CH Le caract re change comme suit ESPACE Si le caract...

Page 46: ...g TV Y TV Y7 TV G TV PG TV 14 TV MA Vous pouvez r gler la classification en fonction du niveau d ge et du genre ge TV Y Tous les enfants TV Y7 Enfants de 7 ans et plus TV G Auditoire g n ral TV PG Sup...

Page 47: ...ec un calendrier de programmation ou d autres informations 1 S lectionnez Setup Closed Caption puis appuyez sur ou ENTER 2 Appuyez sur ou pour r glage CC Setting sur On On Les sous titres apparaissent...

Page 48: ...lan Background Color Auto Noir Black Blanc White Rouge Red Vert Green Bleu Blue Jaune Yellow Magenta Cyan Opacit de Fond Background Opacity Auto Solide Solid Transparent Translucide Translucent Flashi...

Page 49: ...G A B C D E F G Full pour missions de format 16 9 Full affiche l image sa taille maximale Native pour mode PC seulement La r solution du signal de l image est d tect e et affich e l cran avec le m me...

Page 50: ...riph rique s affichera USB Memory Information Delay Time 00 02 09 Message Now Play View Pour supprimer l enregistrement D connectez le p riph rique USB sans sauvegarder l mission ou teignez le t l vis...

Page 51: ...r glages du contraste CONTRAST ou de la luminosit BRIGHTNESS Il est possible de rem dier la plupart des interf rences subies par le t l viseur en r glant la hauteur et en changeant la position de l a...

Page 52: ...osition de l antenne R glez le d codeur de sous titres dans le menu L affichage des fonctions l cran n appara t pas dans la langue s lectionn e S lectionnez la langue d sir e parmi les options du menu...

Page 53: ...de fr quences Entr es Vid o RCA 1 V p p 75 ohms Audio RCA 8 dBm 50k ohms Vid o en composantes Y 1 V p p 75 ohms Pb Pr 0 7 V p p 75 ohms HDMI Compatible HDMI connecteur de type A Compatible HDCP Compat...

Page 54: ...Memo 3KX0121A_EnFr indb 28 3KX0121A_EnFr indb 28 1 13 12 9 29 17 AM 1 13 12 9 29 17 AM...

Page 55: ...Memo 3KX0121A_EnFr indb 29 3KX0121A_EnFr indb 29 1 13 12 9 29 17 AM 1 13 12 9 29 17 AM...

Page 56: ...J3KX0121ASH 12 02 N Printed in Thailand Imprim en Thailande 3KX0121A_EnFr indb 30 3KX0121A_EnFr indb 30 1 13 12 9 29 18 AM 1 13 12 9 29 18 AM...

Reviews: