background image

20

NOTES:

• If the program or video you selected is not closed-captioned, no captions will display on-screen.
• If text is not available in your viewing area, a black rectangle may appear on-screen. If this happens, set the

Closed Caption feature to “OFF”.

• When selecting Closed Captions, the captioning will be delayed approx. 10 seconds.
• If no caption signal is received, no captions will appear, but the plasma Display will remain in the Caption Mode.
• Misspellings or unusual characters may occasionally appear during Closed Captioning. This is normal with

Closed Captioning, especially with live programs. This is because during live programs, captions are also
entered live. These transmissions do not allow time for editing.

• When Captions are being displayed, on-screen displays, such as volume and mute may be seen but may

interfere with Closed Captions.

• Some Cable TV systems and copy protection systems may interfere with the Closed Captioned signal.

Closed Caption

WHAT IS CLOSED CAPTIONING?

This Plasma Display has the capability to decode and display Closed Captioned television programs. Closed
Captioning will display text on the screen for hearing impaired viewers and may translate and display text in
another language if broadcast.

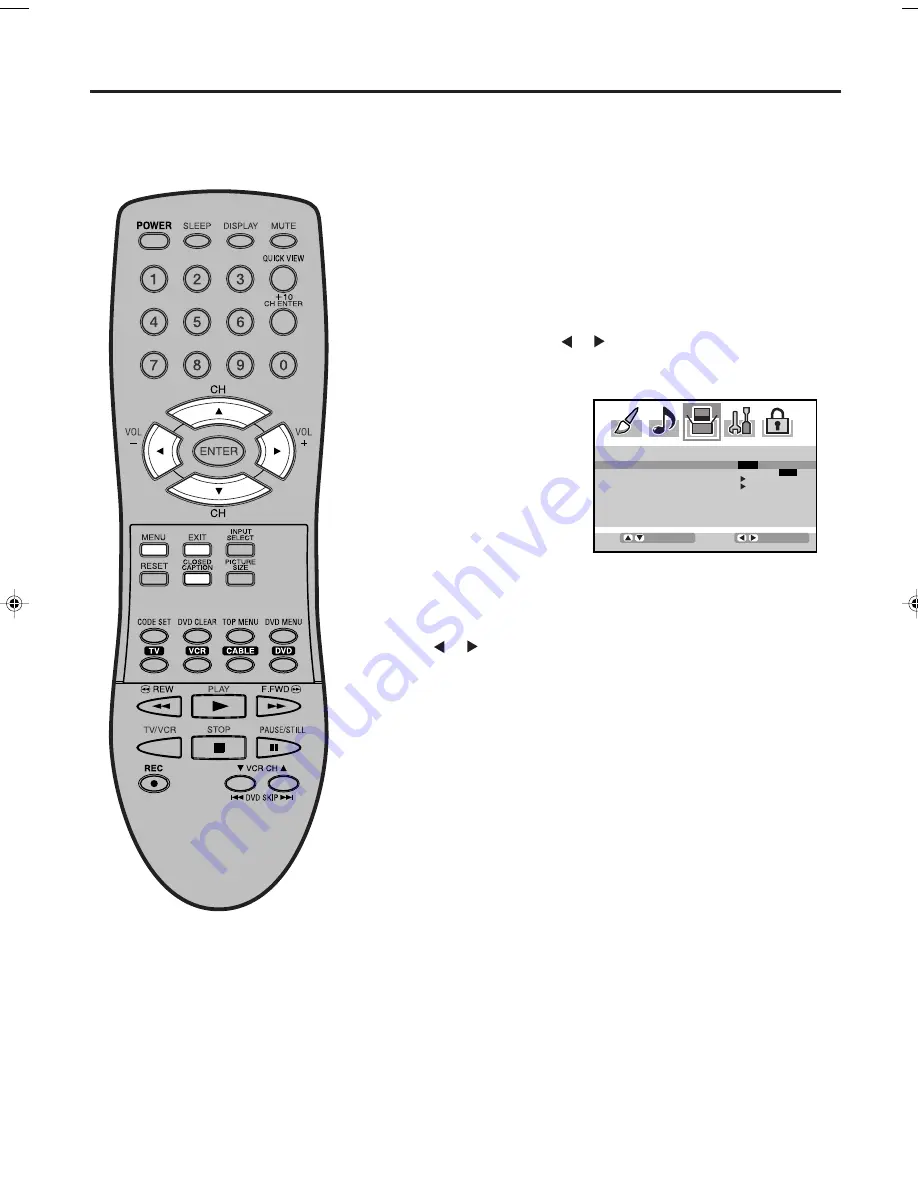
Select desired video source for the Plasma Display.

1

Press 

MENU

,  then press 


or   to display the SETUP menu.

2

4

Press 


or   to select the desired Closed Caption mode.

3

Press 

 or 

 to select “CLOSED CAPTION”.

NOTE:

This screen can be displayed by pressing the 

CLOSED

CAPTION

 button on the Remote control.

NOTE:

To turn the Closed Caption feature off, select “OFF”.

Captions:

 This Closed Caption Mode will display text on the screen

in English or another language if broadcast. Generally, Closed
Captions in English are transmitted on C1 and Closed Captions in
other languages are transmitted on C2.

Text: 

The Text Closed Caption Mode will usually fill 1/2 of the screen

with a programming schedule or other information.

5

Press 

EXIT 

to return to the normal screen.


 3V00101A_En_p17-23

6/2/05, 4:40 PM

20

Summary of Contents for HDPDP4200

Page 1: ...l remote control from your local retailer please contact the remote manufacturer for the required programming code IF CONTACT WITH CUSTOMER SERVICE IS REQUIRED PLEASE HAVE THE MODEL NUMBER READY PRIOR...

Page 2: ...party responsible for compliance to these rules is ORION SALES INC HIGHWAY 41 ORION PLACE PRINCE PRINCETON INDIANA 47670 Ph 1 800 289 0980 WARNING This equipment has been tested and found to comply wi...

Page 3: ...cles and the point where they exit from the apparatus 11 Only use attachments accessories specified by the manufacturer 12 Use only with the cart stand tripod bracket or table specified by the manufac...

Page 4: ...d in the plasma display panel and cause subtle but permanent ghost images This type of damage is NOT COVERED BY YOUR WARRANTY Never leave your plasma display on for long periods of time while it is di...

Page 5: ...ment 30 Selecting the color temperature 31 Resetting your picture adjustment 31 Sound control adjustment 32 Selecting the HDMI audio input source 32 Selecting the BBE 33 Resetting your audio adjustmen...

Page 6: ...elect one of 3 languages English Spanish or French for on screen programming NOTES Please make sure to insert the cord securely at both the Plasma Display and the wall outlet The AC Cord has a groundi...

Page 7: ...AUDIO L R VIDEO OUT jacks COMPONENT2 IN jacks COMPONENT1 IN jacks AUDIO L R VIDEO IN jacks VIDEO1 AC power cord socket HDMI IN jack HDMI AUDIO L R IN jacks PC IN jack PC AUDIO L R IN jacks AUDIO L R V...

Page 8: ...ted on page 10 1 PLASMA DISPLAY VCR CABLE DVD POWER Button Used to turn the Plasma Display VCR Cable Satellite box or DVD on or off after you select the operating mode on step 9 2 SLEEP Button To set...

Page 9: ...are installed and you have registered the codes that operate your products Some buttons are used exclusively for each product and some buttons are used in common with each product To operate your pro...

Page 10: ...Fisher 11 12 13 47 Sanyo 06 12 47 Funai 31 Scott 04 05 33 43 General Electric 14 16 20 Sears 06 09 11 12 15 Goldstar 09 Sharp 08 61 Go Video 56 62 63 Shintom 39 Hitachi 15 57 Signature 2000 08 14 16...

Page 11: ...01 14 Funai 18 32 Samsung 10 Hitachi 11 Sharp 08 JVC 09 Silvania 18 32 Kenwood 15 29 SMC 25 Konka 19 Sony 04 26 27 28 Mitsubishi 05 Technics 00 Nordmende 01 Thomson 01 Onkyo 21 Toshiba 03 Orion 33 Vi...

Page 12: ...Display to a VCR with an S Video cord If you connect a VCR with a S VIDEO cord to the S VIDEO IN jack on the rear of the Plasma Display you must also connect the audio cords to the AUDIO IN jacks on...

Page 13: ...onnect the Plasma Display to a DVD player with component video If your DVD player has component video out jacks connect your Plasma Display to a DVD player using a component video cord It can greatly...

Page 14: ...r lower of the Plasma Display AUDIO R OUTPUT AUDIO L OUTPUT 2 24 Connections to other equipment To connect the Plasma Display to a DTV receiver set top box If you connect a DTV receiver set top box co...

Page 15: ...n the computer The Plasma Display can operate as the computer monitor Monitor Display modes MODE Resolution Refresh rate VGA 640x480 60Hz SVGA 800x600 56 3Hz SVGA 800x600 60 3Hz XGA 1024x768 60Hz To r...

Page 16: ...es and subsequent hook up variations required they have not all been included in the suggested connection diagrams You ll need to consult each component s Owner s Manual for additional information To...

Page 17: ...lect LANGUAGE 4 Press EXIT to return to the normal screen Press MENU The menu screen will appear 5 Setting the language You can choose from three different languages English French and Spanish for the...

Page 18: ...ill be indicated on the screen by white bars As the volume level increases so do the number of bars If the volume decreases the number of white bars also decreases QUICK VIEW This button allows you to...

Page 19: ...e box HD HDMI device only HDMI Press EXIT to return to the normal screen 5 Selecting the video input source Press INPUT SELECT to view a signal from another device connected to your Plasma Display suc...

Page 20: ...ystems may interfere with the Closed Captioned signal Closed Caption WHAT IS CLOSED CAPTIONING This Plasma Display has the capability to decode and display Closed Captioned television programs Closed...

Page 21: ...ord An age limitation can be set to restrict children from viewing or hearing violent scenes or picture that you may choose to exclude The restriction applies to TV RATING and MOVIE RATING if this dat...

Page 22: ...e desired rating you want Press or to select the setting ON or OFF Press or to select MOVIE RATING Then press or to display the desired rating OFF MOVIE RATING is not set G All ages PG Parental guidan...

Page 23: ...4 6 Enter a new password using the number buttons 0 9 then press ENTER 5 1 Press or to display the password entering mode Use the number buttons 0 9 to enter your password then press ENTER The LOCKS m...

Page 24: ...the front panel Press and hold VOLUME on the front panel of Plasma Display for about 10 seconds until the message PANEL LOCK OFF appears on the screen 3Press or to select PANEL LOCK then press or to s...

Page 25: ...appear Press or a number buttons 0 4 to select the desired picture size as described below and on the next page You can view 480i and 480p format programs in a variety of picture sizes NATURAL CINEMA...

Page 26: ...fill the width of the screen it is extended horizontally However it is only slightly extended at the top and the bottom The top and bottom edges of the picture may be hidden To view the hidden areas s...

Page 27: ...SETUP menu Press or to select PICTURE SCROLL You can scroll the picture in CINEMA WIDE2 and CINEMA WIDE3 Setting the picture scroll NOTE The scroll amounts are as follows 480i 480p signal source CINE...

Page 28: ...elect SETUP menu 1 2 To set the CINEMA MODE to FILM Selecting the cinema mode To set the CINEMA MODE to VIDEO Press or to select VIDEO in step 2 above A smoother motion may be obtained by setting the...

Page 29: ...to select PICTURE PREFERENCE 1 2 3 Press or to select the item you want to adjust 4 After your desired setting press EXIT to return to the normal screen Mode Picture Quality SPORTS Bright and dynamic...

Page 30: ...ter your desired setting press EXIT to return to normal screen SHARPNESS BRIGHTNESS CONTRAST COLOR TINT decrease brightness decrease contrast paler color reddish color tint makes picture softer increa...

Page 31: ...reset color temperatures COOL MEDIUM and WARM Press or to select COLOR TEMPERATURE Press or to select the mode you prefer Press MENU then press or select PICTURE menu 1 2 Selecting the color temperatu...

Page 32: ...return to the normal screen Press or to select the item you want to adjust then press or 2 Press or to adjust the setting 3 Press or to select HDMI 2 3 Press or to select HDMI or DVI HDMI When you con...

Page 33: ...ks of BBE Sound Inc Selecting the BBE By correcting the phase delay and distortion naturally gener ated by speaker systems the BBE sound feature ensures that the sound that reaches your ears is as nat...

Page 34: ...he screen in small increments continuously to reduce the image retention of stationary images i e channel identification logo etc INVERSION FULL WHITE Assists in preventing retained images on the scre...

Page 35: ...e steps 1 5 on page 17 If no buttons are pressed for more than approx 60 seconds the PC Monitor Menu screen will return to normal Monitor screen automatically The PC Monitor Menu settings are not effe...

Page 36: ...setting press EXIT to return to the normal screen Press or to select the item you want to adjust then press or 2 BASS 25 TREBLE 25 BALANCE 0 HDMI BBE RESET HDMI OFF ADJUST SELECT Press or to adjust t...

Page 37: ...cture Display does not operate Poor color or no color R WHEN CALLING CUSTOMER SERVICE PLEASE HAVE YOUR MODEL NUMBER READY OR WRITE TO ORION SALES INC 3471 N UNION DR OLNEY ILLINOIS 62450 FOR INFORMATI...

Page 38: ...75 ohms Output VIDEO 1 V p p 75 ohms AUDIO 150 mV rms HDMI input HDMI compliant type A connector HDCP compliant E EDID compliant Suggested scan rates 1080i 480p 480i 720p HDMI Audio 2 channel PCM 32 4...

Page 39: ...ORION to effect warranty repairs to the class of product or by the ORION Factory Service Center d Damaged because it is improperly connected to the equipment of other manufacturers This warranty does...

Page 40: ...Printed in Thailand...

Reviews: