background image

15

ENGLISH

Starting setup

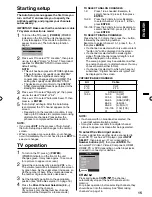
The Auto Setup menu appears the first time you 

turn on the TV, and assists you to specify the 

Air/Cable setting, and program your channels 

automatically.
IMPORTANT: Make sure that the antenna or cable 

TV system connection is made!

1

To turn on the TV, press   (

POWER

) (POWER 

indicator on the front of the unit changes green. 

It may take approx. 10 seconds for a picture to 

appear on screen.). The Auto Setup function 

begins.

Auto Setup

Automatic Search

Start

TV Location

Store

Signal Type

Cable

2

Press 

 or 

 to select “TV Location”, then press 

 or 

 to select “Home” or “Store”. This product 

qualifies for ENERGY STAR In Home mode 

default setting.

NOTE:

This unit has been preset to STORE brightness. 

This setting does not qualify under ENERGY 

STAR. To reduce brightness and energy 

consumption, change setting to ‘HOME’. This 

setting does qualify under ENERGY STAR.

The device may not conform to the ENERGY 

STAR standard after Reset is performed or the 

Backlight is adjusted.

3

Press 

 or 

 to select “Signal Type”, then press 

 or 

 to select “Cable” or “Air”.

4

Press 

 or 

 to select “Automatic Search”, then 

press 

 or 

ENTER

5

“Auto Setup” will begin. After the Auto Setup 

is completed, the TV channel appears on the 

screen.

Depending on the reception condition, it may 

take up to 30 minutes to complete memorizing 

digital cable channels. Please allow the 

process to complete without interruption.

NOTE:

If you press 

EXIT 

in the process of “Auto Setup”, 

the Auto Setup stops and changes to the normal 

screen.
When you make a menu selection, your changes 

occur immediately. You do not have to press 

EXIT 

to 

see your changes.

TV operation

1

To turn on the TV, press   (

POWER

).

(POWER indicator on the front of the unit 

changes green. It may take approx. 10 seconds 

for a picture to appear on screen.)

2

Adjust the volume level by pressing 

VOL +

 or 

 . 

The volume level will be indicated on the screen 

by green bars. As the volume level increases, so 

do the number of bars. If the volume decreases, 

the number of green bars also decreases.

3

Set the Signal Type option to the appropriate 

position (see “Air/Cable selection” on page 18).

4

Press the 

Direct Channel Selection (0

-

9, 

)


buttons to select the channel.

(If you press only channel number, channel 

selection will be delayed for a few seconds.)

TO SELECT ANALOG CHANNELS

1-9: 

Press 1-9 as needed. Example, to 

select channel 2, press 

2

, then press 

ENTER

.

10-99: 

Press the 2 digits in order. Example, 

to select channel 12, press 

1

2

, then 

press 

ENTER

.

100-135:  Press the 3 digits in order. Example, to 

select channel 120, press 

1

2

0

, then 

press 

ENTER

.

TO SELECT DIGITAL CHANNELS

Press the first 1-3 digits, then press the 


button, 

followed by the remaining number.

Example, to select channel 15-1, press 

1

,

 5

,


1

then press 

ENTER

.

If a channel is selected with only audio content, 

“Audio only” will be displayed on the screen.

If a channel is selected with a weak digital 

signal, “Digital channel signal strength is low” 

will be displayed on the screen.

  The same program may be available on either 

an analog channel or a digital channel. You may 

choose to watch either format.

If a channel is selected to which you have not 

subscribed, “Digital channel is encrypted” will 

be displayed on the screen.

VHF/UHF/CABLE CHANNELS

Air

Cable

VHF

2-13

VHF

2-13

UHF

14-69

STD/HRC/IRC

14-36 (A) 

(W)

37-59 (AA) 

(WW)

60-85 (AAA) 

(ZZZ)

86-94 (86) 

(94)

95-99 (A-5) 

(A-1)

100-135 (100) 

(135)

01 (4A)

NOTE:

If a channel with no broadcast is selected, the 

sound will automatically be muted.

It may take a few seconds for a digital channel 

picture to appear on screen after being selected.

To select the video input source

To view a signal from another device connected to 

your LCD TV, such as a VCR player, press

 INPUT 

SELECT

, then press 

 or 

 or corresponding 

Number buttons (0

-

7)

, then press 

ENTER

. You 

can select TV, Video1, Video2, Component, HDMI1, 

HDMI2, PC or DVD depending on which input jacks 

you used to connect your devices.

Input Select

0.TV

1.Video1

2.Video2

3.Component
4.HDMI1
5.HDMI2
6.PC
7.DVD

[0-7]:Select

CH 


Press and release 

CH


 /


. The channel 

automatically stops at the next channel set into 

memory.

For proper operation, before selecting channels, they 

should be set into the memory. See “Memorizing 

channels” on page 18.

56Q0121A_eng.indd   15

56Q0121A_eng.indd   15

2/7/11   10:06:08 AM

2/7/11   10:06:08 AM

Summary of Contents for HDLCDVD328

Page 1: ...g Cable TV set this menu option to the Air position Lorsque l appareil sort de l usine l option Signal Type est en mode Cable c blodistribution Si vous n utilisez pas la c blodistribution s lectionnez...

Page 2: ...REVENT FIRE OR SHOCK HAZARD DO NOT EXPOSE THIS APPLIANCE TO RAIN OR MOISTURE TO PREVENT THE SPREAD OF FIRE KEEP CANDLES OR OPEN FLAMES AWAY FROM THIS PRODUCT AT TIMES CAUTION TO PREVENT ELECTRIC SHOCK...

Page 3: ...harges Section 810 of the National Electrical Code ANSI NFPA 70 provides information with respect to proper grounding of the mast and supporting structure grounding of the lead in wire to an antenna d...

Page 4: ...is may cause skin inflammation If the liquid gets in your mouth immediately gargle and consult with your doctor Also if the liquid gets in your eyes or touches your skin consult with your doctor after...

Page 5: ...t ghost images This type of damage is NOT COVERED BY YOUR WARRANTY Never leave your LCD Panel on for long periods of time while it is displaying the following formats or images Fixed Images such as st...

Page 6: ...he 2 screws sup plied M4x35mm as shown in Figure 1 Finally secure the bottom plate b with 3 screws supplied M4x16mm as indicated by the arrows in Figure 2 Be sure to follow the instructions Insufficie...

Page 7: ...it exceeds audio CD sound Convenience Features Direct selection of your desired scenes using Title Chapter Time Track You can playback from the desired scene Recalling Up to 12 Scenes You can program...

Page 8: ...o inputs 19 Setting the V Chip 20 Closed Caption 21 CC advanced 21 Setting the picture size 22 DVD operation Preparation 23 Status display of disc 23 Playback procedure 23 Special playback 24 Zooming...

Page 9: ...egion number 1 or ALL of DVD video discs can be used on this unit Title When two or more movies are recorded on a disc the disc is divided into two or more sections Each section is called a TITLE Chap...

Page 10: ...Files with extensions jpg or JPG can be played Progressive JPEG formatted files do not work It may take some more time to start to play larger files than usual JPEG files with different aspect ratio m...

Page 11: ...during the menu screen operations PC MONITOR IN jack VIDEO1 IN jacks VIDEO AUDIO L MONO R PC DVI AUDIO IN jack Parts and functions COMPONENT IN jacks RF ANT IN jack Indicator Red Standby Green On AC...

Page 12: ...Screen menu Reset information in the menu VOL Adjust volume of TV INPUT SELECT Display source selection menu RECALL ZOOM Switch between present last channel Zoom CH Select channel of TV DVD MENU Disp...

Page 13: ...ni cad ni mh etc batteries Remove batteries if the remote control will not be operated for an extended period of time Power source TO USE AC POWER Connect the AC cord plug into this unit s AC INPUT ja...

Page 14: ...subscribers to unscrambled Cable TV service with scrambled premium channels If you subscribe to a Cable TV service in which basic channels are unscrambled and premium channels require the use of a Co...

Page 15: ...bars also decreases 3 Set the Signal Type option to the appropriate position see Air Cable selection on page 18 4 Press the Direct Channel Selection 0 9 buttons to select the channel If you press only...

Page 16: ...s sound will be silenced and Mute will appear on the screen The sound can be switched back on by pressing this button again or the VOL or SLEEP To set the TV to turn off after a preset amount of time...

Page 17: ...TV receives a stereo or SAP broadcast the word Stereo or SAP displays on screen every time you press DISPLAY Surround On Off The dynamic presence and sound created offers a thoroughly enjoyable liste...

Page 18: ...vance for several minutes please be patient NOTE Memorizing channels is best accomplished during evening PRIMETIME hours as more stations are broadcasting digital signals Memorizing channels can only...

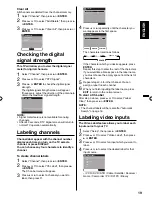
Page 19: ...he Ch Label menu will appear 3 Press or to select a channel you want to label then press Ch Label Label Clear Ch Label Channel Number 15 1 CH 1 Adjust Select CH 4 Press or repeatedly until the charact...

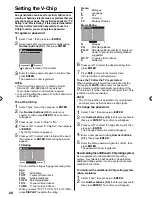
Page 20: ...select TV Y7 TV PG TV 14 or TV MA press DISPLAY to explain the rating Genre D Dialogue L Language S Sex V Violence FV Fantasy Violence Movie Rating G PG PG 13 R NC 17 X Movie Rating ENTER Set Select...

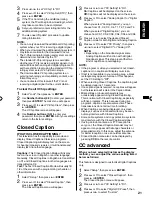
Page 21: ...ENTER The Closed Caption menu will appear 3 Press or to set CC Setting to On On Captions will be displayed on the screen Off Captions will not be displayed on the screen 4 Press or to select Analog C...

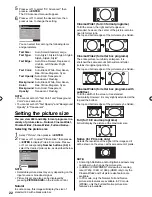
Page 22: ...Natural 4 Full 3 Cinema Wide3 NOTE Selectable picture sizes may vary depending on the input source or broadcast signal Picture Size menu also can be displayed by pressing PICTURE SIZE on the remote c...

Page 23: ...wrong way up Loading will appear on the display and then Can t play disc will be displayed Some playback operations of DVDs may be intentionally fixed by software producers Since this unit plays DVDs...

Page 24: ...1 Press ZOOM during playback The center part of the image will be zoomed in Each press of ZOOM will change the ZOOM magnification Zoom 2 and Zoom 4 2 Press to view a different part of the frame You ma...

Page 25: ...DVD Changing soundtrack language You can select the language when you play a multilingual disc 1 Press AUDIO during playback The current soundtrack language will appear Current Total Audio 1 2 English...

Page 26: ...ay Mode screen will appear A Start Point B End Point Off A B Repeat Repeat Random Program Search Mode Play Mode 2 Press to select A B Repeat then press or ENTER 3 Press to select A Start Point then pr...

Page 27: ...ode in HOME MENU Locating desired scene 1 Press PLAY MODE during playback or stop mode Play Mode screen will appear 2 Press to select Search Mode then press or ENTER 3 Press to select desired search m...

Page 28: ...est part and the darkest part Gamma Emphasize dark part of images Hue Adjust a balance between green and red Chroma Level Adjust color density It is effective with animation or something with high col...

Page 29: ...the image fills the screen 16 9 Wide Set if you have a widescreen TV Language settings Audio Language English French Spanish If there is an English French or Spanish soundtrack on the disc then it wi...

Page 30: ...Password Change Level Change Country Code 2 Press Number buttons 0 9 to input the current password then press ENTER Digital Audio Out Video Output Language Display Options 1 2 3 4 5 6 7 8 Off Initial...

Page 31: ...Moldavian mo 1315 Marathi mr 1318 Malay ms 1319 Maltese mt 1320 Burmese my 1325 Nauru na 1401 Nepali ne 1405 Norwegian no 1415 Occitan oc 1503 Oromo om 1513 Oriya or 1518 Panjabi pa 1601 Polish pl 161...

Page 32: ...MPONENT VIDEO OUT jacks of your DVD player with the COMPONENT video cables not supplied Rear of the unit Audio Video cord not supplied Rear of the unit NOTE Component Video input of the unit are for u...

Page 33: ...rnal component cable box satellite receiver etc to this LCD TV using an HDMI cable or a DVI to HDMI cable the image will not display if the output resolution of the component is set to 480i To receive...

Page 34: ...NT OF YOUR PC S RESOLUTION AND REFRESH RATE 60 HZ Connect one end of a male to male VGA cable to the video cord of the computer and the other end to the VGA connector PC MONITOR IN on the rear of the...

Page 35: ...ARIATION A slight picture size variation is normal when you adjust the CONTRAST or BRIGHTNESS settings Most types of television interference can be remedied by adjusting the height and position of the...

Page 36: ...icture wobbles or drifts Station or Cable TV experiencing problems tune to another station Make sure channels are set into memory Cable TV company is scrambling signal Check antenna orientation 15 18...

Page 37: ...ogram play etc cannot be performed Some discs may not allow some functions No surround sound The setup does not match your stereo system 33 The unit or remote operation key is not functioning Turn off...

Page 38: ...o 2 channel PCM 32 44 1 48 kHz sampling frequency 16 20 24 bits per sample PC Monitor Mini Dsub 15pin x 1 Antenna VHF UHF In 75 ohms coaxial Outputs Digital audio out 0 5 V p p 75 ohms terminated Audi...

Page 39: ...ufacturers This warranty does not cover a Damage to video disc b Damage to equipment not properly connected to the product c Costs incurred in the shipping of the product to an ORION authorized Indepe...

Reviews: