Sansui HDLCD5050 Owner'S Manual Download Page 12

EN

 12

GAME CONSOLE

or

Y

Pb

Pr

Y

Pb

Pr

The exact arrangement you use to interconnect various video and audio components to this unit is dependent 

on the model and features of each component. Check the Owner’s Manual provided with each component for 

the location of video and audio inputs and outputs.

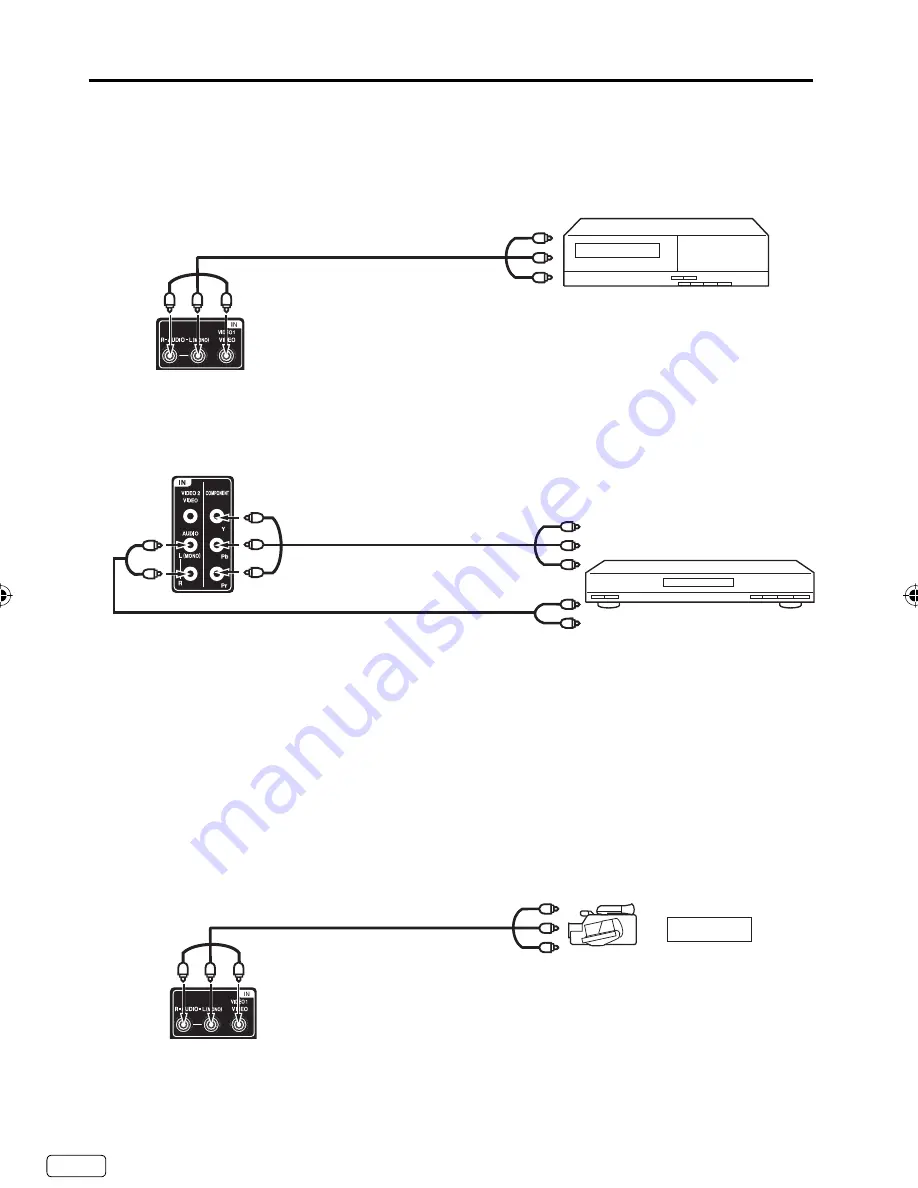
To connect the TV to a VCR

Connections to other equipment

To connect the TV to a DVD player with Component Video Input

You can enjoy a high quality picture by connecting the unit’s COMPONENT VIDEO OUT jacks of your DVD 

player with the component video cables (not supplied).

Left of the unit

To Video/Audio OUT

Video/Audio cord (not supplied)

To VIDEO/AUDIO IN

To Component OUT

Audio cord (not supplied)

Component video cord 

(not supplied)

To AUDIO IN

Rear of the unit

To COMPONENT IN

To Audio OUT

NOTE:

Component Video input of the unit are for use with a device which output 480i/1080i interlaced signals and 

480p/720p progressive signals.

VCR

DVD

To connect the TV to a camcorder, or a game console

To playback from a camcorder, connect the camcorder to the unit as shown.

This unit can also be used as a display device for many video games. However, due to the wide variety of 

signals generated by these devices and subsequent hook-up variations required, they have not all been 

included in the suggested connection diagrams. You’ll need to consult each component’s Owner’s Manual for 

additional information.

Video/Audio cord (not supplied)

To VIDEO/AUDIO IN

To Video/Audio OUT

Rear of the unit

J3LQ0121A_EN.indd   12

J3LQ0121A_EN.indd   12

3/14/12   4:36:46 PM

3/14/12   4:36:46 PM

Summary of Contents for HDLCD5050

Page 1: ...l appareil sort de l usine l option Signal Type est en mode Cable c blodistribution Si vous n utilisez pas la c blodistribution s lectionnez l option Air Before operating the unit please read this man...

Page 2: ...is encouraged to try to correct the interference by one or more of the following measures Reorient or relocate the receiving antenna Increase the separation between the equipment and receiver Connect...

Page 3: ...shock Never spill or spray any type of liquid into the unit 19 If an outside antenna or cable system is connected to the unit be sure the antenna or cable system is grounded to provide some protection...

Page 4: ...nufacturers If you have any doubts about your ability to safely install your flat panel display contact your retailer about professional installation Make sure that the wall where you are mounting the...

Page 5: ...liquid gets in your mouth immediately gargle and consult with your doctor Also if the liquid gets in your eyes or touches your skin consult with your doctor after rinsing for at least 15 minutes or lo...

Page 6: ...4 screws supplied 4x35mm 5 32 x 1 23 64 inches as shown in figure 1 Finally secure the bottom plate b with 5 screws supplied 4x12mm 5 32 x 15 32 inches as indicated by the arrows in figure 2 Be sure t...

Page 7: ...creen programming NOTE Please make sure to insert the cord securely at both the LCD TV and the wall outlet The AC cord has a polarized type AC line plug If the supplied AC cord does not match your AC...

Page 8: ...ons 11 Connections to other equipment 12 TV operation Starting setup 15 TV operation 15 Quick guide for menu operation 16 Convenience functions 17 Memorizing channels 18 Checking the digital signal st...

Page 9: ...L VOLUME buttons and INPUT ENTER button can be used to select the desired setting during the menu screen operations PC DVI AUDIO IN jack VIDEO1 IN jacks VIDEO AUDIO R L MONO COMPONENT IN jacks HDMI2 I...

Page 10: ...on When you press this button the current information will be displayed on a screen To remove the display from the screen press this button again 3 Direct Channel Selection Buttons 0 9 Allows direct a...

Page 11: ...or subscribers to unscrambled Cable TV service with scrambled premium channels If you subscribe to a Cable TV service in which basic channels are unscrambled and premium channels require the use of a...

Page 12: ...VIDEO AUDIO IN To Component OUT Audio cord not supplied Component video cord not supplied To AUDIO IN Rear of the unit To COMPONENT IN To Audio OUT NOTE Component Video input of the unit are for use...

Page 13: ...it will not work in conjunction with DTS audio or MPEG audio There will be no sound output if connected to an AV amplifier with a built in DTS decoder or MPEG decoder To Audio L Input To Audio R Input...

Page 14: ...HDMI cable If you use HDMI cable you don t have to connect the audio cord If you use DVI to HDMI cable please connect audio cord as same way as VGA cable Press INPUT SELECT on the remote control to s...

Page 15: ...pprox 10 seconds for a picture to appear on screen 2 Adjust the volume level by pressing VOL or The volume level will be indicated on the screen by green bars As the volume level increases so do the n...

Page 16: ...LAY again to clear the call display NOTE After a few seconds DISPLAY screen will return to normal TV operation automatically SLEEP To set the TV to turn off after a preset amount of time press SLEEP o...

Page 17: ...cond audio program SAP containing a second language or other audio information When the TV receives a stereo or SAP broadcast the word Stereo or SAP displays on screen every time you press DISPLAY Sur...

Page 18: ...digital signals Memorizing channels can only be accomplished while a station is broadcasting a digital signal to set that channel into memory If you are unsure of the digital channels available in you...

Page 19: ...ly until the character you want appears in the first space Label Clear Ch Label Channel Number 15 1 Ch Label CH 1 CH The characters rotation as follows SPACE If the character which you desire appears...

Page 20: ...rental guidance TV 14 14 years old and above TV MA 17 years old and above When you select TV Y7 TV PG TV 14 or TV MA press DISPLAY to explain the rating Genre D Dialogue L Language S Sex V Violence FV...

Page 21: ...CS6 4 Press or to select the desired Closed Caption mode for both Digital and Analog Caption 5 Press or to select CC Priority then press or to select Digital CC or Analog CC NOTE Depending on the broa...

Page 22: ...black side bar Cinema Wide1 for 4 3 format programs To fill the screen the right and left edges are extended however the center of the picture remains near its former ratio The top and bottom edges o...

Page 23: ...Shift operation buttons The status display will appear USB Memory Information Delay Time 00 02 09 Message Now Play View To delete the recorded program Disconnect the USB memory record another program...

Page 24: ...ATION A slight picture size variation is normal when you adjust the CONTRAST or BRIGHTNESS settings Most types of television interference can be remedied by adjusting the height and position of the VH...

Page 25: ...ircuit breaker Unplug unit for an hour then plug it back in Poor sound or no sound Station or Cable TV experiencing problems tune to another station Check sound adjustments VOL or MUTE Check for sourc...

Page 26: ...synthesized Inputs Video RCA 1 V p p 75 ohms Audio RCA 8 dBm 50k ohms Component video Y 1 V p p 75 ohms Pb Pr 0 7 V p p 75 ohms HDMI HDMI compliant type A connector HDCP compliant E EDID compliant Sug...

Page 27: ...ment of other manufacturers This warranty does not cover a Damage to equipment not properly connected to the product b Costs incurred in the shipping of the product to an ORION authorized Independent...

Reviews: