background image

58

GB

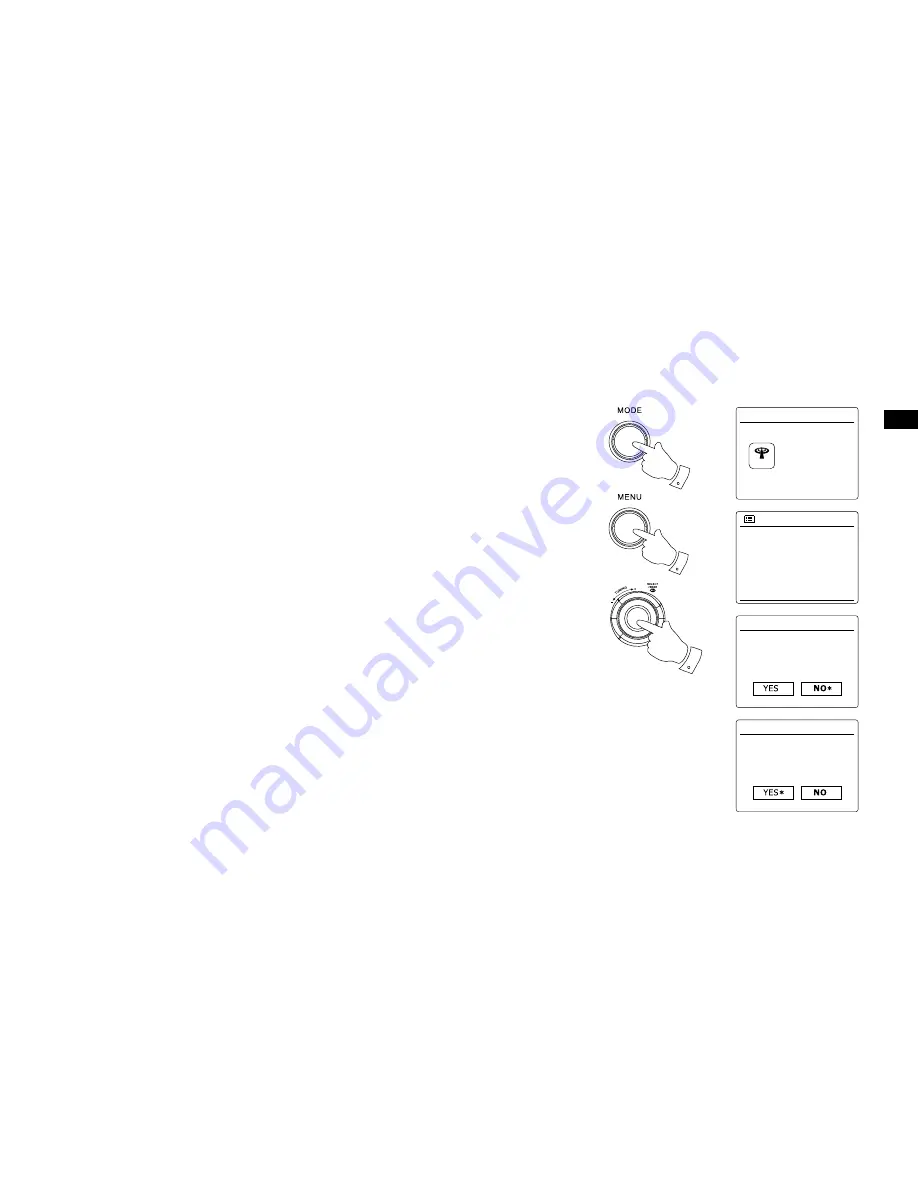
Scan setting

When using the FM mode your radio can be set to either scan local stations or to scan all 
stations including distant radio stations.

. Press the 

Mode

 button and rotate the 

Tuning Control Rotary 

as needed to highlight FM radio 

    mode. Press the 

Tuning Control Rotary

 to select the option.

2. Press the 

Menu

 button to enter the FM menu.

. Rotate the 

Tuning Control Rotary

 until 'Scan setting' is highlighted and then press the 

Tuning 

    Control Rotary

 to enter the scan adjustment mode. The current scan setting is indicated with 

    an asterisk.

4. To set your radio so that only the stations with the strongest signals are found during scanning 
    rotate 

Tuning Control Rotary

 until 'YES' is highlighted. Press the 

Tuning Control Rotary

 to 

    confirm the setting. (Normally this will restrict scanning to local transmissions.)

Alternatively, to set your radio so that all available stations are found during scanning (local and 

distant transmissions) rotate the Tuning Control Rotary until 'NO' is highlighted. Press the Tuning 
Control Rotary to confirm the setting.

2

1

3,4

FM

radio

104.90MHz

FM

10:38

FM Radio

FM

Scan setting
Audio setting
System setting
Main menu             

>

>

Strong stations only?

FM station scan

Strong stations only?

FM station scan

Summary of Contents for WFR-28

Page 1: ...Revision 2 WFR 28C WFR 28 GB...

Page 2: ...these functions are present on the radio The Now Playing screen provides radio station or media information with direct control of the radio volume Download iSangean from Apple iTunes Apple Store and...

Page 3: ...Play to function UPnP renderer 43 44 Using USB memory devices 45 46 DAB mode 47 55 Selecting a DAB radio station 48 Display modes 49 Finding new DAB radio stations 50 Manual Tuning 51 Dynamic Range Co...

Page 4: ...and FM radio functions can operate wherever the internet radio is able to receive a suitable broadcast signal IMPORTANT Before you continue make sure that your wireless access point or router is powe...

Page 5: ...new rechargeable batteries Do not use a mix of full and empty rechargeable batteries Do not use batteries that have a different mAh capacity Do not use damaged or leaking batteries Make sure the radio...

Page 6: ...Back button 7 Forward button 8 Standby button 9 Battery charge indicator Low battery indicator 10 Tuning Control Rotary Select knob 11 Volume button 12 Mute button 13 Preset 5 Stop button 14 Preset 4...

Page 7: ...GB 19 FM telescopic aerial 20 Auxiliary input jack 21 Line out jack 22 Headphone jack 23 DC in jack 24 Battery compartment 25 Alkaline NiMH NiCad rechargeable battery switch...

Page 8: ...ng to the radio station or music file being played 4 Many operations require the user to make a selection from the menu Highlight the menu item using the Tuning Control Rotary on the right side of the...

Page 9: ...3 When you apply power the display on the radio will light up and say SANGEAN The rst time that you use your radio or after Factory Reset the display will show Setup wizard and YES will be highlighte...

Page 10: ...power consumption but it does mean that you will need to switch that radio on manually in order to use either the Play to function or any other remote control software If you need to be able to remote...

Page 11: ...enter the network details manually This is described in Manual Network Configuration If your network name is being broadcast and it was not found then try re scanning press the Back button and if nec...

Page 12: ...characters as well as the three controls on the right The character currently highlighted will be entered when you press the Tuning Control Rotary Do this as needed until the complete key has been en...

Page 13: ...fully your radio will have connected to your router and then made a connection to the Internet and set its clock If this is the case then you can try listening to radio stations via the Internet Note...

Page 14: ...gured with a hidden SSID then you will need to enter some network settings manually Note a hidden SSID may prevent casual observers from detecting your network but is not recommended as a means of net...

Page 15: ...e value and to move on to the next group Repeat this until all eight groups of digits have been entered The next step is to set up the WiFi connection starting with the name of the wireless network SS...

Page 16: ...etween 8 and 63 characters and must be identical to the key which has been entered into your router Note the encryption key is sensitive to the use of upper and lower case letters and symbols Take car...

Page 17: ...r facility allows you to ensure that your radio can only be controlled by your own Apple device rather than someone else s Details of how this feature can be used with your iPhone or iPod touch are ex...

Page 18: ...ion and the country from which a station is broadcast this may be the easiest method to find a station It is also a great way to experience radio from other parts of the world You may also search for...

Page 19: ...tations is highlighted on the display and then press the Tuning Control Rotary Note that the menu may offer one or more local selections based upon the country in which the unit is being used accordin...

Page 20: ...nnot connect to a radio station Note If your radio is unable to connect to an internet radio station it will generally either display Network Error or Stopped This can be for many reasons but typicall...

Page 21: ...rol Rotary Rotate the Tuning Control Rotary to scroll through the list of content types This menu is normally cyclic you can scroll the list continually in either direction When the chosen genre is hi...

Page 22: ...ress the Info button to access the delete character on the screen and the character selection After the final character of the search has been entered use the Info button and then the Tuning Control R...

Page 23: ...n the display and then press the Tuning Control Rotary 2 Rotate the Tuning Control Rotary until Stations is highlighted on the display and then press the Tuning Control Rotary 3 Rotate the Tuning Cont...

Page 24: ...Rotary 3 You may then search by location genre or using part of the name of the podcast The searches operate in exactly the same way as when searching for a conventional radio station Searching by loc...

Page 25: ...o store the currently playing radio station as a preset press and hold the required Preset button 1 5 on the panel until the display shows Preset stored The station will be stored using the chosen pre...

Page 26: ...io mode press the Menu button The first item on the menu is Last listened With this item highlighted press the Tuning Control Rotary 2 The display will then show a list of the last ten Internet radio...

Page 27: ...stream to your radio If there are no bars shown to the right of the dividing line then the data stream reliability may be poor and you may find that there are many breaks in the audio this is not alw...

Page 28: ...ess code This allows it to uniquely identify your internet radio from the many others that it also provides data for To obtain the access code please followthese steps 2 With your radio switched on an...

Page 29: ...link My favourites in the My account area To delete a favourite radio station click on the icon with a heart and minus symbol 1 2 3 4 5 If you wish to listen to a radio which is not a currently held i...

Page 30: ...ry until My Favourites is highlighted on the display Press the Tuning Control Rotary and your favorite stations list will appear on the display set up as described on the preceding page Press the Tuni...

Page 31: ...do not broadcast 24 hours per day and some stations are not always on line In addition as mentioned in the previous section it is possible to specify audio streams for My added stations which are not...

Page 32: ...les which have DRM protection are not supported When using a UPnP server the search and selection criteria are determined by the server software but typically include Artist Album and Genre Many serve...

Page 33: ...available on your PC To add new media les to the library select Library then Music then All music or Artist Album etc This will show you the current library contents You may then simply drag and drop...

Page 34: ...ab in WMP 12 and select the Stream item to open the Media Streaming window Select Automatically allow devices to play my media then select Automatically allow all computer and media devices Alternativ...

Page 35: ...ontent to suitable devices 4 The radio will now list the media categories which are made available by the UPnP server for example Album Artist and Genre Rotate the Tuning Control Rotary to highlight w...

Page 36: ...owing the tracks in that album or folder When searching by UPnP they will normally be listed in track number order but as with the search criteria this can vary according to the server application use...

Page 37: ...m the point where it was paused 3 Press the Rewind button to start playback of the previous track in the list 4 Press the Fast forward button to start playback of the next track in the list 5 Press an...

Page 38: ...to enter the main Music player menu Rotate the Tuning Control Rotary until Shuffle play is highlighted on the display Press the Tuning Control Rotary to turn on the shuffle function Your selected trac...

Page 39: ...ntly playing d Format Displays the bit rate and format of the track currently playing e Buffer Displays the radios internal buffer status during media playback Whenever the Music Player is displaying...

Page 40: ...ess and hold the Tuning Control Rotary and the display will show Added to My playlist 2 The track will be added to the playlist for playback later Adding an entire album or folder 3 When using a UPnP...

Page 41: ...ary until My Playlist is highlighted on the display Press the Tuning Control Rotary button to enter the playlist 3 Rotate the Tuning Control Rotary until the track you wish to erase is highlighted Pre...

Page 42: ...y until My playlist is highlighted on the display Press the Tuning Control Rotary button 3 To play the playlist from a particular track rotate the Tuning Control Rotary until the desired track is high...

Page 43: ...ers Your radio stores details of the UPnP servers that it has seen via its network connection in its internal memory If you use the radio at different locations you may find that there are servers lis...

Page 44: ...s iOS or Android operating systems In this mode the radio acts as a UPnP Renderer 1 In order to use the Play to function the radio must be actively connected to the network The first time that you use...

Page 45: ...to the playlist in the current Play to window You may also delete or change the order of tracks within the Play to window When you wish to exit DMR mode simply either switch off your radio or press t...

Page 46: ...32 filing system in order to operate with the sound system However there are many different card variants available and not all cards can be guaranteed to work in the WFR 28C USB memory must use the...

Page 47: ...eeded until Music Player mode is selected Press the Tuning Control Rotary to select the option 3 Rotate the Tuning Control Rotary until USB playback is highlighted on the display and press the control...

Page 48: ...on counter will increase and the stations will be added to the list which is stored in the radio The bar graph indicates the progress of the scan 5 When scanning is completed the radio will list the s...

Page 49: ...recently been detected by the radio It may still be available Secondary services Some DAB radio stations can have one or more secondary stations associated with them Typically these are not broadcast...

Page 50: ...trength graph can be used when positioning the radio or its antenna For good reception the graph should occupy three or more blocks e Bit rate and audio type Displays the digital bit rate and audio co...

Page 51: ...ed to highlight DAB radio mode Press the Tuning Control Rotary to select the option 2 Once in DAB mode press the Menu button 3 Rotate the Tuning Control Rotary until Scan is highlighted on the display...

Page 52: ...he DAB multiplex found if any A bar graph shows the signal strength and is useful if you need to reposition the radio or its aerial The minimum signal marker I which separates the left and right parts...

Page 53: ...on the display 5 Press the Tuning Control Rotary to enter the DRC adjustment mode The current DRC setting will be indicated with an asterisk 6 Rotate the Tuning Control Rotary to highlight the requir...

Page 54: ...ntil Station order is highlighted Press the Tuning Control Rotary to enter the station order adjustment mode 5 Rotate the Tuning Control Rotary to choose between Alphanumeric Ensemble and Valid Alphan...

Page 55: ...e option 3 Press the Menu button to enter the DAB menu 4 Press the Tuning Control Rotary until Prune invalid is highlighted Press the Tuning Control Rotary 5 To cause the stations list to be pruned el...

Page 56: ...If RDS information is available after a few seconds the display will show the radio station name If you only hear hiss or interference simply press the Tuning Control Rotary to scan further Your radio...

Page 57: ...he Tuning Control Rotary to select the option 3 Rotate the Tuning Control Rotary to control the frequency that the radio will tune to The frequency will change in steps of 50kHz When the end of the wa...

Page 58: ...n the radio will only be able to display the frequency There will be no text or program type information available under these conditions The radio only provides displays when there is information ava...

Page 59: ...tting is indicated with an asterisk 4 To set your radio so that only the stations with the strongest signals are found during scanning rotate Tuning Control Rotary until YES is highlighted Press the T...

Page 60: ...g is highlighted on the display Press the Tuning Control Rotary to enter the audio setting mode The current setting is indicated with an asterisk 4 To switch to mono in order to reduce the hiss from a...

Page 61: ...edure as needed for the remaining presets 4 Stations which are already stored in the presets may be over written by following the above procedure Note The radio station presets are retained in memory...

Page 62: ...turn on this radio s power please refer to Con guration in the previous section Note It is necessary that your radio and your smartphone connect to the same wi network so that you can nd the radio on...

Page 63: ...e the icon it indicates no connect device available Check your device s user manual or the manufacture s support site as a rmware upgrade may be required 5 Control playback Use the controls on your Co...

Page 64: ...ays the bit rate and sampling rate of the track currently playing e Playback buffer Displays the radios internal buffer level Note If the Audio streaming from Spotify Connect is interrupted or stopped...

Page 65: ...that your computer Smartphone is on the same network as the radio Enter the IP address noted above into the address bar of your web browser 2 When you enter the radio s con guration web page the top p...

Page 66: ...th your radio switched on press the Menu button to access the menu for the current mode 2 Rotate the Tuning Control Rotary until System settings is highlighted on the display Press the Tuning Control...

Page 67: ...the Tuning Control Rotary until Set format is highlighted on the display Press the Tuning Control Rotary to enter the clock format menu The current clock display format is marked with an asterisk 5 Ro...

Page 68: ...go to step 13 To change the current time or date setting rotate the Tuning Control Rotary until Time Date is highlighted on the display then press the Tuning Control Rotary to enter the time and date...

Page 69: ...cable to your location then press the Tuning Control Rotary to confirm the setting Rotate the Tuning Control Rotary until Daylight savings is highlighted on the display then press the Tuning Control R...

Page 70: ...the desired alarm 1 or 2 is highlighted on the display Press the Tuning Control Rotary to enter alarm setup 4 Rotate the Tuning Control Rotary until Time is highlighted on the display Press the Tunin...

Page 71: ...Off will disable the alarm Press the Tuning Control Rotary to confirm the selection If you choose to set the alarm to Once you will also need to set the date using the Tuning Control Rotary The alarm...

Page 72: ...until Save is highlighted Press the Tuning Control Rotary to store the alarm settings Your radio will show Alarm saved and will then go back to the list of alarms with the new alarm setting shown in...

Page 73: ...sounding the sound of the alarm will come out from your earphone Disabling alarms 1 To disable a single alarm enter the alarm setup menu and rotate the Tuning Control Rotary until the desired alarm i...

Page 74: ...n again while the radio is snoozed will set the available snooze time to 5 10 15 or 30 minutes 2 While the snooze timer is active the remaining snooze time is shown next to the flashing alarm icon on...

Page 75: ...off after the preset sleep time has elapsed 5 Your radio will switch into standby mode after the preset time has elapsed An active sleep timer is shown using a small timer indicator at the bottom of t...

Page 76: ...y to enter the setup Options for idle time will appear on the display 3 Rotate the Tuning Control Rotary to select the desired idle time Use the OFF option to cancel the inactive standby function 4 Yo...

Page 77: ...s highlighted Press the Tuning Control Rotary to enter the setup 2 Rotate the Tuning Control Rotary until Equalizer is highlighted on the display Press the Tuning Control Rotary to confirm 3 Rotate th...

Page 78: ...ter the adjustment mode and rotate the Tuning Control Rotary until the desired level between 14 and 14 is displayed The sound will change as you adjust the level Press the Tuning Control Rotary when y...

Page 79: ...to enter the system settings menu Rotate the Tuning Control Rotary until Brightness is highlighted on the display Press the Tuning Control Rotary to confirm the setting 3 In brightness menu there are...

Page 80: ...ay Press the Tuning Control Rotary to enter the settings menu 2 Rotate the Tuning Control Rotary until Language is highlighted on the display Press the Tuning Control Rotary to enter the menu 3 Rotate...

Page 81: ...before connecting headphones to the radio It is also recommended to reduce the volume before unplugging your headphones IMPORTANT Excessive sound pressure from earphones and headphones can cause heari...

Page 82: ...rotate the Tuning Control Rotary until AUX in mode is shown on the display Press the Tuning Control Rotary to select the option 4 Press the play on the connected audio device If you are using its head...

Page 83: ...ess the Tuning Control Rotary to con rm the setting The display will revert to the previous menu 4 With YES highlighted a full reset will be performed and the radio will restart as if rst plugged in T...

Page 84: ...hen press the Tuning Control Rotary to confirm the setting The radio will check to see if an update is available The display will show Checking for new versions If there are no updates then the displa...

Page 85: ...l Rotary to enter the settings menu 2 Rotate the Tuning Control Rotary until Network is highlighted on the display Press the Tuning Control Rotary to enter the Network settings menu 3 Rotate the Tunin...

Page 86: ...dio switched on and in the Internet Radio mode rotate the Tuning Control Rotary until Station list is highlighted on the display and the Tuning Control Rotary 2 Rotate the Tuning Control Rotary until...

Page 87: ...sion 11 to act as your UPnP Universal Plug and Play media server If not already installed on your PC Windows Media Player 11 may be downloaded from Microsoft s web site and installed by following the...

Page 88: ...that the radio may access the music files you will need to click the Library tab in WMP 11 and select the Media Sharing item to open the Media Sharing window Make sure the box Share my media to is ti...

Page 89: ...mes and protocols even within UPnP In general your radio will play the supported formats with most common UPnP servers Bit Rates The following table summarizes the maximum supported bit rates for the...

Page 90: ...to operate the product such that there is a minimum distance 10cm recommended to adjacent objects in order to ensure good ventilation The ventilation of the product should not be restricted by coveri...

Page 91: ...50 60 Hz 12W 87 5 108 MHz 174 928 239 200 MHz 802 11b and 802 11g supported with WEP and WPA WPA2 encryption Compatible with 802 11n routers which offer mixed mode support for 802 11b g Support dual...

Reviews: