05
GB
F
E
NL
D
When you change the setting of the’ Mic gain’, the new
setting will be shown on the display.
2.
Adjust the recording level
● This function allows you to adjust
the volume of recording input. Press
and hold the REC button [
]
to begin recording and the record
indicator illuminated.
When the input is too high, the PEAK indicator on the
top panel near REC button flashes red. In this case,
rotate the REC LEVEL rotary in anti-clockwise direction
till the PEAK indicator stops flashing.
● In addition, you can adjust the left / right balance of
the recording input. When recording, the input signal is
shown by the level meters on the display and the level
of the input signal from both left and right channel can
be monitored.
If the level meters for the right channel (indicating as R on
the display) moves to the right of the center on the scale,
rotate the balance control anticlockwise to increases the
recording level of left channel and vice versa.
However, normally, the cursor of balance control is highly
suggested to place in the center click to gain the same
recording level from both channels.
Music mode
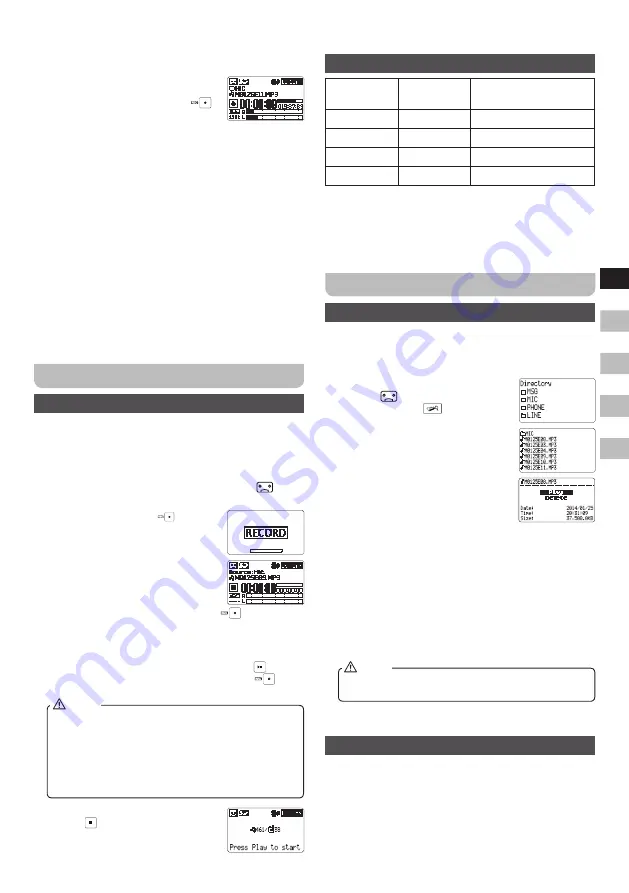
Recording
This recorder has 3 recording modes. Slide the Telephone /
Music / Reminder switch to set the recording mode.
Different settings are required for each recording mode.
1.
Press and hold the Power button to turn on the recorder.
2.
Slide MODE switch to the Music mode (
) and
‘MUSIC’ will be shown on the display.
3.
Press the Rec button
to begin
recording standby. ‘RECORD’ will be
shown on the display.
4.
You will see ‘Source: Mic.’ flashes on
the display. Press the Source button
to select the recording input option of
mic or Line (i.e. external device).
5.
Press and hold the Rec button
to start the
recording. Now the Rec indicator is constantly lit in red
and the counter on the display indicates the progress
of the recording and the remainingrecording time.
6.
To pause the recording, press pause button and the
Rec indicator flashes. Press the Rec button
again
to restart recording in the same file.
In Music mode, you can see all the recorded files
in your SD card. To find the files recorded in Music
mode, they are saved under the folder name of
‘MIC’ or ‘LINE.’ If the files are recorded with built-
in / external mic, they are stored in the ‘MIC folder’;
whereas LINE folder stored all the recoding made
from external source device (i.e. LINE IN).
NOTE
7.
To stop the recording, press stop
button
and the Rec indicator
stops illuminate. The display shows
the current recorded file.
8.
To check the recorded content, press the Play button to
start the playback.
Recorded file name
Recording
source
Folder name File name
Microphone
MIC
MmmddYxx.MP3
Telephone
PHONE
TmmddYxx.MP3
Reminder
MSG
RmmddYxx.MP3
LINE IN
LINE
LmmddYxx.MP3
mm: indicating month, numbered from 01~12
dd: indicating date, numbered from 01~31
Y: indicating Year, A=2010 / B =2011 / C=2012...and so on.
xx: indicating each file’s serial number on a daily basis.
Playback
Listening to a particular track / Deleting a file
On the browse screen, you can view the contents of the
Music folders, which contains the audio files on the SD
card. On this screen, you can also view the information,
play and erase selected audio files.
1.
Slide MODE switch to the Music
mode (
) and press the File
browser button
to enter the
browse screen. It shows the contents
of the folder that contains the file
that was played onthe home screen
before the browse screen.
2.
Press the File browser button again
to move up to the root menu (i.e.
Directory).
3.
To view the files in a specific file
folder in your SD card, rotate the
Tuning control until the desired file folder is highlighted.
Then press the Enter button to enter the folder, all the
files in the folder will be displayed.
4.
Rotate the Tuning control to move to the audio file
that you want to play. Press the Enter button and the
display will show PLAY or DELETE. Rotate the Tuning
control to select PLAY, and press theEnter button to
start playing the file. This unit will then play subsequent
tracks from the same folder. Or select DELETE to
erase the selected file.
When playing / pausing a track, press and hold the
File browser button to delete the current track.
NOTE
5.
Rotate the Volume control to adjust volume to an
appropriate level.
Controlling playback
1.
Press the Play / Pause button to pause playback of the
current track. Press the Play / Pause button again to
resume from the point where it was paused.
2.
Press the Rewind button to start playback of the
previous track in the list.
3.
Press the Fast-forward button to start playback of the
next track in this list.
Summary of Contents for DAR-101
Page 1: ...DAR 101 Revision 2 GB...


