background image

KBox A-150-SKL -  User Guide Rev. 1.1 


www.kontron.com 


// 46 


10.3.2.


Mechanical Diagrams Heatsink 

The following outline dimension drawings show the features of the optional heatsink with DIN rail mounting holes. 

Figure 35: Mechanical Diagram Heatsink 


19.2 

32.5 

32.5 

47.4 

47.4 

130 

118.8 

1.5 ±0.1 

32.5 

65 

32.5 

30° 

7.62 

19.2 

130 

130 

1.5 ±0.1 

130 

Summary of Contents for Kontron KBox A-150-SKL

Page 1: ...USER GUIDE www kontron com 1 KBox A 150 SKL Doc User Guide Rev 1 1 Doc ID 1062 3588...

Page 2: ...KBox A 150 SKL User Guide Rev 1 1 www kontron com 2 This page has been intentionally left blank...

Page 3: ...will be suitable for the specified use without further testing or modification Kontron expressly informs the user that this user guide only contains a general description of processes and instructions...

Page 4: ...OR RESALE FOR THE OPERATION OF APPLICATION IN A HAZARDOUS ENVIRONMENT OR REQUIRING FAIL SAFE PERFORMANCE OR IN WHICH THE FAILURE OF PRODUCTS COULD LEAD DIRECTLY TO DEATH PERSONAL INJURY OR SEVERE PHY...

Page 5: ...tions For contact information refer to the corporate offices contact information on the last page of this user guide or visit our website CONTACT US Customer Support Find Kontron contacts by visiting...

Page 6: ...escribed by the law may endanger your life health and or result in damage to your material ESD Sensitive Device This symbol and title inform that the electronic boards and their components are sensiti...

Page 7: ...es before performing any work on this product Earth ground connection to vehicle s chassis or a central grounding point shall remain connected The earth ground cable shall be the last cable to be disc...

Page 8: ...necessary to store or ship the product then re pack it in the same manner as it was delivered Special care is necessary when handling or unpacking the product See Special Handling and Unpacking Instru...

Page 9: ...ity EU 16 2 1 FCC Statement USA 16 2 2 EMC Compliance Canada 16 2 3 3 Shipment and Unpacking 17 Packaging 17 3 1 Unpacking 17 3 2 Scope of Delivery 17 3 3 Accessories 17 3 4 Kontron Parts option 18 3...

Page 10: ...7 10 4 Standards Certifications and Directives 47 10 5 Power Specification 50 10 6 10 6 1 Power Protection Requirements 50 10 6 2 Power Consumption 51 10 6 3 Protective Earth Stud Bolt 51 11 Connector...

Page 11: ...able 6 mPCIe Expansion Card Option 27 Table 7 Mainboard Specification 42 Table 8 Mechanical Specification 43 Table 9 Environmental Specification 47 Table 10 KBox A 150 SKL without Wi Fi Standards Cert...

Page 12: ...bay 36 Figure 23 Keep Out Area for Mounting for KBox A 150 SKL with heatsink no drive bay 36 Figure 24 Keep Out Area for installed dual Wi Fi Antenna with external 2 5 HDD SSD drive bay 37 Figure 25...

Page 13: ...as ventilation openings the openings are not covered or blocked If an air filter is provided this should be cleaned regularly Additionally make sure the system is well ventilated by observing that hea...

Page 14: ...tective earth connection is provided A suitable easily accessible disconnecting product is used in the application e g overcurrent protective product if the product cannot be disconnected A disconnect...

Page 15: ...components by their edge or by their casing 4 Avoid contact with pins leads or circuitry 5 Switch off power and input signals before inserting and removing connectors or connecting test equipment 6 K...

Page 16: ...e harmful interference to radio communications However there is no guarantee that interference will not occur in a particular installation If this product does cause harmful interference to radio or t...

Page 17: ...missing items contact your dealer Table 1 Scope of Delivery Delivered Item Part Description KBox A 150 SKL Corresponding to the ordered product configuration Phoenix Power Connector 3 pin DC mating p...

Page 18: ...tron s DIN rail embedded Box PC Kontron s A Series is intended for control cabinet applications Table 3 Product Identification System Type Product Designation Model Description KBox A KBox A 150 KBox...

Page 19: ...supports up to 512 GBytes of memory expansion and an internal mPCIe slot enables Wi Fi Bluetooth BT expansion All components are selected to ensure a long lifetime and the fanless design ensures a si...

Page 20: ...2 5 HDD SSD drive bay Figure 4 Front Panel no external drive bay 1 Power connector shown with mating connector attached 2 Protective earth stud bolt 3 HDMI connector 4 Display Port 5 2x LAN connector...

Page 21: ...P connector see Chapter 11 1 3 Display Port Connector DP 4 1 5 Ethernet LAN1 LAN2 There are two GbE LAN ports both supporting 10 100 100 Mbit Ethernet see Figure 3 and Figure 4 pos 5 For the pin assig...

Page 22: ...Figure 5 Rear View 1 DIN rail clamp Top View and Bottom View 4 3 Figure 6 Top View and Bottom View 1 DIN rail clamp 2 2x DIN rail mounting hole pairs M4 x 6 mm for horizontal and vertical mounting 3 H...

Page 23: ...150 SKL s chassis increases with the external 2 5 HDD SSD drive bay option 58 mm high with drive bay 50 mm high without drive bay Figure 7 Left Side View and Right Side View with external 2 5 HDD SSD...

Page 24: ...rews 5 3x Main chassis screws holes for 3x flathead M2 5x6 screws Corresponding to front panel screw holes pos 10 6 3 5 SBC 7 1x mPCIe slot with card 8 1x M 2 socket with module 9 Lithium battery 10 3...

Page 25: ...or for external drive bay 8 SATA2 connector 9 mPCIe slot 10 M 2 key B socket 11 Serial port 1 connector 12 Power on switch front panel pin header 13 Serial port 2 connector 14 USB 2 0 port pin header...

Page 26: ...roduct or and internal components Pay attention to manufacturer s instructions before installing removing expansion cards Due to the limited predetermined lifespan of expansion devices Kontron recomme...

Page 27: ...ble 5 M 2 Module Memory Expansion Table 5 M 2 Module Memory Expansion Storage Device Description 1x M 2 2242 SSD module M 2 Key B 2242 width 22 mm and length 42 mm SATA SSD drive Capacity 32 GByte 64...

Page 28: ...o observe this warning notice may result in damage to the product or and internal components Pay attention to manufacturer s instructions before installing removing expansion cards Due to the limited...

Page 29: ...150 SKL invalidates the warranty and may cause damage to internal components Before opening the KBox A 150 SKL the product must be switched off using the power on switch and disconnect all peripheral...

Page 30: ...igure 12 pos 2 that fasten the front panel and SBC together to form a SBC front panel assembly that can slide in out of the chassis 4 Turn the system around with the bottom side facing upwards Remove...

Page 31: ...Front panel with side screw removed 2 Front panel SBC assembly slides out of the main chassis 3 Main chassis with side screw removed 6 Place the front panel SBC assembly on an ESD safe surface 7 Close...

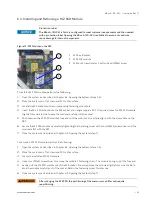
Page 32: ...efully into the socket 5 Push down on the M 2 SSD module s free end until the module s screw hole aligns with the screw hole on the SBC 6 Secure the M 2 SSD module by carefully tightening the fastenin...

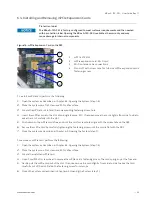
Page 33: ...card into the slot at an angle approx 30 If required move the card slightly from side to side to ease the card carefully into the slot 5 Push down on the mPCIe cards free end until the card s screw h...

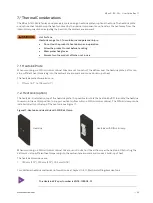
Page 34: ...ersing into the ambient environment and cause a build up of heat The heatsink plate dimensions are 171 mm 6 7 x 105 mm 4 1 Heatsink option 7 2 The heatsink is installed on top of the heatsink plate It...

Page 35: ...ithin the control cabinet Therefore when installing the DIN rail clamp take the following into consideration Do not obstruct the airflow over the heatsink this can stop sufficient heat dispersing and...

Page 36: ...ure 24 Figure 20 Keep Out Area for Mounting for KBox A 150 SKL with external 2 5 HDD SSD drive bay Figure 21 Keep Out Area for Mounting for KBox A 150 SKL with no drive bay Figure 22 Keep Out Area for...

Page 37: ...from the Wi Fi connector Wiring the DC Mating Power Connector 8 3 The DC input power connector connects to the DC power supply via the supplied DC mating power connector PSC 1 5 3 F and the correspond...

Page 38: ...e end of the prepared wires 5 Insert the wires into the corresponding clamp of the Phoenix mating power connector Make sure that you have the right polarity of the connection For the pin assignment of...

Page 39: ...ction made to the product is the power wiring The wires used for power connections must be clearly marked functional earth to ensure that the wires are connected to the DC input power connector and th...

Page 40: ...tch off using the Power on switch to perform an orderly shutdown without data loss Switching On 9 3 To switch on while the KBox A 150 SKL is connected to the DC power supply perform the following 1 Pr...

Page 41: ...ernal interfaces Processor On board controller On board memory 4x USB 3 0 2x LAN GbE 1x HDMI 1x DisplayPort 2x Serial Port configurable External Power Source External Part Audio Chip Realtek ALC662 Po...

Page 42: ...422 RS485 BIOS configurable 1x power on switch Storage 1x M 2 2242 SSD module Key B mixed w USB2 0 or SATA Up to 512 GB max 1x 2 5 slim HDD SSD drive option 1 Audio Line In Line Out Mic via Audio conn...

Page 43: ...eel chassis Mounting DIN Rail Color RAL7035 front panel RAL7043 top cover and main chassis Cooling fins black 10 3 1 Mechanical Diagrams KBox A 150 SKL For detailed mechanical information refer to the...

Page 44: ...HDD SSD Drive Bay mm Figure 30 Side View Dimensions with External 2 5 HDD SSD Drive Bay mm The following outline dimension drawings show the features for the KBox A 150 SKL without a drive bay Figure...

Page 45: ...v 1 1 www kontron com 45 Figure 32 Rear Side Dimensions without Drive Bay mm Figure 33 Top Side Dimensions without Drive Bay mm Figure 34 Side View Dimensions without Drive Bay mm 90 180 25 43 2 6 8 9...

Page 46: ...ical Diagrams Heatsink The following outline dimension drawings show the features of the optional heatsink with DIN rail mounting holes Figure 35 Mechanical Diagram Heatsink 19 2 32 5 32 5 47 4 47 4 1...

Page 47: ...sites for specific approvals may no longer apply Kontron is not responsible for any radio television interference caused by unauthorized modifications of the product or the substitution or attachment...

Page 48: ...tives Compliance RED Draft ETSI EN 301 489 01 V2 2 0 2017 03 EMC standard for radio equipment and services Part 1 Common technical requirements Harmonized standard for Electromagnetic compatibility Fi...

Page 49: ...rbance characteristics limits and methods of measurement ICES 003 2016 rules to limit the potential of harmful interference Environment WEEE Compliant with the Waste Electrical and Electronic Equipmen...

Page 50: ...applications requiring continuous operation use an uninterruptible PSU to provide constant power even during AC power loss To ensure an orderly shutdown without loss of data use a PSU with pre longed...

Page 51: ...B 3 0 1x HDMI 1x DP Mainboard External Interfaces Voltage 9 V to 30 V Max range Current 4 4 A Max 15 W 22 6 W 37 6 W Power 39 5 W 37 6 W 5 The PSU must supply the power required by all KBox A 150 SKL...

Page 52: ...HDMI Pin Signal Name Pin Signal name 2 18 1 19 1 TMD Data2 11 GND 2 GND 12 TMD Clock 3 TMD Data2 13 CEC 4 TMD Data1 14 Reserved 5 GND 15 DDC_CLK 6 TMD Data1 16 DDC_DATA 7 TMD Data0 17 GND 8 GND 18 5V...

Page 53: ...in Signal Name 4 1 5 9 13 10 14 18 1 USBA_VCC 1 10 USBB_VCC 1 2 USBA_D 11 USBB_D 3 USBA_D 12 USBB_D 4 GND 13 GND 5 USBA_RX 14 USBB_RX 6 USBA_RX 15 USBB_RX 7 GND 16 GND 8 USBA_TX 17 USBB_TX 9 USBA_TX 1...

Page 54: ...on s RTC battery assembly Pin Signal Name 1 VBAT 2 GND 11 2 2 12 VDC Out Power Connector Connector supplies the internal components with a nominal input voltage of 12 VDC Pin Signal Name 1 12 V 2 GND...

Page 55: ...lex 1 DCD Tx Data Tx 2 DSR 3 RXD Tx Data Tx 4 RTS 5 TXD RX RX 6 CTS 7 DTR RX RX 8 RI 9 GND GND GND GND 10 5V 5V 5V 5V 11 2 6 USB 2 0 Port Pin Header Pin Signal Name Pin Signal Name 1 USBVCC 2 USBVCC 3...

Page 56: ...tch Pin Header Connects to the front panel s Power on switch Pin Signal Name Pin Signal Name 1 Power LED 2 Power Button 3 NC 4 Power Button 5 Power LED 6 SMBALERT 7 BatLow 8 SMBus DATA 9 GND 10 SMBus...

Page 57: ...ctions or access to further sub menus with their own specific functions To start the uEFI BIOS Setup program follow the steps below 1 Switch on the KBox A 150 SKL 2 Wait until the first characters app...

Page 58: ...ain Setup Menu Figure 36 Main Setup Menu Example Aptio Setup Utility Copyright C 2018 American Megatrends Inc Main Advanced Power Boot Security Save Exit Product Information Product Name ECX SLU1 BIOS...

Page 59: ...8 0B 2C 24 Intel R Ethernet Connection I219 LM 00 50 08 0B 2C 23 F4 Save Reset ESC Exit Version 2 18 1263 Copyright C 2018 American Megatrends Inc The following table gives more information for import...

Page 60: ...h IRQ 3 4 5 6 7 9 10 11 12 Change Settings Auto Serial Port Type RS232 RS422 RS485 CPU Chipset Configuration EIST Enabled Disabled Hyper Threading Enabled Disabled VT d Enabled Disabled Active Process...

Page 61: ...2 0 UEFI Spec Version TCG_1_2 TCG_2 Physical Presence Spec 1 2 1 3 TPM 20 Interface Type Read only field TIS Additional Info Items marked with are hidden if security device support disabled Network St...

Page 62: ...N Configuration CPU FAN Setting Manual Smart Manual Duty 255 Intel I210 Gigabit Network Connection NIC Configuration Auto Negotiated Auto Negotiated 10Mbps Half 10 Mbps Full 100Mbps Half 100Mbps Full...

Page 63: ...elect Change Opt F1 General Help F2 Previous Values F3 Optimized Defaults F4 Save Reset ESC Exit Version 2 18 1263 Copyright C 2018 American Megatrends Inc The following table gives more information f...

Page 64: ...4 Save Reset ESC Exit Version 2 18 1263 Copyright C 2018 American Megatrends Inc The following table gives more information for important setup options within the Boot Menu Default setting are display...

Page 65: ...ximum length 20 Select Screen Select Item Administrator Password Enter Select User Password Change Opt F1 General Help HDD Security Configuration F2 Previous Values P1 TS32GMTS400I F3 Optimized Defaul...

Page 66: ...Install Factory Default keys Enroll Efi Image Save all Secure Boot variables Secure Boot Variable Size Key Source Platform Key PK 862 1 Test AMI Key Exchange Keys 1560 1 External Authorized Signatures...

Page 67: ...ppears Select Yes to save changes and exit Discard Changes and Exit Exits system setup without saving changes Select this option only if you do not want to save the changes that you made to the Setup...

Page 68: ...period Follow these steps before returning any product to Kontron 1 Visit the RMA Information website http www kontron com support and services support rma information 2 Download the RMA Request sheet...

Page 69: ...ol metallic threads or solvents like abrasives alcohol acetone or benzene for cleaning the KBox A 150 SKL 14 3 1 Replacing the Lithium Battery The KBox A 150 SKL is equipped with a Kontron specific ba...

Page 70: ...he internal USB 3 0 connector Figure 42 pos 2 using a double sided adhesive pad 4 Close the KBox A 150 SKL as described in Chapter 6 2 Opening the System step 7 Danger of explosion when replacing with...

Page 71: ...honor the warranty even during the warranty period and shall be exempted from the statutory accident liability obligations in the event of damage caused to the product due to failure to observe the fo...

Page 72: ...ternet of Things KVM Keyboard Video Mouse LAN Local Area Network LVD Low Voltage Device M 2 Next smaller generation of mSATA MEI Management Engine Interface mPCIe Mini PCI Express mSATA Mini SATA OS O...

Page 73: ...ducts and tailor made solutions based on highly reliable state of the art embedded technologies Kontron provides secure and innovative applications for a variety of industries As a result customers be...

Reviews: