background image

Initial S

etup

17

GB

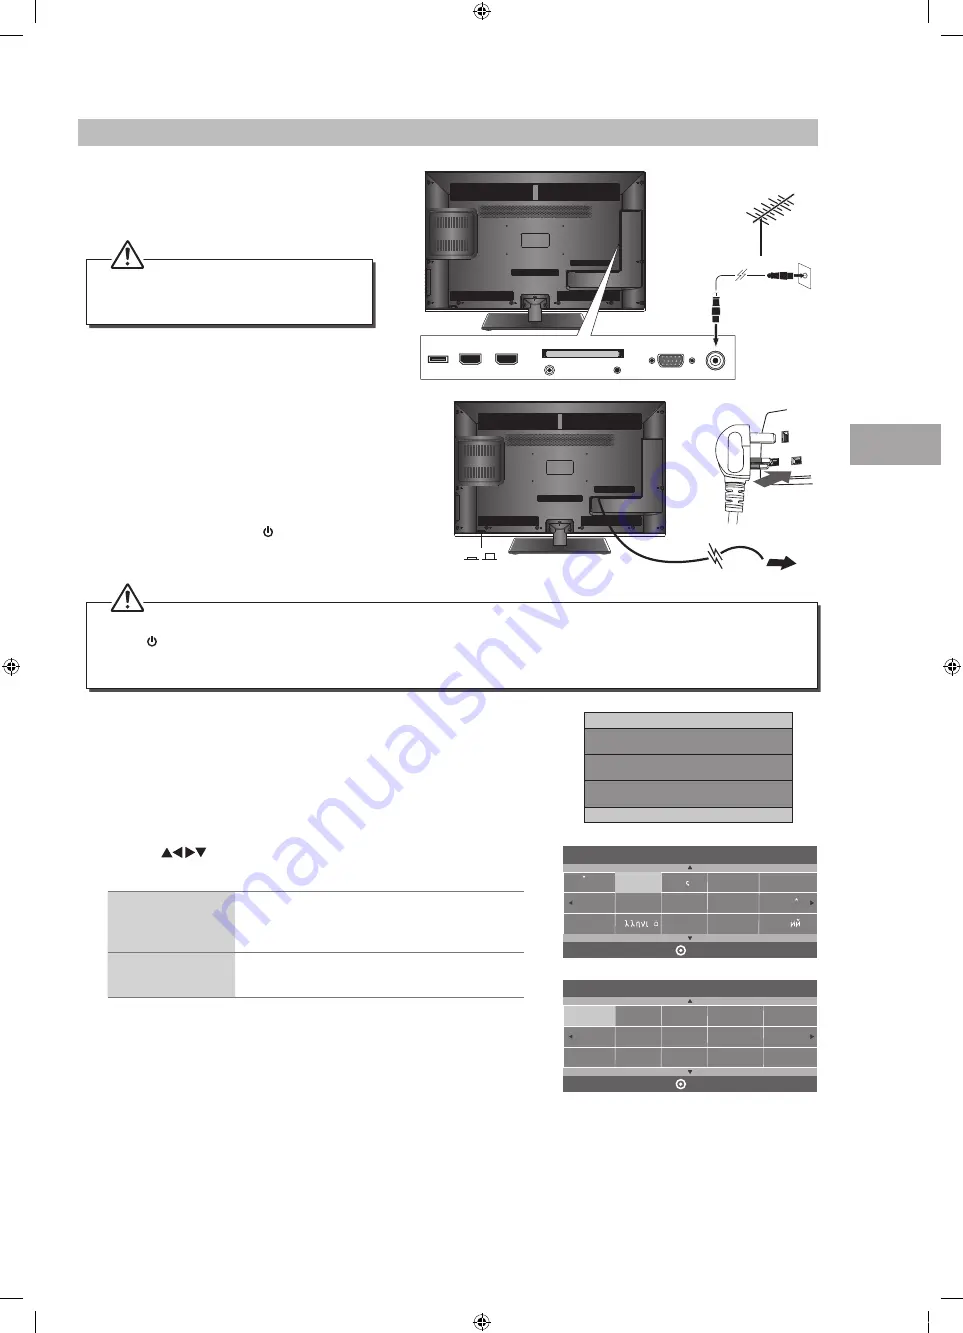
Turning the TV On for the First Time

1.  Connect one end of the RF coaxial cable to the 

aerial socket on the wall and the other end of the 
cable to the RF (75Ω) socket at the rear right side 
of your TV.

USB

HDMI2

HDMI1

PC IN

RF

COMMON  INTERFACE (CI)

HEADPHONE

PC AUDIO

Initial Setup

6.  Press the 


 buttons to navigate the menu and change the 

settings. Press the OK button to confirm.

OSD Language

Select your desired language to be displayed on 
the menu. The default on-screen menu language 
is set as English.

Country

Select the country where you will operate the TV. 
The default country is set as UK.

RF coaxial cable

(not included)

OR

2.  Connect the mains cable to the mains socket after 

you have completed all the connections.

3.  Switch on the POWER ON/OFF switch which is 

located at the front right side under the frame. At this 
stage, the TV switches to standby mode. The red LED 
indicator will illuminate on the front panel of the TV.

4.  In standby mode, press the   button on the right side 

panel of the TV or on the remote control to turn the 
TV on. The red LED indicator will turn green.

To the mains 

socket

On Off

5.  The first time you turn the TV on, it will go straight into the First Time 

Installation menu. Please ensure the aerial is plugged in and then press 
the OK button. (If you have already installed the TV using the Quick Start 
Guide, please go to the section “Selecting the Input Source” on the next 
page.)

Dansk

Deutsch

Hrvatski

Italiano

 OSD Language

OK                                         

Magyar

Nederlands

Norsk

Polski

English

Cesky

E           k

Espanol

~

Fran  ais

Portugues

Pycck

First Time Installation

Please ensure aerial is plugged in!

Then press OK button.

France

Greece

UK

Australia

Austria

Czech

Denmark

Finland

Country

OK                                         

Belgium

Bulgaria

Croatia

Hungary

Italy

Luxembourg

Germany

Do not connect the TV to the mains 
supply until you have completed all the 
connections.

•  Always disconnect the TV from the mains socket when not in use for a long period of time.
•  The   button on the right side panel of the TV or on the remote control is only used for switching the TV into standby, it 

does not disconnect the TV from the mains power. To completely disconnect the mains power, please remove the mains 
plug from the mains socket or switch off the POWER ON/OFF switch.

S32FED12_IB_120731_Annie.indd   17

12年7月31日   下午4:24

Summary of Contents for S32FED12

Page 1: ...Instruction Manual 32 Full HD LED TV with DVD Player S32FED12 S32FED12_IB_120731_Annie indd 1 12 7 31 4 23...

Page 2: ...S32FED12_IB_120731_Annie indd 2 12 7 31 4 23...

Page 3: ...tor 18 Selecting the Input Source 18 Channel Selection 19 Display Channel Information 19 Volume Adjustment 19 Customising TV Settings 20 Channel Setting DTV TV or Radio Mode 20 Auto Tuning 20 DTV Manu...

Page 4: ...es 52 Supported Formats 52 Region Code 52 Basic DVD Playback Functions 53 Playing the DVD 53 Menu Playback for DVD 53 Stopping Playback 53 Previous Next for DVD CD Multimedia discs 53 Forward Backward...

Page 5: ...tchcover Addendum P N 4031C241307 Thank youfor purchasing your new Sandstr m 32 Full HD LED TV with DVD player Your new TV has many features and incorporates the latest technology to enhance your view...

Page 6: ...ing kit Due to space restrictions we recommend that you make all connections refer to page 13 16 and page 44 for details before mounting on to the wall Installing Removing the Base Stand 200 mm 100 mm...

Page 7: ...f the TV 12 cm discs only Don t insert 8 cm discs 4 Press to eject disc DVD mode 5 Press to start playback or pause DVD mode 6 INPUT Press to select among different input signal sources DTV ATV SCART...

Page 8: ...l Connects to the aerial socket on the wall with the RF coaxial cable 6 PC IN PC AUDIO Connects to a computer or other devices with a VGA interface 7 COMMON INTERFACE Allows the insertion of a Common...

Page 9: ...y type indicated in this manual When the batteries are exhausted the remote will not function Replace both batteries at the same time with new ones Do not install new batteries with used ones and do n...

Page 10: ...sound mode Standard Music Movie Sports User 11 ASPECT Watch the screen in various formats Auto 4 3 16 9 Zoom Subtitle Smart Zoom Full 12 GUIDE Displays the EPG Electronic Programme Guide DTV mode TIT...

Page 11: ...V mode MENU Display the DVD menu DVD mode 24 S Subtitle Display subtitles which are broadcast with the programme DTV mode Display subtitles on the DVD DVD mode 25 REC Record the current programme DTV...

Page 12: ...e SUBPAGE Display the subpage on the teletext screen ATV mode 34 Advance playback rapidly DVD USB mode INDEX Select the page number of the index from teletext ATV mode 35 Coloured buttons Access the T...

Page 13: ...el of the TV or on the remote control to turn on your TV 4 Press the button on the right side panel of the TV or the INPUT button on the remote control to display the Source List Use the buttons to se...

Page 14: ...put socket 2 Plug the connected devices into the mains socket before switching on the POWER ON OFF switch which is located at the front right side under the frame 3 Press the button on the right side...

Page 15: ...io Left white and Audio Right red 2 Plug the connected devices into the mains socket before switching on the POWER ON OFF switch which is located at the front right side under the frame 3 Press the bu...

Page 16: ...ly increase the volume until you reach a comfortable listening level Rear Right Side View of TV USB HDMI2 HDMI1 PC IN RF COMMON INTERFACE CI HEADPHONE PC AUDIO Earphones Cable not included Long term e...

Page 17: ...turn the TV on The red LED indicator will turn green To the mains socket On Off 5 The first time you turn the TV on it will go straight into the First Time Installation menu Please ensure the aerial i...

Page 18: ...service that you require Press the buttons to adjust each option s setting and then press the OK button to confirm Country Code This will be shown as GBR for the UK Primary Region This will show the r...

Page 19: ...for details on Block Channel Press the FAV button to view the Favourite List Then use the buttons to highlight and select the channel Press the OK button to view the selected channel refer to page 22...

Page 20: ...V ATV Press the button and then press the buttons to select the country where you will operate the TV Press the OK button to confirm 2 Press the buttons to select Auto Tuning and then press the OK but...

Page 21: ...e CHANNEL menu and then press the OK button CHANNEL PICTURE SOUND TIME OPTION LOCK EXIT EXIT Auto Tuning DTV Manual Tuning ATV Manual Tuning Signal Information CI Information Software Update OAD Softw...

Page 22: ...e OK button ATV Manual Tuning Storage To 1 Sound System I Current CH 1 Search Fine Tune Frequency 255 25 MHz Save MENU a Delete Press the RED button to delete the selected channel b Rename ATV channel...

Page 23: ...to return to the main menu 4 Press the EXIT button to exit the menu Signal Information DTV Mode Allows you to view the signal information 1 Press the MENU button and then press the buttons to select t...

Page 24: ...tons to select the CHANNEL menu and then press the OK button 2 Press the buttons to select CI Information and then press the OK button CI Common Interface DTV Mode The common interface allows the use...

Page 25: ...ion Software Update OAD Off Software Update USB Channel Edit Yes No New FW is available for upgrading TV Version V0 01 Stream Version v0 03 Yes to upgrade No to ignore this upgrade EXIT Download 20 So...

Page 26: ...ess 50 Colour 50 Sharpness 50 Tint 50 BACK MENU EXIT Brightness Increases or decreases the amount of white in the picture for User mode Colour Controls the colour intensity for User mode Sharpness Adj...

Page 27: ...screen This selection will allow you to zoom in the picture without any alternation while showing subtitles at the bottom of the screen Smart Zoom This selection is similar to 16 9 mode but the pictur...

Page 28: ...loped by SRS Labs that provides an enhanced listening experience unlike any other technology that has been offered for a two speaker playback environment TruSurround HD builds upon its predecessor the...

Page 29: ...uages dual language you can switch to NICAM DUAL I NICAM DUAL II NICAM DUAL I II or MONO by pressing the AD button repeatedly NICAM DUAL I Sends the primary broadcast language to the loudspeakers NICA...

Page 30: ...e press the SLEEP button repeatedly until Off appears Auto Standby The unit will automatically switch to standby mode 4 hours after the last time the remote control was used A reminder screen will pop...

Page 31: ...l channels if multiple audio languages are broadcast 1 Press the MENU button and then press the buttons to select the OPTION menu and then press the OK button CHANNEL PICTURE SOUND TIME OPTION LOCK EX...

Page 32: ...Impaired Shows information for the hearing impaired in some programmes For DTV channels only if available 1 Press the MENU button and then press the buttons to select the OPTION menu and then press t...

Page 33: ...ory Default OSD Language Audio Language Country Subtitle Language 2 Press the buttons to select PVR File System and then press the OK button 3 Press the buttons to select the following PVR File System...

Page 34: ...f the TV remote controls e g controlling a TV set set top box and DVD player using only the remote control of the TV CEC also allows individual CEC enabled devices to command and control each other wi...

Page 35: ...p you to reduce power consumption and thus save money by reducing electricity bills Backlight Allows you to adjust the backlight setting of your TV This controls the brightness and display performance...

Page 36: ...must be set to On for this function to operate If the Lock System is set to On a valid password must be entered when you access Auto Tuning Manual Tuning Restore Factory Default 1 Press the MENU butt...

Page 37: ...the MENU button to return to the main menu 6 Press the EXIT button to exit the menu Set Password 1 Press the MENU button and then press the buttons to select the LOCK menu and then press the OK button...

Page 38: ...ase enter old password The default password is 6666 If you change the password be sure to remember the new password If you forget the new password enter the master password 9527 The default password i...

Page 39: ...g to information from the broadcasting station therefore if the signal has incorrect information this function will not operate This allows you to set up blocking schemes to block specific channels an...

Page 40: ...urn to the previous menu or press the MENU button to return to the main menu 7 Press the EXIT button to exit the menu 4 Press the buttons to select Parental Guidance and then press the OK button Lock...

Page 41: ...tons to select the desired programme Press the OK button to confirm Button Functions in a 7 Days Guide Remote Control Button Function RED Record Timer Programming See page 50 for details on Timer Prog...

Page 42: ...ading the text on the TV you can double the height of the text Press the SIZE button The top half of the page will be displayed in double height text Press the SIZE button again The bottom half of the...

Page 43: ...ist Press the buttons and then press the OK button to select the teletext channel Press the LIST button to exit the Channel List and the teletext page will be displayed after a few seconds Alternative...

Page 44: ...ear Right Side View of TV USB HDMI2 HDMI1 PC IN RF COMMON INTERFACE CI HEADPHONE PC AUDIO USB Cable not included Adapter Portable hard Disk USB Hub USB Some versions of portable hard disk may require...

Page 45: ...ect the specified photos press the buttons to select the picture file and then press the OK button A tick box will be displayed If you want to delete the file press the RED button to enter the Sub Men...

Page 46: ...fo Aspect Ratio 3 Press the buttons to select your storage device and then press the OK button Viewing Movies 1 Press the button on the right side panel of the TV or the INPUT button on the remote con...

Page 47: ...s the OK button to select the function Prev page Next page Prev Next Stop Music Playlist Info 3 Press the buttons to select your storage device and then press the OK button My Text 1 Press the button...

Page 48: ...ss Bar 1 Indicates the status of the currently displayed video 2 Indicates the time lagging behind the live broadcast DVR reviewing 3 Indicates the available recording time on your USB storage device...

Page 49: ...bar will disappear 3 Press the Stop button to stop recording If you want to turn off your TV during recording press the button on the right side panel of the TV or on the remote control A dialogue wil...

Page 50: ...This function is used to perform scheduled recording The recording from timer programme or direct recording may have a little bit of delay when it starts to record the broadcast programme Please make...

Page 51: ...on 4 Press the buttons to select the MY PVR folder and then press the OK button 5 Press the buttons to select your recorded programme and then press the OK button A tick box will be displayed If you w...

Page 52: ...eWritable AUDIO VIDEO JPEG DVD R DVD Recordable Audio Video format or JPEG files DVD R AUDIO VIDEO JPEG CD R CD Recordable Audio Video format or JPEG files AUDIO VIDEO JPEG CD RW CD Rewritable Audio V...

Page 53: ...move it from the disc slot When not using the DVD function in stand by mode or using others modes for a long period of time please take out the disc to protect the DVD loader and the disc Previous Nex...

Page 54: ...9 buttons or input the playback time After editing press the OK button to start If the input is invalid it will not function Repeat A B for DVD CD When playing DVD CD disc press the A B button to rep...

Page 55: ...To leave the Edit mode press the OK button on the remote control again to cancel the highlight 3 Press the button on the remote control to skip to the left screen Press the buttons on the remote cont...

Page 56: ...iew to Program view 2 Press the buttons on the remote control to select Edit mode then press the OK button on the remote control to leave the Edit mode Picture CD Playback When you insert a PICTURE CD...

Page 57: ...t the Video menu and then press the button to enter the sub menu Press the buttons to select the menu options Press the SETUP button to exit the menu Aspect Ratio TV System Language Video Rating Misc...

Page 58: ...rol Press the buttons to select the Misc menu and then press the button to enter the sub menu Press the buttons to select the menu options Press the SETUP button to exit the menu Using the DVD Rating...

Page 59: ...o not use any type of solvent such as thinner benzine commercially available cleaners or antistatic spray They may damage the disc Storing Discs Do not store discs in places subjected to direct sunlig...

Page 60: ...TV startup process Please contact your service centre if the picture has not appeared after five minutes No or poor colour or poor picture Adjust the settings in the PICTURE menu Try another channel...

Page 61: ...hy do I get blocking on my digital picture In most cases blocking is caused by a reception problem either the signal is too weak or there is some kind of interference Talk to your retailer or contact...

Page 62: ...check the display settings of your computer before connecting to the TV If the display setting of your computer does not match the TV there may be no video Resolution Vertical Frequency Hz Aspect Rati...

Page 63: ...nsumption In HOME STANDBY mode 39 3 W Average Annual Energy Consumption 57 kWh Standby Power Consumption 0 35 W Operating Temperature 0 C 40 C Operating Humidity 10 80 Mercury Content mg X Presence of...

Page 64: ...Maintenance Hints and Tips Specification 64 GB A B C D E F G ENERG Y IE IJA IA 2010 1062 2011 57 kWh annum 39 3 Watt 80 cm 31 5 inch S32FED12 A S32FED12_IB_120731_Annie indd 64 12 7 31 4 25...

Page 65: ...moving the unit Unplug the unit from the mains socket during a lightning storm Mains Cable Make sure the unit or unit stand is not resting on top of the mains cable as the weight of the unit may dama...

Page 66: ...ty Always remove the disc when the unit is not in use Failure to do so will risk severely damaging the disc and the unit Do not stack devices heat from other devices may affect the performance of the...

Page 67: ...poration and Macrovision are protected by trademarks HDMI the HDMI logo and High Definition Multimedia Interface are trademarks or registered trademarks of HDMI Licensing LLC The FREEVIEW word and log...

Page 68: ...S32FED12_IB_120731_Annie indd 68 12 7 31 4 25...

Page 69: ...S32FED12_IB_120731_Annie indd 69 12 7 31 4 25...

Page 70: ...S32FED12_IB_120731_Annie indd 70 12 7 31 4 25...

Page 71: ...S32FED12_IB_120731_Annie indd 71 12 7 31 4 25...

Page 72: ...S32FED12_IB_120731_Annie indd 72 12 7 31 4 25...

Reviews: