background image

S&C Instruction Sheet 765-510    31

 WARNING

DO NOT operate the Omni-Rupter Switch slowly 

or part way by using a “chopping” motion. 
When in service, the Omni-Rupter Switch should 
always be opened or closed vigorously through its full 
travel without hesitation at any point to avoid arcing 
and personal injury.

NOTICE

If furnished with provisions for power operation 
using the 6801M Automatic Switch Operator (catalog 
number suffix “-M”), follow the operating instructions 
found in the 6801M Operator operating manual (S&C 
Instruction Sheet 1045M-540).

To Open:

Remove the padlock or retaining device from the padlock 
hasp. Swing the hasp clear of the closed stop plate. Make 
sure the padlock hasp of the open stop plate is clear of the 
stop plate opening.

Lift the handle out of the closed stop plate and swing it 

quickly toward the open direction. See Figure 38. Lower the 
handle into the open stop plate. Secure the handle with a 
padlock or retaining device according to standard system 
operating procedures and safety practices.

Make sure all three pole-units are open and their blades 

are at an approximate 90 degrees from the 

Closed

 position 

(perpendicular to the switch mounting-weldment). See 
Figure 32 on page 28.

To Close:

Remove the padlock or retaining device from the padlock 
hasp. Swing the hasp clear of the open stop plate. Make 
sure the padlock hasp of the closed stop plate is clear of 
the stop plate opening.

Lift the handle out of the open stop plate and swing it 

quickly toward the closed direction. Lower the handle into 
the closed stop plate. Secure the handle with a padlock or 
retaining device according to standard system operating 
procedures and safety practices.

Check the switch blades to make sure all three phases 

are closed. See Figure 31 on page 28.

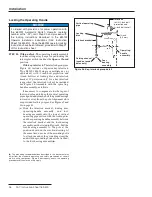
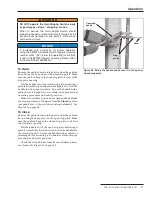
Figure 38. Swing the handle and secure it in the open or 

closed stop plate.

Operating 
handle

Hasp

Stop 
plates

Operation

Summary of Contents for Omni-Rupter Series

Page 1: ...n this Instruction Sheet 2 Proper Application 3 Warranty 3 Safety Information Understanding Safety Alert Messages 4 Following Safety Instructions 4 Replacement Instructions and Labels 4 Location of Sa...

Page 2: ...n Do not assume the operating handle position necessarily indicates the Open or Closed position of the interrupter switch blades Upon completion of an opening or closing operation visually check the p...

Page 3: ...ns of Sale Immediate Purchasers Outside the United States plus any special warranty provisions as set forth in the applicable product line specification bulletin are exclusive The remedies provided in...

Page 4: ...ecautions are not followed NOTICE NOTICE identifies important procedures or requirements that can result in product or property damage if instructions are not followed Following Safety Instructions If...

Page 5: ...ther side and with blades in any position G 6580 2 B WARNING Lifting Instructions G 9377 C WARNING Lifting Instructions G 9379 D NOTICE Instructions for Connecting Conductors to Terminal Pads G 9391 E...

Page 6: ...clothing in accordance with safe operating procedures and rules 4 SAFETY LABELS AND TAGS Do not remove or obscure any of the DANGER WARNING CAUTION or NOTICE labels and tags Remove tags ONLY if instru...

Page 7: ...rlocks mounting bracket for interlock V1 V2 or V3 adds one two or three respec tively extra 6 foot 10 inch 208 cm lengths of pipe and includes the appropriate number of extra couplings and guides A de...

Page 8: ...urations Upright upright with extra mounting pole clearance and inverted mounting configuration switches are provided with a single point lifting bracket permanently attached to the switch base See Fi...

Page 9: ...e washers between the square washers and nuts to compensate for wood pole shrinkage and thus maintain fastener tightness Square and spring type washers are not included with the switch STEP 1 Drill tw...

Page 10: ...base from the shipping skid e Slowly and carefully lift the switch to the proper mounting height f Guide the switch so the through bolts projecting from the utility pole slip into the holes in the sw...

Page 11: ...ngs ONLY to the single point lifting bracket c Lift the switch as shown in Figure 3 until the lifting slings are just taut d Unbolt the switch base from the shipping supports e Slowly and carefully li...

Page 12: ...the switch to the proper mounting height f Guide the switch so the through bolts projecting from the utility pole slip into the holesintheswitch spole mountingbracket The pole mounting bracket is pro...

Page 13: ...nstallation Installing the Optional Pole Band STEP 4 Securethepole band optional tothemounting bracketontheswitch usingtheJ boltsprovided See Figure 6 Two 1 3 inch stiffening blocks are furnished to b...

Page 14: ...ility to the couplings joining one or more lengths of pipe Before assembling a coupling back the piercing set screw out of the coupling so the tip does not protrude into the body of the coupling This...

Page 15: ...e in accordance with the dimension shown on the erection drawing STEP 8 Pass the next section of vertical operating pipe up through the guide bearing and attach it to the universal coupling on the low...

Page 16: ...the ground ing strap the end with the grounding connector attached to the foot bearing assembly If necessary to compensate for the taper of the wood pole and to keep the vertical operating pipe align...

Page 17: ...handle when lowered fits into the open position slot Mark on the support plate the location of the open position stop plate Figure 12 The foot bearing assembly and operating handle assembly Foot bear...

Page 18: ...ith insulated bases NOTICE S C recommends installing the Wildlife Protection option after the switch is secured to the utility pole Damage to the Wildlife Protection option may occur if lifting slings...

Page 19: ...ting brackets STEP 16 Hook one end of the spring clip assembly into the lip on the edge of one side of the base cover See Figure 15 Bring the spring clip underneath the switch base and stretch it unti...

Page 20: ...blade end When the wildlife disks are installed properly they will be at approximately the same height See Figure 18 On Upright 34 5 kV Omni Rupter Switches Porcelain and Cypoxy Insulators Count up t...

Page 21: ...t up three skirts from the live parts and install the wildlife disk to the insulator on the blade end When the wildlife disks are installed properly they will be at approximately the same height See F...

Page 22: ...witch See Figure 21 Then insert the locking tabs of one half of the disk into the open slot on the other half to create a secure overlapping fit Repeat the procedure on the opposite side of the disk W...

Page 23: ...king tab firmly into place Both tabs should protrude through the open slot as shown in Figure 22 on page 22 d Repeat Steps 17 a through 17 c to install the wildlife disks on the insulators on the cont...

Page 24: ...alues are shown in Tables 1 and 2 Table 1 Maximum Single Side Dead End Loading for Steel Base Switches Mounting Configuration Pounds per Conductor 14 4 kV 25 kV 34 5 kV Upright 2000 2000 1500 Upright...

Page 25: ...em in their respective connectors d Attach the connectors to the terminal pads Allow the articulating terminal pad to settle naturally with the weight of the conductor For other types of connector fol...

Page 26: ...vel locking disc and interlock bracket If provision only for a key interlock is specified the interlock will not be included See Figure 28 Assemble with the operating handle assembly as follows If nec...

Page 27: ...use the interlock bolt to position thelockingdiscsotheboltenterstheclosed position slot in the disc and will enter the open position slot when the switch is in the Openposition Holdthelockingdisc inc...

Page 28: ...structions S C Instruction Sheet 1045M 510 STEP 21 Open and close the interrupter switch by swinging the handle slowly through its full travel Make sure the following conditions exist a With the opera...

Page 29: ...er shunt arm will be released and will quickly snap back to its Closed position and reset for the next operation See Figure 33 c Slowly close the switch The following conditions should be met The inte...

Page 30: ...sustained during shipping or storage Contact the nearest S C Sales Office for assistance NOTICE Omni Rupter Switches specified with the optional harsh environment contacts catalog number suffix C have...

Page 31: ...Figure 38 Lower the handle into the open stop plate Secure the handle with a padlock or retaining device according to standard system operating procedures and safety practices Make sure all three pole...

Reviews: