background image


Chapter 2


—Getting Started 

24 

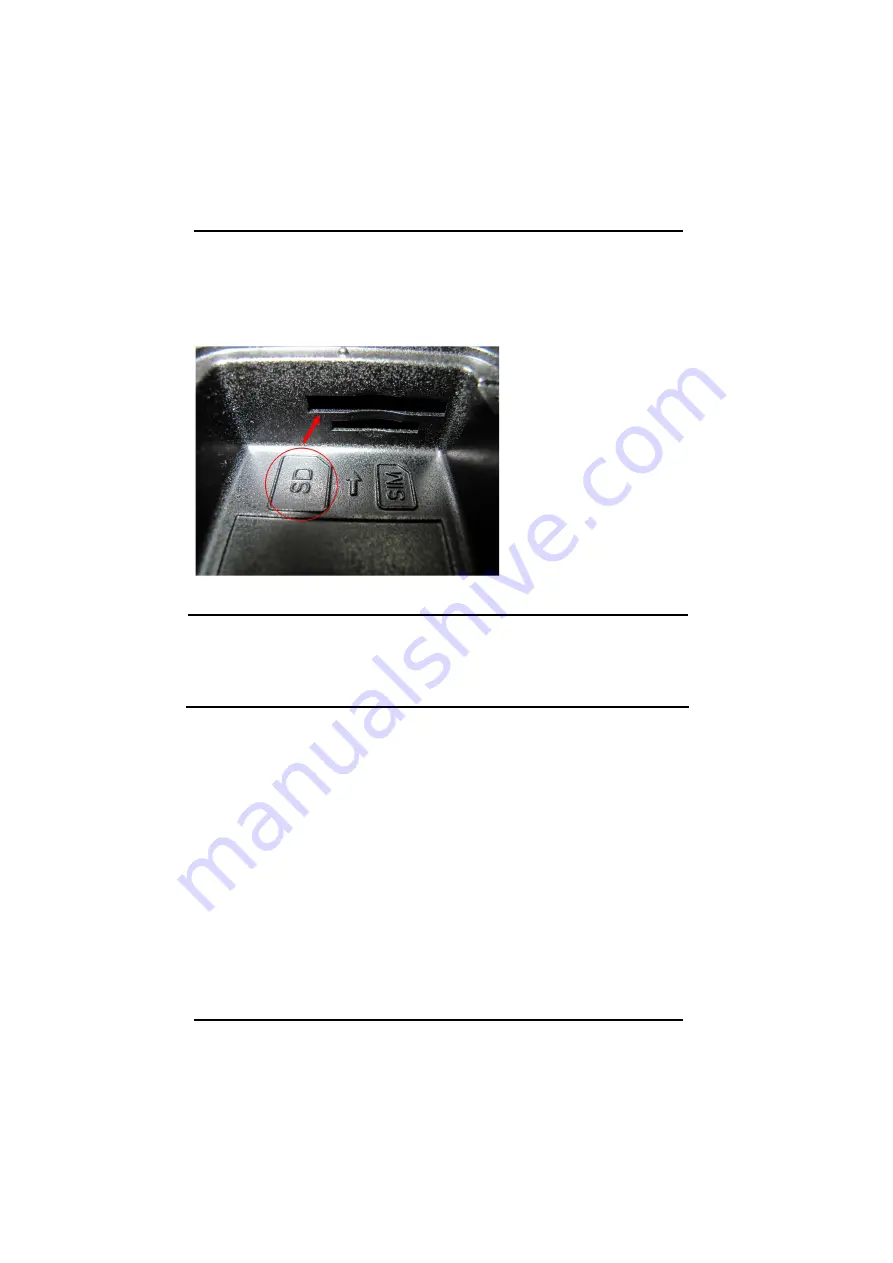
The SD Card Slot 

Your  Tablet  PC  includes  card  slot


which


supports  SD  Card.  Before  you 

find out the SD card slot, you need remove battery pack first.  
Then you will see the SD card slot like below picture: 


Note: 
Please read the instructions included with individual PC cards. 

Some cards may be inserted with power on, while others 
require that the Tablet PC be turned off


Summary of Contents for RuggedBook SR820s

Page 1: ...t Readable Water Proof Drop Proof Copyright 2010 SAMWELL GROUP Rugged Tablet PC SR820s Portable IP65 MIL 6 hours Battery 8 9 WSVGA LED Backlight Since 1975 AN ISO TS 16949 9001 13485 14001 OHSAS 18001...

Page 2: ...of Your Old Product vi Chapter 1 Introduction Getting Started 2 Safety and Maintenance 3 Check Lists 4 Features 5 Overview 5 About Your Tablet PC 7 Quick Start 8 Load Window 10 Keying Product ID 10 Pr...

Page 3: ...ag ge em me en nt t 27 Checking the Battery Level 27 Adjust the Power Plan 28 Sleep Power State 29 Battery Charging 30 When to Replace the Battery 31 Thermal Considerations 32 Chapter 4 System Softwar...

Page 4: ...Appendix Statements 53 Safety Caution 54 Important Safety Instructions 54 Canadian Department of Communications 55 Caution For Adatper 55 Battery Caution 55 iii...

Page 5: ...the CE test for environmental specifications Test conditions for passing included the equipment being operated within an industrial enclosure In order to protect the product from being damaged by ESD...

Page 6: ...ect the equipment from overheating DO NOT COVER THE OPENINGS 9 Position the power cord so that people cannot step on it Do not place anything over the power cord 10 If the equipment will not be used f...

Page 7: ...udes monitors and electrical accessories such as signal cables or power cords When you need to dispose of your display products please follow the guidance of your local authority or ask the shop where...

Page 8: ...C Ch ha ap pt te er r 1 1 I In nt tr ro od du uc ct ti io on n...

Page 9: ...ere This Manual contains the information you need to set up and use your Tablet PC It describes all the features of the Tablet PC in a manner of easy to read thorough Inventory This Tablet PC is desig...

Page 10: ...the system cabinet are for ventilation purposes Do not block or cover these openings or the system could overheat Do not use or store the Tablet PC near a source of heat or dust On the base or rear pa...

Page 11: ...x 1 Caution When purchasing any accessories purchase only those accessories that are approved for use with your Tablet PC Your system vendor can obtain these approved accessories If you use items that...

Page 12: ...s of the display LED backlight technology with the touch screen sunlight readable extraordinary functions 4GB up to 8GB DDR IIl compact SSD storage and fully connection of I O ports such as 2M pixel i...

Page 13: ...ptional function GPS Function Optional You can purchase our GPS module to set your GPS function up You can also purchase third party GPS navigation program to arrange in a group to use Please connect...

Page 14: ...ew users can find a simple step by step orientation in the Quick Start section of this chapter About Windows Help and Support are available at the Windows XP Tablet Edition Start menu offers extensive...

Page 15: ...stall and change battery at your Tablet PC ______________________________________ 1 Remove the screws on the battery cover at bottom side of your Tablet PC and open the battery cover 2 Remove the wate...

Page 16: ...e battery cover Turn on the Tablet PC for the first time 1 Connect the AC adapter to SR820s 2 Connect the AC adapter power cord to the AC adapter 3 Connect the AC adapter power cord to an AC outlet 4...

Page 17: ...operating system please check with your vendor for installation details Keying Product ID At the first time you starting the tablet PC you may choose your Language options by selecting the dropdowns L...

Page 18: ...y look for the product key sticker on your computer or inside the Windows package Your Tablet PC will begin loading Windows once you turn on the power Wait a few seconds for Windows setup to load The...

Page 19: ...Start Wizard updates your system settings the Welcome to Windows screen will appear You may disable this feature by clearing the check box labeled show this screen each time Windows starts Some softw...

Page 20: ...m the desktop Follow these steps to disconnect your computer from external accessories 1 Save any open files 2 Remove any media floppy disks or compact disks from the drive s 3 Shut down the computer...

Page 21: ...ing off the Tablet PC properly is important to maintaining your Tablet PC 1 Click the Windows start button 2 Choose Shut down option and turn off the Tablet PC by click on Switch user Warning Shutting...

Page 22: ...C Ch ha ap pt te er r 2 2 G Ge et tt ti in ng g S St ta ar rt te ed d...

Page 23: ...e different components and controls of your Tablet PC including the hardware components the software and the audio and video systems Getting Started Before you begin using your Tablet PC read this cha...

Page 24: ...e EMI ferrite suppression box to inhibit electromagnetic interference 3 Microphone Jack There can connect your own microphone to record your voice or using an IM program which support voice transfer 4...

Page 25: ...Chapter 2 Getting Started 18 Please see the Hotkey Table section at Page 22...

Page 26: ...t permit the use of the fax modem designed for this system 15 Barcode Scanner Optional There is a Barcode Scanner function for your second choice the detail information please see Chapter 5 16 USB por...

Page 27: ...Bay 19 Camera Please see the camera item at Chapter 5 page 49 20 Stylus Bay Put your stylus at Stylus Bay 21 Heat Flow Hole There has a heat sink inside 22 WWAN You can install a WWAN module to setup...

Page 28: ...also show battery status and low battery power alerts Icon Light Description Blue Power on Orange blinking System save to RAM Orange Battery is charging Off Battery is discharged Red blinking Low batt...

Page 29: ...of your Tablet PC The function as follows Hot key Function Power ON OFF switch Implement Secure Attention Sequence SAS same as Ctrl Alt Del Rotate the working screen Volume up Volume down Switch Wire...

Page 30: ...in use Storage a Solid State Disk SSD The SSD disk provides high performances even after violent shake high temperatures Windows and most programs are stored here It may be your other choice b Hard Di...

Page 31: ...D Card Before you find out the SD card slot you need remove battery pack first Then you will see the SD card slot like below picture Note Please read the instructions included with individual PC cards...

Page 32: ...card slot supported User can also purchase 3 75G WWAN module to setup your own WWAN network Before you insert your SIM card into the SIM card slot please remove battery pack first Then you will find o...

Page 33: ...C Ch ha ap pt te er r 3 3 P Po ow we er r M Ma an na ag ge em me en nt t...

Page 34: ...battery life and system performance can be balanced as well as enhanced Checking the Battery Level You can check the remaining battery power in the Windows battery status indicator located at the low...

Page 35: ...s those may be customized to fit individ circumstances as requirements of users 1 Click the Battery Icon More power options Control Panel System and Security Power Options Change Plan Settings System...

Page 36: ...ically be saved to the hard disk When using a mobile PC Windows XP Tablet Edition restores the previous work within seconds it won t be necessary to restart or re open the files While sleeping only ap...

Page 37: ...e Indicator panel will be active When the battery is fully charged the Battery Charge icon will turn off If your Tablet PC is turned off a fully discharged battery will take about 2 5 hours recharge t...

Page 38: ...in battery pack as follows 1 Unlock the screws on battery cover and remove the battery cover and remove the water proof rubber under battery pack 2 Slide battery latch to lift the cover then insert ba...

Page 39: ...specially designed to consume few power and generates less heat However working in a hot environment or working for long periods may raise the temperature If the temperature continues to rise processo...

Page 40: ...C Ch ha ap pt te er r 4 4 S Sy ys st te em m S So of ft tw wa ar re e...

Page 41: ...ve the sound system and the graphics sub system System Recovery Before you start If you reinstall your operating system all of the data originally on the hard disk will be overwritten Before reinstall...

Page 42: ...ROM and turn off system 3 Press power button to turn on the system then press Del key to enter BIOS setup menu 4 Move to Advanced BIOS Features setup menu and set USB DVD ROM to priority 1st HDD to p...

Page 43: ...w picture you can a If you do not want to recover your OS please take off the service DVD first and then type N and press Enter key to reboot system System will be rebooting b If you want to execute r...

Page 44: ...37 6 Continue recovery step like below graphics...

Page 45: ...am running After seeing below message Press any key to reboot system you can remove service DVD from DVD ROM RW and press any key to reboot system 8 If you choose 2 to run recovery system your system...

Page 46: ...When recover process successfully the system will show below picture After seeing below message Press any key to reboot system you can remove the service DVD from DVD ROM and press any key to reboot s...

Page 47: ...C Ch ha ap pt te er r 5 5 U Ut ti il li it ti ie es s a an nd d C Co om mm mu un ni ic ca at ti io on n D De ev vi ic ce es s...

Page 48: ...communication devices utility you can use on the Tablet PC Bluetooth WLAN GPS Barcode Scanner Camera WWAN Caution All of the utilities on SR820s Tablet PC have authorization to use but only for your...

Page 49: ...stem n Enhanced Data Rate EDR compliant for both 2Mbps and 3Mbps supported n Fully speed operation with Piconet and Scatternet support n Implement 802 11 coexistence solution by AFH Adjacent Frequency...

Page 50: ...le click My Bluetooth Places icon on the desktop 2 From Taskbar By double click My Bluetooth Places icon on the taskbar 3 From Start Menu By click My Bluetooth Places icon on Start Programs My Bluetoo...

Page 51: ...tible with the IEEE 802 11b g standard n High speed wireless connection up to 300 Mbps data rate and long distance of connection range n 2 antennas to support 1 Transmit x2 Receive MIMO technology n L...

Page 52: ...Connection that you can search for the available wireless networks and set up wireless network configuration Using WLAN After turn on the WLAN function via Hotkey on the front panel 1 From Taskbar By...

Page 53: ...rk Connection icon on Start Settings Network Connections Wireless Network Connection Functions 1 Search for the available wireless networks 2 Connect with a wireless network 3 Set up a wireless networ...

Page 54: ...Now Offline A GPS services OMA SUPL compliant n High immunity to jamming n 4 Hz position update rate n High sensitivity ultra low power consumption cost efficient n Supports external active antenna wh...

Page 55: ...Chapter 5 Utilities and Communication devices 48 1 TomTom n Web site http www tomtom com 2 Destinator n Web site http www intrinsyc com...

Page 56: ...de n Programmable scan angle Provides flexibility to cost effectively customize products for specific applications n RoHS compliant n Die cast zinc chassis and single board construction Has a shock ra...

Page 57: ...able n Codebar Disable n MSI Disable n RSS Disable Utility You can use Scan Engine Demo to scan barcode Using barcode scanner 1 Executes ScanEngineDemo exe on Windows XP Embedded desktop 2 Go to Start...

Page 58: ...site http www webcamxp com download aspx to download the camera utility to take picture and review Of course you also can try to use another provider camera utility Beside you can use the camera modul...

Page 59: ...A Ap pp pe en nd di ix x S St ta at te em me en nt ts s...

Page 60: ...erence to radio or television reception which can be determined by turning the equipment off and on the user is encouraged to try to correct the interference by one of the following measures n Reorien...

Page 61: ...rger telecommunication line cord IMPORTANT SAFETY INSTRUCTIONS When using your telephone equipment basic safety precautions should always be followed to reduce the risk of fire electric shock and inju...

Page 62: ...expressly approved by the manufacturer may void the user s authority to operate the equipment The manufacturer is not responsible for any radio or television interference caused by unauthorized modifi...

Page 63: ...en that the equivalent isotropically radiated power EIRP is not more than that required for successful communication This Class B digital apparatus complies with Canada RSS 210 Cet appareil num rique...

Page 64: ...tenuation distance based attenuation or other electronic controls to meet their laser power classification provided that the product s laser classification matches the engine Symbol will also provide...

Page 65: ...Symbol Note that some specialty markets such as medical military or other specialty markets may have more specialized regulatory controls and may require additional tests to be performed The Class 2 S...

Reviews: