


24_
live
live
Preset
Preset is a specific position remembered by the PTZ camera. You can use the Preset function to define up to
255 presets for a single PTZ camera.
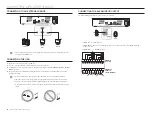
To add a preset
1.
Check the preset checkbox.
2.
Select <
>.
The virtual keyboard will appear on the screen. Use it to provide the preset name.
`
Refer to "
Using Virtual Keyboard
". (Page 26)
•
: You can change the preset settings to your preference.
•
: Delete a selected preset.
•
: Delete all the existing preset settings.
M
`
You can add up to 255 presets, which is the max count supported by the NVR.
`
If you replace a camera that saves your preset settings with a different one, you must configure the preset settings again.
3.
Select <
OK
>.
The preset setting will be saved in the provided name.
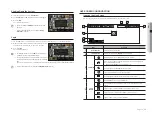
To change or delete a registered preset
1.
Check the preset checkbox and select a preset to change or delete.
2.
Press <
> or <
> as needed.
•
: Delete all the existing preset settings.
J
`
If you delete the entire presets, the default presets specified in the network camera can be deleted accordingly.
3.
Provide a new name and press <
OK
>.
BACKUP
You can check the backup device and set the backup schedule by channel or by time.
1.
Select <
Backup
> from the live screen menu.
You can click on <
> in the launcher menu.
2.
The backup settings screen will be opened.
• Channel : Sets the channel to backup.
`
You can select multiple channels.
If you select <
All CHs
>, all channels will be selected.
• Backup Range : Sets the <
Start
> and <
End
> time for the backup.
• Overlapped Data : Shows a list of overlapping data on a same time according to the number of data.
It appears when one channel has multiple data on a certain time point due to changing of time or time zone
settings, etc.
`
Refer to time and time zone of “
Setting the Date/Time/Language
”. (Page 25)
• Device : Select a backup device from the recognized devices.
• Type : Sets the backup data format.
- NVR : Saved data can be played back only by the NVR.
- SEC : Saves data in the proprietary format with built-in viewer, which supports immediate playback on a
PC.
`
When you select the SEC format, you can select or deselect "
Password
" and "
Text data included
".
• Path : displays the location of the folder in which the backup file is to be saved.
• Check capacity : Shows the size of the selected backup data, used and available capacity of the selected
backup device.
3.
When the backup setup is done, press <
OK
>.
`
If no available device is recognized for backup, <
OK
> button is not activated.
J
`
The application may slow down during the backup.
`
You can switch to the menu screen during the backup in operation, but playback of data is not available.
`
The data can be played back on a Webviewer while the backup is in progress but audio does not function.
`
If backup has failed, select “
Device
>
Storage Device
” and check the free space of the HDD and check also if the HDD is
properly connected.
M
`
Pressing the <
Exit
> during the backup will return to the previous menu, while the backup progresses.


