


English -
12
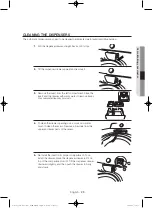
Draining to a Standpipe
If you have a standpipe, the recommended height of the standpipe is 39 in / 99 cm. The drain
hose must be routed through the drain hose clip to the standpipe. The standpipe must be large
enough to accept the outside diameter of the drain hose. You can also drain the washer into a
wash basin or laundry tub. The drain hose is attached to the washer at the factory.
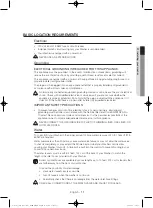
Flooring
For best performance, you must install your washer on a solidly constructed floor. Wood floors
may need to be reinforced to minimize vibration and/or unbalanced load situations. Carpeting
and soft tile surfaces are contributing factors to vibration which can cause your washer to move
slightly during the spin cycle.
Never install your washer on a platform or weakly supported structure.
Location considerations
Do not install your washer in areas where water may freeze, since your washer will always retain
some water in its water valve, pump, and hose areas. Frozen water can damage the belts, the
pump, hoses, and other components.
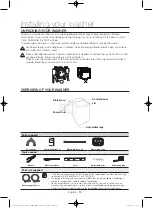
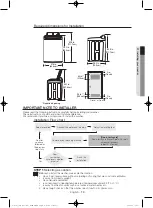
Alcove or closet installation
MINIMUM CLEARANCES FOR CLOSET AND ALCOVE INSTALLATIONS:
Sides – 1 in / 25 mm
Rear – 6 in / 152 mm
Closet Front – 2 in / 51 mm
TOP - 21 in / 533 mm
For the gap between the water valve and the wall:
- Case 1. If you connect the supply hose after installing the washer: Over 3.9 in (10 cm).
- Case 2. If you connect the supply hose before installing the washer: Over 2.8 in (7cm).
If the washer and dryer are installed together, the closet front must have at least a 72 in² (465 cm²)
unobstructed air opening. Your washer alone does not require a specific air opening.
A. Recessed area
B. Side view - closet or confined area
installing your washer
2 in.
(5.1 cm)
6 in.
(15.2 cm)
32.3 in.
(82.0 cm)
B
21 in.
(53.3 cm)
Case 1. 3.9 in. (10 cm)
Case 2. 2.8 in. (7 cm)
A
1 in.
(2.5 cm)
1 in.
(2.5 cm)
30.0 in.
(76.2 cm)
30.0 in.
(76.2 cm)
1 in.
(2.5 cm)
WA3000J_WA40J3000AW_USER MANUAL_DC68-03520A-10.indd 12
2016/6/27 19:11:13
Summary of Contents for WA40J3000AW/AA
Page 37: ...memo WA3000J_WA40J3000AW_USER MANUAL_DC68 03520A 10 indd 37 2016 6 27 19 11 19...
Page 38: ...memo WA3000J_WA40J3000AW_USER MANUAL_DC68 03520A 10 indd 38 2016 6 27 19 11 19...
Page 39: ...memo WA3000J_WA40J3000AW_USER MANUAL_DC68 03520A 10 indd 39 2016 6 27 19 11 19...
Page 77: ...m mo WA3000J_WA40J3000AW_USER MANUAL_DC68 03520A 10_CFR indd 37 2016 6 28 11 03 08...
Page 78: ...m mo WA3000J_WA40J3000AW_USER MANUAL_DC68 03520A 10_CFR indd 38 2016 6 28 11 03 08...
Page 79: ...m mo WA3000J_WA40J3000AW_USER MANUAL_DC68 03520A 10_CFR indd 39 2016 6 28 11 03 08...
Page 117: ...comentarios WA3000J_WA40J3000AW_USER MANUAL_DC68 03520A 10_MES indd 37 2016 6 28 11 02 37...
Page 118: ...comentarios WA3000J_WA40J3000AW_USER MANUAL_DC68 03520A 10_MES indd 38 2016 6 28 11 02 37...
Page 119: ...comentarios WA3000J_WA40J3000AW_USER MANUAL_DC68 03520A 10_MES indd 39 2016 6 28 11 02 37...


