background image

42

_ English

The Auto Focus/Manual Focus function works in both 

Camera

 and 

M.Cam

 modes. 

page 18

In most situations, it is better to use the automatic focus feature, as it enables you to concentrate on the creative 

side of your recording.

Manual focussing may be necessary under certain conditions that make automatic focussing difficult or unreliable.

Adjust the Auto Focus / Manual Focus functions only by using the joystick.

AutoFocus

If you are inexperienced in the use of camcorders, we recommend that  

you make use of auto focus.
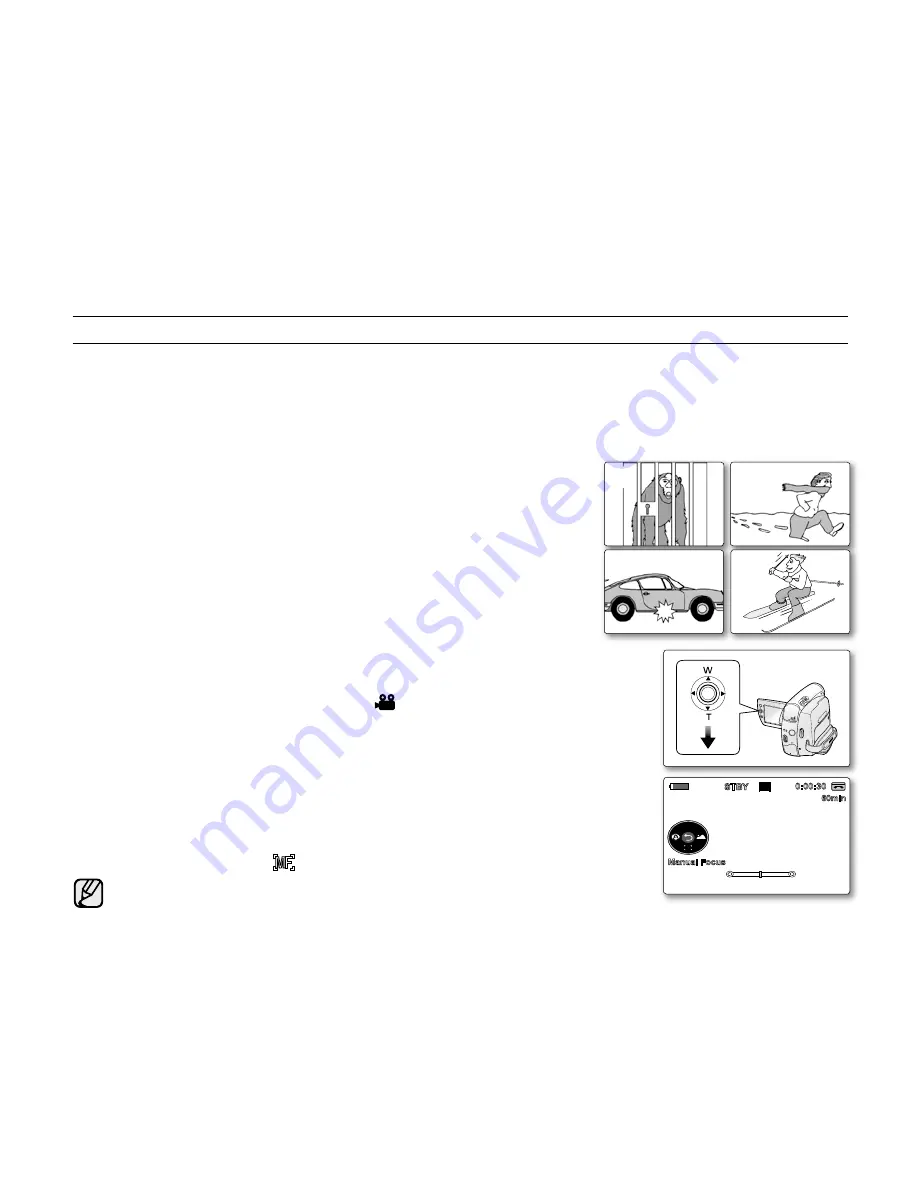
ManualFocus

In the following situations, you may obtain better results by adjusting the  

focus manually.

a.

  A picture containing several objects, some close to the camcorder, others  

further away.

b.

  A person enveloped in fog or surrounded by snow.

c.

  Very shiny or glossy surfaces like a car.

d.

  People or objects moving constantly or quickly like an athlete or a crowd.

SettingtheFocus

1.

  Set the 

Select 

switch to 

CARD

 or 

TAPE

. (VP-D385( i ) only) 

2.

  Press the 

MODE

 button to set 

Camera 

 ).

3.

  Press the 

Joystick

.

Quick menu will appear.

4.

  Move down the 

Joystick (

)

 to select the 

"Manual Focus" 

mode. 

You can toggle between 

"Auto Focus"

 and 

"Manual Focus"

 by moving down 

the 

Joystick

 (

).  

Move the

 Joystick (


)

 left or right to select the desired manual


focus value,  

then press the 

Joystick

.  

5.

  To exit, press the

 Joystick

.

Manual focus indicator ( 

 ) and the status bar will be displayed on the LCD screen.

Manual focus is not available in the EASY.Q mode.


AUTOFOCUS/MANUALFOCUS

basic recording

a

c

b

d

MODE

POWER

CHG.

VO

L

MENU

16Bit

S

10Sec

60min

0:00:30

SP

STBY

Manual Focus

Summary of Contents for VP-D381

Page 1: ...ser manual VP D381 i VP D382 i VP D382H VP D384 VP D385 i imagine the possibilities Thank you for purchasing this Samsung product To receive more complete service please register your product at www samsung com global register ...

Page 2: ...ves you clean sharp images as well as the ability to review your recordings immediately Digital Image Stabilizer DIS The DIS compensates for any hand shaking reducing unstable images particularly at high magnification Various Visual Effects The Visual Effects allow you to give your films a special look by adding various special effects Back Light Compensation BLC The BLC function compensates for a...

Page 3: ... camcorder These warning signs are here to prevent injury to you and others Please follow them explicitly After reading this section keep it in a safe place for future reference precautions Warning This camcorder should always be connected to an AC outlet with a protective grounding connection Batteries shall not be exposed to excessive heat such as sunshine fire or the like Caution Danger of expl...

Page 4: ...gh precision technology However there may be tiny dots red blue or green in colour that appear on the LCD screen These dots are normal and do not affect the recorded picture in any way Do not pick up the camcorder by holding the LCD screen or battery pack Please rotate the LCD screen carefully as illustrated Over rotation may cause damage to the inside of the hinge that connects the LCD screen to ...

Page 5: ...to qualified service personnel When replacement parts are required be sure the service technician has used replacement parts specified by the manufacturer and having the same characteristics as the original part Unauthorised substitutions may result in fire electric shock or other hazards NOTES REGARDING CAMCORDER Do not leave the camcorder exposed to high temperatures above 60 C or 140 F For exam...

Page 6: ...y 14 Using the battery pack 17 Connecting a power source 18 Basic miniDV camcorder operation 19 Screen indicators in camera player modes 20 Screen indicators in m Cam m Player modes vp d385 i only 21 Using the display button 22 Using the joystick 22 Handling quick menus with the joystick 24 Setting the clock Clock set 25 Setting the wireless remote control acceptance remote vp D382 i D382H d385 i ...

Page 7: ...y for a desired scene setting the zero memory vp D382 i D382H d385 i only 39 Self record using the remote control setting the self timer vp D382 i D382H d385 i only 40 Reviewing and searching a recording 41 Using the fade on and off 42 Auto focus manual focus 43 Setting the shutter speed exposure 44 selecting the record mode audio mode Rec Mode Audio Mode 45 Cutting off wind noise windcut plus 46 ...

Page 8: ...ayback Audio Select 67 Audio effect 68 Setting the av in out AV In Out VP D381i D382i D385i only 69 Tape playing back on a tv screen 71 Copying a camcorder tape onto a video tape 72 Using the voice function 73 Recording copying a tv programme or video tape onto a camcorder tape VP D381i D382i D385i only 74 Using a memory card usable memory card not supplied 75 Structure of folders and files on the...

Page 9: ...tures using the pictbridgetm 92 Transferring ieee1394 I Link dv standard data connections 94 Using usb interface 96 Selecting the usb device usb connect 97 Installing the software dv media pro programme 98 Connecting to a pc 100 After finishing a recording 100 Usable cassette tapes 101 Cleaning and maintaining the camcorder 102 Using your miniDV camcorder abroad 103 Troubleshooting 105 Setting men...

Page 10: ...local Samsung dealer Option This is an optional accessory To buy this one contact your nearest Samsung dealer A memory card is not included See page 74 for memory cards compatible with your miniDV camcorder getting to know your miniDV camcorder Battery Pack IA BP80W AC Power Adapter AA E9 type Audio Video Cable USB Cable VP D385 i only Software CD VP D385 i only User Manual Button type Battery for...

Page 11: ... 2 Remote sensor VP D382 i D382H D385 i only 6 Display button 3 Light VP D382 i D382H D384 D385 i only 7 TFT LCD screen 4 OPEN switch 8 Internal microphone Be careful not to cover the internal microphone and lens during recording CAUTION OPEN 5 6 7 8 1 2 3 4 ...

Page 12: ...ystick function works reversely 1 MENU button 2 Joystick Select W T page 23 3 Recording start stop button 4 Jack cover AV DV jack 5 Built in speaker 6 Select CARD TAPE switch VP D385 i only 7 Battery pack 8 Battery release BATT switch AV DV BATT MENU W T MODE POWER CHG 5 7 4 1 2 3 8 6 BATT CHG MODE TAPE CARD VP D385 i only ...

Page 13: ...W 1 Zoom W T Volume VOL lever 5 Jack cover DC IN USB VP D385 i only jack 2 PHOTO button page 60 78 6 Cassette compartment cover 3 Recording start stop button 7 Hand strap 4 POWER switch MODE AV DV POWER CHG V O L 4 5 6 7 1 2 3 ...

Page 14: ...ra Player mode 4 DC IN Jack 5 DV IEEE1394 jack 6 Charging CHG indicator 7 USB jack VP D385 i only 8 Memory card slot VP D385 i only 9 Tripod receptacle 10_ English 9 8 Jacks VP D385 i AV DV DC IN USB VP D381 i D382 i D382H D384 AV DV DC IN VP D385 i only MMC SD AV MODE DC IN DV POWER CHG 1 4 5 6 7 3 2 ...

Page 15: ...page 60 78 10 Direction button page 64 2 REC button 11 Display button 3 SELF TIMER button page 39 12 W T Zoom button 4 ZERO MEMORY button page 38 13 X2 button page 64 5 PHOTO SEARCH button page 61 14 DATE TIME button 6 A DUB button page 65 15 SLOW button 7 FF button 16 PAUSE button 8 REW button 17 STOP button 9 PLAY button 18 F ADV button page 64 1 2 3 4 5 6 7 8 9 ...

Page 16: ... the hand strap and adjust its length for your convenience 3 Close the hand strap Lens Cover Attaching the Lens Cover 4 Hook up the lens cover with the lens cover strap as illustrated 5 Hook up the lens cover strap to the hand strap and adjust it following the steps as described for the hand strap 6 Close the hand strap Installing the Lens Cover after Operation Press buttons on both sides of the l...

Page 17: ...rt the button type battery holder Precaution regarding the button type battery There is a danger of explosion if button type battery is incorrectly replaced Replace only with the same or equivalent type Do not pick up the battery using tweezers or other metal tools This will cause a short circuit Do not recharge disassemble heat or immerse the battery in water to avoid the risk of explosion Keep t...

Page 18: ... pack from the miniDV camcorder Charging the Battery Pack 1 Slide the POWER switch downwards to turn off the power 2 Insert the battery pack to the camcorder 3 Open the jack cover and connect the AC power adaptor to the DC IN jack 4 Connect the AC power adaptor to a wall socket 5 Once charged disconnect the AC power adaptor from the DC IN jack on your camcorder Even with the power switched off the...

Page 19: ...ctions are measured using a fully charged battery pack at 25 C 77 F As the environmental temperature and conditions vary the remaining battery time may differ from the approximate continuous recording times given in the instructions Charging time Recording time IA BP80W Approx 1hr 20min Approx 1hr 20min Battery Time Charging indicator The colour of the LED indicates the power or charging state If ...

Page 20: ...tery pack a Fully charged b 20 40 used c 40 80 used d 80 95 used e Completely used Blinking The Camcorder will turn off soon change the battery as soon as possible Battery Pack Management The battery pack should be recharged in an environment between 0 C 32 F and 40 C 104 F The life and capacity of the battery pack will be reduced if it is used in temperatures below 0 C 32 F or left in temperature...

Page 21: ...en fully discharged Fully discharging a battery pack damages the internal cells To preserve battery power keep your camcorder turned off when you are not operating it If your camcorder is in Camera mode and it is left in STBY mode without being operated for more than 5 minutes with a tape inserted it will automatically turn itself off to protect against unnecessary battery discharge Do not drop th...

Page 22: ... photo images on a tape page 19 M Cam mode To record movie or photo images on memory card page 20 M Player mode To play movie or photo images on memory card page 20 The operating modes are determined by the position of the MODE button and Select switch VP D385 i only Mode Name Camera Mode Player Mode M Cam Mode M Player Mode MODE button hwl jhyk hw l hwl jhyk tvkl tvkl hwl jhyk hw l hwl jhyk tvkl ...

Page 23: ...pe Indicator 9 Remaining Tape measured in minutes 10 Audio Mode page 44 11 Light page 59 VP D382 i D382H D384 D385 i only 12 BLC Back Light Compensation page 56 13 WindCut Plus page 45 14 Fade page 41 Remote page 25 VP D382 i D382H D385 i only 15 USB page 98 VP D385 i only 16 C Nite page 58 17 Real Stereo page 46 18 Zoom Position page 37 19 Date Time page 32 20 Manual Focus page 42 21 Manual Expos...

Page 24: ...en the miniDV camcorder is powered on after turning it off 1 Time counter movie recording time 2 File number of the moving image 3 Volume Control page 86 4 Erase Protection Indicator page 80 5 Silde page 79 6 Image Counter Current photo image Total number of recordable photo images 7 Photo image size page 75 8 Folder Number File Number page 77 9 Print Mark page 89 OSD in M Player Mode 00 00 1 JAN ...

Page 25: ...isplay mode All information will appear Minimum display mode Only operating status indicators will appear Checking the remaining battery Press and hold the Display button while charging with the power off After a while the charging status will be displayed on the LCD screen for 7 seconds The battery charge status is given as reference and is an estimation It may differ depending on the battery cap...

Page 26: ...e each of the menu items listed after this page For example setting the Exposure in Camera mode 1 Press the Joystick Quick menu is displayed 2 Press the Joystick to control the setting Moving the Joystick up toggles between Auto Exposure and Manual Exposure 3 Press the Joystick to confirm your selection Press the Joystick button to exit the quick menu according to the selected mode There are some ...

Page 27: ... Player modes VP D385 i only Joystick M Cam Mode M Player Mode Movie images M Player Mode Photo images STOP PLAY PAUSE FF REW Exposure Delete Focus Thumbnail STOP STOP STOP STOP Thumbnail Previous Skip REW REW REW REW Previous Skip Next Skip FF FF FF FF Next Skip OK Return Selection Exit the menu PLAY PAUSE PLAY PLAY PLAY Slide Show Status Input Quick Menu In Camera Player modes HANDLING QUICK MEN...

Page 28: ...ting the year 8 Press the Joystick after setting the minutes A message Complete is displayed 9 To exit press the MENU button You can set the year up to 2037 Turning the date and time display on off To switch the date and time display on or off access the menu and change the date time display mode page 32 SETTING THE CLOCK CLOCK SET initial setting system menu setting Display illustrations in this ...

Page 29: ...Remote then press the Joystick 6 Move the Joystick up or down to select On or Off then press the Joystick 7 To exit press the MENU button If you set the Remote to Off in the menu and try to use it the remote control indicator will blink for 3 seconds on the LCD screen and then disappear SETTING THE WIRELESS REMOTE CONTROL ACCEPTANCE REMOTE VP D382 i D382H D385 i only Move Select Exit Remote Beep S...

Page 30: ...t 5 Move the Joystick up or down to select Beep Sound then press the Joystick 6 Move the Joystick up or down to select On or Off then press the Joystick 7 To exit press the MENU button SETTING THE BEEP SOUND BEEP SOUND initial setting system menu setting When beep sound is set to off the power on off sound is off Move Select Exit Remote Beep Sound Shutter Sound Language Demonstration Camera Mode M...

Page 31: ...tick up or down to select System then press the Joystick or move the Joystick to the right 4 Move the Joystick up or down to select Shutter Sound then press the Joystick 5 Move the Joystick up or down to select On or Off then press the Joystick 6 To exit press the MENU button SETTING THE SHUTTER SOUND SHUTTER SOUND Move Select Exit Remote Beep Sound Shutter Sound Language Demonstration Camera Mode...

Page 32: ...English Français Español Deutsch Italiano Português Polski Nederlands Magyar Svenska Iran Русский Українська Suomi Türkçe Norwegian Danish Czech Slovakia 6 Move the Joystick up or down to select the desired OSD language then press the Joystick The OSD language is refreshed in the selected language 7 To exit press the MENU button Language options may be changed without prior notice initial setting ...

Page 33: ...ct On then press the Joystick 7 Press the MENU button The demonstration will begin 8 To quit the demonstration press the MENU button The demonstration function is automatically activated when the camcorder is left idle for more than 10 minutes after switching to the Camera mode if no tape is inserted in the camcorder If you press other buttons MENU Joystick EASY Q during the demonstration mode the...

Page 34: ...ings Contents On screen display Off Disables the function None Cross Records the subject placed in the centre as the most general recording composition Grid Records the subject on the horizontal or vertical composition or with close up Safety Zone Records the subject within safety zone which prevents from being cut when editing in 4 3 for left and right and 2 35 1 for top and bottom Set Safety Zon...

Page 35: ...Joystick up or down to select Display then press the Joystick or move the Joystick to the right 5 Move the Joystick up or down to select the item you want to adjust LCD Bright or LCD Colour then press the Joystick 6 Move the Joystick up or down to adjust the value of the selected item LCD Bright or LCD Colour then press the Joystick You can set values for LCD Bright and LCD Colour between 0 to 35 ...

Page 36: ...he AC power adaptor or while the battery pack is attached The rechargeable battery will be fully discharged in about 3 months if you do not use your camcorder at all Use your camcorder after charging the built in rechargeable battery If the built in rechargeable battery is not charged any input data will not be backed up and the date time appears on the screen as 00 00 1 JAN 2008 when Date Time di...

Page 37: ...era or Player 3 Press the MENU button The menu list will appear 4 Move the Joystick up or down to select Display then press the Joystick or move the Joystick to the right 5 Move the Joystick up or down to select TV Display then press the Joystick 6 To activate TV Display function move the Joystick up or down to select On or Off then press the Joystick 7 To exit press the MENU button Move Select Ex...

Page 38: ...t 3 Press the area marked PUSH on the cassette compartment cover until it clicks into place The cassette is loaded automatically 4 Close the cassette compartment cover INSERTING EJECTING A CASSETTE basic recording VARIOUS RECORDING TECHNIQUES In some situations different recording techniques may be required 1 General recording 2 Downward recording Making a recording with a top view of the LCD scre...

Page 39: ...ke sure the image you want to record appears on the LCD screen Make sure the battery level indicates that there is enough remaining power for your expected recording time You can select a record mode of your choice page 44 4 To start recording press the Recording start stop button REC is displayed on the LCD screen To stop recording press the Recording start stop button again STBY is displayed on ...

Page 40: ...cording start stop button to start recording Recording will begin using the basic automatic settings To cancel the EASY Q mode Press the EASY Q button again The EASY Q and DIS indicators disappear from the screen Almost all the settings will return to the settings that were set prior to activating EASY Q mode You cannot cancel the EASY Q mode during recording Buttons unavailable during EASY Q oper...

Page 41: ... move your finger off the Zoom lever the operation sound of the Zoom lever may be also recorded Focussing may become unstable during zooming In this case set the zoom before recording and lock the focus by using the manual focus then zoom in or out during recording page 42 The minimum possible distance between camcorder and subject while maintaining sharp focus is about 1 cm about 0 39 inch for wi...

Page 42: ... you have finished playback fast forward or rewind the tape in stop mode The tape stops automatically when it reaches the zero position When you have finished recording press the MODE button to set Player and press the REW button The tape stops automatically when it reaches the zero position 5 The tape counter with the zero memory indicator disappears from the display and the tape counter is chang...

Page 43: ... timer starts counting down from 10 At this moment recording indicator blinks with a beep sound At the last second of the countdown recording starts automatically If you want to cancel the self timer function before recording press the SELF TIMER button again Do not obstruct the remote control sensor by putting obstacles between the remote control and miniDV camcorder The remote control maximum ra...

Page 44: ...to the left While you press and hold the Joystick the selected images will be played in reverse order Press and release the Joystick to play the images in reverse order for 3 seconds before resetting the play order to normal To perform the normal search Move the Joystick to the right While you press and hold the Joystick the selected images will be played in normal order To resume recording when y...

Page 45: ...ht fade function to select Fade On 4 Press the Recording start stop button and at the same time release the Fade function Recording starts and the picture and sound gradually appear Fade In To Stop Recording 5 When you want to stop recording with fade out press the Joystick then move the Joystick to the right Move the Joystick to the right fade function to select Fade On 6 Press the Recording star...

Page 46: ...se to the camcorder others further away b A person enveloped in fog or surrounded by snow c Very shiny or glossy surfaces like a car d People or objects moving constantly or quickly like an athlete or a crowd Setting the Focus 1 Set the Select switch to CARD or TAPE VP D385 i only 2 Press the MODE button to set Camera 3 Press the Joystick Quick menu will appear 4 Move down the Joystick to select t...

Page 47: ...ck to switch the mode to manual You can also toggle between Auto Exposure and Manual Exposure by moving up the Joystick 5 Move the Joystick left or right to select the desired exposure value then press the Joystick Exposure value can be set between 00 to 29 6 To exit press the Joystick Selected settings are displayed Recommended Shutter Speeds when Recording Outdoor sports such as golf or tennis 1...

Page 48: ...tick up or down to select Rec Mode or Audio Mode then press the Joystick 6 Move the Joystick up or down to select the desired record mode or audio mode then press the Joystick Rec mode can be set to SP or LP Audio mode can be set to 12Bit or 16Bit 7 To exit press the MENU button The selected indicator is displayed When 12Bit is selected no indicator is displayed We recommend that you use this camc...

Page 49: ... Joystick to the right 5 Move the Joystick up or down to select WindCut Plus then press the Joystick 6 To activate the windcut plus function move the Joystick up or down to select the windcut plus type then press the Joystick Off Disables the function Auto Minimises the wind noise while preserving voices On Removes the low pitched wind noise 7 To exit press the MENU button WindCut Plus On or Auto ...

Page 50: ...oystick up or down to select Real Stereo then press the Joystick 6 To activate the Real Stereo function move the Joystick up or down to select On then press the Joystick If you do not want to use the Real Stereo function set the Real Stereo menu to Off 7 To exit press the MENU button Real Stereo indicator is displayed SELECTING THE REAL STEREO FUNCTION REAL STEREO advanced recording S BATT CHG MOD...

Page 51: ...he right 5 Move the Joystick up or down to select Program AE then press the Joystick The available options are listed 6 Move the Joystick up or down to select the desired program AE option then press the Joystick 7 To exit press the MENU button The indicator of the selected mode is displayed When the Auto mode is selected no indicator is displayed BATT CHG MODE TAPE CARD AV DV BATT MENU W T MOD E ...

Page 52: ...appears against a softened background The portrait mode is most effective when used outdoors The shutter speed is automatically adjusted from 1 50 to 1 1000 per second Spotlight Prevents overexposure of subject s face etc when strong light strikes the subject as in a wedding or on stage Sand Snow Prevents underexposure of subject s face etc in a place where reflection of light is intense such as a...

Page 53: ...Joystick or move the Joystick to the right 5 Move the Joystick up or down to select White Balance then press the Joystick The available options are listed 6 Move the Joystick up or down to select the desired white balance mode then press the Joystick 7 To exit press the MENU button The indicator of the selected mode is displayed When the Auto mode is selected no indicator is displayed BATT CHG MOD...

Page 54: ...the message Set white balance are displayed 2 Frame a white object such as a piece of paper so that it fills the screen Use an object that is not transparent If the object that fills the screen is not focussed correct the focus using Manual Focus page 42 3 Press the Joystick The white balance setting will be applied and indicator is displayed The White Balance function will not operate in EASY Q m...

Page 55: ...to select Camera then press the Joystick or move the Joystick to the right 5 Move the Joystick up or down to select Visual Effect then press the Joystick The available options are listed 6 Move the Joystick up or down to select the desired visual effect option then press the Joystick The display mode is set to the selected mode 7 To exit press the MENU button APPLYING VISUAL EFFECTS VISUAL EFFECT ...

Page 56: ...D effect embossing on surrounding area of an image 9 Pastel1 This mode applies a pale pastel drawing effect to an image Pastel2 This mode applies a pale pastel drawing effect to surrounding area of an image Mirror mode is not available in the 16 9 Wide mode Release the 16 9 Wide mode first to set Mirror mode page 53 Visual Effect modes are not available while EASY Q is in use The Mosaic Mirror Emb...

Page 57: ...ate the 16 9 wide function move the Joystick up or down to select On then press the Joystick If you do not want to use the 16 9 wide function set the 16 9 Wide menu to Off 7 To exit press the MENU button 16 9 wide indicator is displayed You cannot set the following functions in the 16 9 Wide mode If you want to use the following functions set the 16 9 Wide menu to Off first Mirror Visual Effect En...

Page 58: ... the Macro menu to Off 7 To exit press the MENU button Tele Macro indicator is displayed When recording in Tele Macro mode the focus speed may be slow When you operate the zoom function in the Tele Macro mode the recording subject may be out of focus Use a tripod not supplied to prevent hand shake in the Tele Macro mode Avoid shadows when recording in the Tele Macro mode As the distance to the sub...

Page 59: ...ou do not want to use the DIS function set the DIS menu to Off 7 To exit press the MENU button DIS indicator is displayed EASY Q mode automatically sets the DIS to On You cannot set the following functions in the DIS mode Mosaic Mirror Emboss2 Pastel1 Pastel2 C Nite Digital Zoom Setting the DIS function in 16 9 Wide mode may produce lower quality than in normal mode When you press the PHOTO button...

Page 60: ...menu list will appear 4 Move the Joystick up or down to select Camera then press the Joystick or move the Joystick to the right 5 Move the Joystick up or down to select BLC then press the Joystick 6 Move the Joystick up or down to select On then press the Joystick If you do not want to use the BLC function set the BLC menu to Off 7 To exit press the MENU button BLC indicator will be displayed This...

Page 61: ...p to 34x 7 To exit press the MENU button Move the Joystick up or down or move the Zoom lever to use the digital zoom The digital zoom indicator appears Maximum digital zooming may result in lower picture quality You cannot set the Digital Zoom mode in the following modes Please release these functions first to set the Digital Zoom mode EASY Q Mosaic Mirror Emboss2 Pastel1 Pastel2 DIS The Digital Z...

Page 62: ...of the selected mode is displayed When the Off mode is selected no indicator is displayed When using the C Nite the image takes on a slow motion like effect When using the C Nite the focus adjusts slowly and white dots may appear on the screen This is not a defect The C Nite function does not work as following situations When DIS or EASY Q is set While using the C Nite function you can not use the...

Page 63: ...k up or down to select On then press the Joystick To cancel the Light function set the Light menu to Off 7 To exit press the MENU button Light indicator will be displayed The light can become extremely hot Do not touch it while in operation or soon after turning it off otherwise serious injury may occur Do not place the camcorder into the carrying case immediately after using the light since it re...

Page 64: ...mcorder returns to the standby mode During the seven seconds you cannot record another photo image During the Tape Photo Recording do not shake your camcorder Mosaic pattern noise may appear on the image During the Tape Photo Recording you can not set the following functions Visual Effect DIS Digital Zoom C Nite After tape photo recording most functions return to the previous mode Tape Photo Recor...

Page 65: ... photo image When there are no photo images recorded on the tape it will be fully rewound or forwarded 7 To stop the photo search move down the Joystick or press the MENU button The remote control will help you search for a desired photo image VP D382 i D382H D385 i only In STOP mode press the PHOTO SEARCH button on the remote control When the indictor blinks on the screen use the rewind or fast f...

Page 66: ...ting the LCD Bright LCD Colour during Playback You can adjust the LCD bright LCD colour during playback The adjustment method is the same procedure as used in Camera mode page 31 Adjusting the Volume When you use the LCD screen for playback you can hear recorded sound from the built in speaker Take the following steps to lower the volume or mute the sound while playing a tape on the camcorder When...

Page 67: ...e Joystick during playback To resume playback press the Joystick Press the PLAY or PAUSE button on the remote control Picture Search Forward Reverse Move the Joystick left or right during playback or pause mode To resume normal playback press the Joystick Press the REW FF buttons on the remote control Slow Playback Forward Reverse VP D382 i D382H D385 i only Forward Slow Playback Press the SLOW bu...

Page 68: ...n on the remote control during playback To resume normal playback press the PLAY button Reverse X2 Playback Press the button during forward X2 playback To resume normal playback press the PLAY button Reverse Playback VP D382 i D382H D385 i only To play back in reverse at normal speed press the button on the remote control during normal forward playback Press the PLAY button or button to return to ...

Page 69: ...ress the Joystick to playback and press it again to pause the scene If you want to resume to playback just press the Joystick again on playback 5 Press the A DUB button on the remote control Audio dubbing indicator is displayed The camcorder is ready for dubbing 6 Press the PLAY button on the remote control or Joystick to start dubbing Press the STOP button on the remote control or move down the J...

Page 70: ... the audio playback channel then press the Joystick Sound 1 Plays the original sound Sound 2 Plays the dubbed sound MIX 1 2 Plays back sound 1 and 2 equally mixed 7 To exit press the MENU button 8 Press the Joystick to play back the dubbed tape To stop the dubbed audio playback move down the Joystick When you play back added sound Sound 2 or MIX 1 2 you may experience a loss of sound quality Move ...

Page 71: ...ffect channel then press the Joystick Off Disables the function Voice Highlights the human voice Music Highlights the sound by enhancing the bass and treble Wide Magnifies the stereo effect by enhancing the left and right sounds Echo Gives an echo effect 7 To exit press the MENU button We recommended connecting to stereo devices TV speakers for better audio effects Audio effect function is not ava...

Page 72: ...ck 6 Move the Joystick up or down to select Out or In then press the Joystick Out Select this when copying or playing back the contents of this camcorder onto the external device In Select this when recording the contents of an external device to the camcorder 7 To exit press the MENU button When recording images from a VCR playback must be at normal speed or a grey image will appear on the camcor...

Page 73: ...low jack Video The white jack Audio L mono The red jack Audio R If you connect to a mono TV connect the yellow jack Video to the video input of the TV and the white jack Audio L to the audio input of the TV 2 Set the Select switch to TAPE VP D385 i only 3 Press the MODE button to set Player 4 Turn on the TV and set the TV VIDEO selector on the TV to Video Refer to the TV user s manual 5 Play the t...

Page 74: ... the tape Playback the tape 1 Connect a power source 2 Insert the tape you wish to play back 3 Set the Select switch to TAPE VP D385 i only 4 Press the MODE button to set Player 5 Move the Joystick left or right find the first position you wish to play back 6 Press the Joystick The images you recorded will appear on the TV after a few seconds If a tape reaches its end while being played back the t...

Page 75: ...nput jack on your VCR The yellow jack Video The white jack Audio L mono The red jack Audio R 6 Press the Record button on your VCR to start recording 7 Play the tape on your camcorder Please refer to page 70 to see how to play a tape if you do not want to copy the screen display set the TV Display to Off in the menu page 33 When Copying is Complete Stop recording on your VCR then move down the Joy...

Page 76: ...l the function press the Recording start stop button again Voice is available only when the Audio Video cable is connected If a different cable DV or USB cable VP D385 i only is connected Voice function may not operate properly If you move the Joystick when you operate Voice function Voice function will be deactivated During the Voice process the MENU and PHOTO button functions do not work The Voi...

Page 77: ... Insert the video tape to be played in your VCR Pause at the starting point of playing 5 Start copying by pressing the Recording start stop button on your camcorder 6 Press the PLAY button on your VCR to play the tape To record from a TV 4 Select a TV channel to be recorded 5 Start recording by pressing the Recording start stop button on your camcorder When Recording Copying is Complete Move down ...

Page 78: ...to edit or delete data by mistake Deleting images stored in memory card Marking photo images with print Information Formatting memory cards Inserting a Memory Card 1 Open the memory card cover 2 Insert the memory card into the memory card slot until it softly clicks 3 Close the memory card cover Ejecting a Memory Card 1 Open the memory card cover 2 Slightly push the memory card inwards to pop it o...

Page 79: ...rce when you insert eject the memory card Do not turn the power off while recording loading erasing a photo image or formatting the memory card Turn the power off before you insert or eject the memory card to avoid losing data Do not place the memory card near a strong electro magnetic device Do not allow metal substances to come in contact with the terminals on the memory card Do not bend drop or...

Page 80: ...78 Tape Capture 640x480 Movie image Images are compressed in MPEG4 Moving Picture Experts Group format The file extension is AVI The picture size is 720X576 page 84 Up to 99 files are created in one folder New folder is created when more than 99 files are created You may modify the name of a file folder stored in the memory card using a PC This camcorder may not recognise modified files Number of ...

Page 81: ...on to set Camera 3 Press the MENU button The menu list will appear 4 Move the Joystick up or down to select Memory then press the Joystick 5 Move the Joystick up or down to select File No then press the Joystick 6 Move the Joystick up or down to select the desired option Series or Reset then press the Joystick 7 To exit press the MENU button When you set File No to Series each file is assigned wit...

Page 82: ...as been recorded Photo images are saved more widely than have been taken in LCD screen Photo images are saved in the memory card in an 800x600 format The number of photo images that can be stored depends on the quality of the image Photo images JPEG can be stored in a memory card up to 20 000 files The photo images that you recorded are saved in JPEG file format on the memory card In M Cam or M Pl...

Page 83: ...from the current picture All images will be played back consecutively for 2 3 seconds each To stop the slide show press the Joystick again To view the Multi Display If you move down the Joystick you will see a message of Please wait and 6 photo images on the screen in a moment To display the previous six images press and hold the Joystick for about 3 seconds To display the next six images press an...

Page 84: ...earch for the photo image that you want to protect 4 Press the MENU button The menu list will appear 5 Move the Joystick up or down to select Memory then press the Joystick 6 Move the Joystick up or down to select Protect then press the Joystick 7 Move the Joystick up or down to select On then press the Joystick 8 To exit press the MENU button Protection indicator is displayed If the write protect...

Page 85: ...elete 4 Press the MENU button The menu list will appear 5 Move the Joystick up or down to select Memory then press the Joystick 6 Move the Joystick up or down to select Delete then press the Joystick A message Do you want to delete is displayed 7 Move the Joystick left or right to select Yes or No then press the Joystick Using the Joystick You can directly access the delete function using the Joys...

Page 86: ...hen there is no stored picture on the memory card the message No image will be displayed If an erroneous image file is found on the memory card the message Memory Card Error will be displayed It may be caused by copying images from different digital devices To protect important pictures from accidental deletion activate the image protection page 80 You can use the format functions to completely de...

Page 87: ... format is completed 7 To exit press the MENU button If you execute the format function all photo images moving images will be erased completely and erased photo images moving images cannot be recovered Formatting the memory card using a different device will cause memory card read errors Do not turn the power off in the middle of the formatting A memory card with the protection tab set to save wi...

Page 88: ...e to be recorded is 720X576 Saving moving images onto a Memory Card 1 Set the Select switch to Card 2 Press the MODE button to set Camera 3 Press the Recording start stop button the moving images are recorded on the memory card in MPEG4 REC is displayed on the LCD screen You can record a photo image on memory card by pressing the PHOTO button instead of the Recording start stop button page 78 4 Pr...

Page 89: ... Moving images that you recorded are saved in avi avi 1 0 file format on the memory card The moving images on a memory card are a smaller size and lower definition than images on tape The sound is recorded in mono The following functions are not allowed in M Cam mode DIS Digital Zoom Fade Program AE Visual Effect 16 9 Wide C Nite While recording on a memory card don t insert or eject the tape as i...

Page 90: ...oving image then press the Joystick Use the Joystick to enjoy various playback operations Press the Joystick to pause or play back Move the Joystick right or left to search playback during playback or pause mode MENU button is not available during moving image playback To use MENU button stop playback Moving image playback is not available when a MENU is displayed on the screen To start playback p...

Page 91: ...back 4 Press the PHOTO button The photo image is recorded on the memory card During the time it takes to save an image the playback screen is paused and the OSD is displayed 5 When you finish the recording move down the Joystick to stop recoding and switch the mode to M Player for your visual reference page 79 Photo images copied from the cassette to the memory card are saved in 640x480 format Num...

Page 92: ...ress the Joystick All photo images recorded on the cassette tape will be copied onto a memory card 6 The camcorder automatically performs the photo image search to find photo images and copy starts 7 Move down the Joystick to stop copying Copy stops when the cassette is finished or memory card is full 8 Switch to the M Player mode before you can see the photo image page 79 The last photo image of ...

Page 93: ...ect Print Mark then press the Joystick 7 Move the Joystick up or down to select the desired option All Off This File or All Files then press the Joystick 8 If you select This File move the Joystick up or down to select the quantity then press the Joystick 9 To exit press the MENU button Print mark indicator and number of prints are displayed Removing the Print Mark To remove all Print Marks select...

Page 94: ...ard 3 Press the MODE button to set Player 4 Press the MENU button The menu list will appear 5 Move the Joystick up or down to select System then press the Joystick 6 Move the Joystick up or down to select USB Connect then press the Joystick 7 Move the Joystick up or down to select Printer then press the Joystick Computer Connect to a computer Printer Connect to a printer To use the PictBridge func...

Page 95: ...nting will be cancelled The Date Time Imprint option may not be supported by all printers Check with your printer manufacturer The Date Time menu cannot be setup if the printer does not support this option The PictBridgeTM is a registered trademark of CIPA Camera Imaging Products Association an image transfer standard developed by Canon Fuji HP Olympus Seiko Epson and Sony PictBridge supporting pr...

Page 96: ... images is dependent on the capacity of the PC System Requirements CPU faster Intel Pentium III 450MHz compatible Operating system Windows 98SE ME 2000 XP VISTA Mac OS 9 1 10 4 Main memory more than 64 MB RAM IEEE1394 add on card or built in IEEE1394 card Operation is not guaranteed for all the recommended computer environments mentioned above IEEE 1394 is an international standard standardized by...

Page 97: ...n the power OFF and ON again When you transmit data from the camcorder to PC PC function button is not available in M Player mode VP D385 i only Do not use another DV device when using IEEE1394 Do not connect the camcorder to a PC using both DV and USB VP D385 i only cables It may not operate properly The IEEE1394 cable DV cable is sold separately Moving image software is commercially available Mo...

Page 98: ... with Service Pack 4 or later installed Windows XP High speed USB on a system with Service Pack 1 or later installed Windows VISTA High speed USB on a system with Service Pack 1 or later installed System Requirements Windows System CPU Intel Pentium 4 2GHz OS Operating System Windows 2000 XP VISTA Standard installation is recommended Operation may not assured if the above OS has been upgraded Memo...

Page 99: ...ioned above Do not connect the camcorder to a PC using both DV and USB cables It may not operate properly In M Cam or M Player mode be sure that the memory card is inserted into camcorder before connecting USB cable If no memory card or an unformatted memory card is inserted PC will not recognise your camcorder as a removable disk If you disconnect the USB cable from the PC or the camcorder during...

Page 100: ...ress the Joystick 5 Move the Joystick up or down to select USB Connect then press the Joystick 6 Move the Joystick up or down to select Computer or Printer then press the Joystick You can select Computer to use the camcorder as a web camera USB Stream or removable disk You can select Printer to use the Pictbridge feature page 90 7 To exit press the MENU button USB interface VP D385 i only Move Sel...

Page 101: ... installed already there is no need to restart the PC Application Installation Video Codec Click on Video Codec on the setup screen Video Codec is required to play movie files recorded by this miniDV camcorder on a PC Please install by using the Software CD that came with this camcorder We do not guarantee compatibility with other CDs During installation if the Microsoft LOGO test warning is shown...

Page 102: ...a may be damaged If you connect the USB cable to a PC via a USB HUB or simultaneously connect the USB cable along with other USB devices the camcorder may not work properly If this occurs remove all USB devices from the PC and reconnect the camcorder USB interface VP D385 i only Using the Removable Disk Function This function works in both M Cam and M Player modes page 18 You can easily transfer d...

Page 103: ... voice communication may not be supported depending on the video conferencing software In this case connect an external microphone to the soundcard of the PC to enable voice communication Using the camcorder with PC Net Meeting Programme installed you can participate in video conference The web camera s screen size Transferred video frame rate for the web camera function is max 12 5 fps 640X480 VG...

Page 104: ...sconnect the power source or remove the battery pack Open the LCD panel of the camcorder and slide down the Battery release BATT switch on the left side of the body to remove the battery with a click maintenance Usable Cassette Tapes When you have recorded something that you wish to keep you can protect it so that it will not be accidentally erased a Protecting a tape Push the safety tab on the ca...

Page 105: ...ss the MODE button to set Player 3 Insert a cleaning tape 4 Press the Joystick 5 Move down the Joystick after 10 seconds Check the quality of the picture using a video cassette If the picture quality has not improved repeat the operation Clean the video heads with a dry type cassette cleaner Some cleaning cassette products stop automatically Refer to the cleaning cassette s instructions for detail...

Page 106: ... recordings on a TV or to copy it to an external device it must be an PAL system based TV or an external device and have the appropriate Audio Video jacks Otherwise you may need to use a separate video format transcoder PAL NTSC format converter PAL compatible countries regions Australia Austria Belgium Bulgaria China CIS Czech Republic Denmark Egypt Finland France Germany Greece Great Britain Net...

Page 107: ... page 104 Self Diagnosis Display in M Cam M Player Modes VP D385 i only Display Blinking Informs that Action No Memory Card slow There is no memory card in the camcorder Insert a memory card Memory full slow There is not enough memory to record Change to a new memory card Erase recorded image No image slow There are no images recorded on the memory card Record new images Write protect slow The mem...

Page 108: ...e recording in bright surroundings page 56 Auto focus does not work Check the Manual Focus menu Auto focus does not work in the Manual Focus mode page 42 FF or REW Play function Joystick does not work Press the MODE button to set Player You have reached the beginning or end of the cassette You see a mosaic pattern during playback search This is normal operation and it is not a failure or defect Th...

Page 109: ... Light 59 Tape Photo Search Searching pictures recorded on a tape 61 Photo Copy Copying photo images from a cassette to memory card 88 Audio Select Selecting the Audio playback channel 66 Audio Effect Selecting the Audio Effect 67 Record Rec Mode Selecting the recording speed 44 Audio Mode Selecting Sound Quality for recording 44 WindCut Plus Minimising wind noise 45 Real Stereo Selecting the Real...

Page 110: ...OUT THIS USER MANUAL This user manual covers models VP D381 VP D381 i VP D382 VP D382 i VP D382H VP D384 VP D385 and VP D385 i Although the external appearances of VP D381 i D382 i D382H D384 and VP D385 i are different they operate in the same way Illustrations of model VP D385 i are used in this user manual The displays in this user manual may not be exactly the same as those you see on the LCD ...

Page 111: ...2K LCD Screen Method TFT LCD Connectors Video output 1Vp p 75Ω terminated Audio output 7 5dBs 600Ω terminated DV input output 4pin special in out connector USB output VP D385 i only Mini B type connector USB2 0 High Speed General Power source DC 8 4V Lithium Ion Battery Pack 7 4V Power source type Battery Pack Power supply 100V 240V 50 60Hz Power consumption Recording 3 7W Operating temperature 0 ...

Page 112: ... consult your dealer for assistance However if there is no alternative to cutting off the plug remove the fuse and then safely dispose the plug DO NOT connect the plug to a mains socket as there is a risk of shock hazard from the bared flexible cord IMPORTANT The wires in the mains lead are coloured in accordance with the following code BLUE NEUTRAL BROWN LIVE As these colours may not correspond t...

Page 113: ...ducts caused by such repair work will not be covered by this warranty 4 This product is not considered to be defective in materials nor workmanship by reason that it requires adaptation in order to conform to national or local technical or safety standards in force in any Country other than the one for which the product was originally designed and manufactured This warranty will not cover and no r...

Page 114: ...άστημα αγοράς Επίσης πρέπει να προσκομισθεί και το τιμολόγιο ή η απόδειξη λιανικής πώλησης πάνω στην οποία ο σειριακός αριθμός του προϊόντος πρέπει να είναι ευκρινής 2 Η υποχρέωση της SAMSUNG αφορά μόνο την επισκευή του προϊόντος 3 Η επισκευή του προϊόντος πρέπει να ανατίθεται μόνο σε εξουσιοδοτημένα κέντρα serνice ή εξουσιοδοτημένους αντιπροσώπους της SAMSUNG Καμία αποζημίωση δεν θα γίνει αποδεκτ...

Page 115: ...ήση του προϊόντος με τρόπους που αντίκεινται στις τεχνικές προδιαγραφές ασφαλείας που ισχύουν κατά την χρήση του προϊόντος Β Επισκευή που έγινε από μη εξουσιοδοτημένα συνεργεία service Γ Ατυχήματα θεομηνίες ή οποιαδήποτε αιτία πέρα του ελέγχου της SAMSUNG συμπεριλαμβανομένων αλλά μη περιορισμένων των κεραυνών του νερού της φωτιάς των δημοσίων αναταραχών του κακού αερισμού κ λπ Δ Η εγγύηση αυτή δεν...

Page 116: ...ng com ITALIA 800 SAMSUNG 726 7864 www samsung com LUXEMBURG 0035 0 2 261 03 710 www samsung com be NETHERLANDS 0900 SAMSUNG 726 7864 0 10 Min www samsung com nl NORWAY 815 56 480 www samsung com no POLAND 0 801 801 881 022 607 93 33 www samsung com pl PORTUGAL 80820 SAMSUNG 726 7864 www samsung com pt SLOVAKIA 0800 SAMSUNG 726 7864 www samsung com sk SPAIN 902 10 11 30 www samsung com SWEDEN 0771...

Page 117: ...ertain Hazardous Substances in Electrical And Electronic Equipment and we do not use the 6 hazardous materials Cadmium Cd Lead Pb Mercury Hg Hexavalent Chromium Cr 6 Poly Brominated Biphenyls PBBs Poly Brominated Diphenyl Ethers PBDEs in our products Code No AD68 02562G 00 ...

Reviews: