background image

ENGLISH

27

27

The Language function works in 

<Camera>

/

<Player>

/

<M.Cam>

/

<M.Player>

modes. 

page 19

You can select the desired language to display the menu screen and the messages.
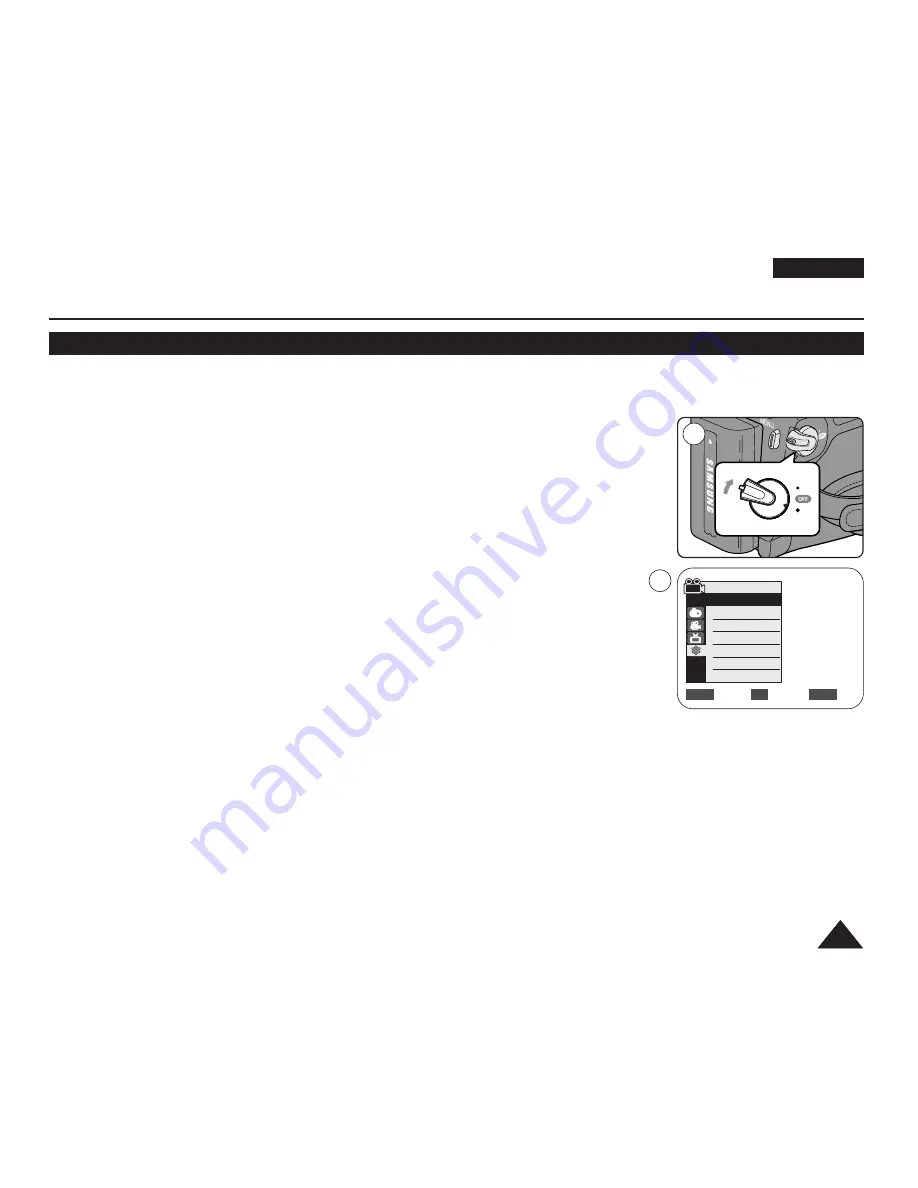
1. Set the 

[Power]

switch to

[CAMERA]

or 

[PLAYER]

.

2. Set the 

[Mode]

switch to 

[TAPE]

or 

[MEMORY]

. (VP-D363(i)/D364W(i)/D365W(i) only)

3. Press the 

[MENU]

button.

The menu list will appear.

4. Move the 

[Zoom]

lever up or down to select 

<System>

, then press the 

[OK] 

button.

5. Move the 

[Zoom]

lever up or down to select 

<Language>

, then press the 

[OK]

button.

The available language options are listed.

6. Move the 

[Zoom]

lever up or down to select desired OSD language, then press the 

[OK]

button.

The OSD language is refreshed in selected language.

7. To exit, press the 

[MENU]

button.

[ Note ]

The word 

<Language> 

in the menu is always indicated in English.

Selecting the OSD Language (Language)

Initial Setting : System Menu Setting

Camera Mode

System

Clock Set
Remote
Beep Sound
Language
Demonstration

On

On

English

On

Move     

Select

Exit

MENU

OK

ZOOM

4

PLAYE

R

CA

M

ER

A

CA M

ER

A

PLA

YE

R

1

Summary of Contents for VP-D361

Page 1: ... is a danger of overheating fire or explosion Samsung is not responsible for problems occurring due to using unapproved batteries This product meets the intent of Directive 89 336 CEE 73 23 CEE 93 68 CEE RoHS compliant Our product complies with The Restriction Of the use of certain Hazardous Substances in electrical and electronic equipment and we do not use the 6 hazardous materials Cadmium Cd Le...

Page 2: ...ting the OSD Language Language 27 Viewing the Demonstration Demonstration 28 Adjusting the LCD Screen LCD Bright LCD Colour 29 Displaying the Date Time Date Time 30 Setting the TV Display TV Display 31 Using the Viewfinder 32 Inserting Ejecting a Cassette 32 Various Recording Techniques 33 Making your First Recording 34 Recording with Ease for Beginners EASY Q Mode 35 Reviewing and Searching when ...

Page 3: ...ions 68 Inserting a Memory Card 68 Ejecting a Memory Card 68 Structure of Folders and Files on the Memory Card 69 Selecting the Memory Type VP D365W i only 70 Selecting the Photo Quality 71 Setting the File Number 72 Taking a Photo Image JPEG on the Memory Card 73 Viewing Photo Images JPEG 74 To view a Single Image 74 To view a Slide Show 74 To view the Multi Display 74 Protection from accidental ...

Page 4: ...e System 89 System Requirements 89 Selecting the USB Device USB Connect VP D363 i D364W i D365W i only 90 Installing DV Media PRO Program 91 Connecting to a PC 92 Disconnecting the USB Cable 92 Using the PC Camera Function 93 Using the USB Streaming Function 94 Using the removable Disk Function VP D363 i D364W i D365W i only 94 After Finishing a Recording 95 Usable Cassette Tapes 95 Cleaning and M...

Page 5: ...D Screen the inside of the Viewfinder or the Lens Take pictures of the sun only in low light conditions such as at dusk 2 The LCD Screen has been manufactured using high precision technology However there may be tiny dots red blue or green in colour that appear on the LCD Screen These dots are normal and do not affect the recorded picture in any way 3 Do not pick up the Camcorder by holding the Vi...

Page 6: ...h your Samsung product are trademarks or registered trademarks of their respective holders Do not attempt to service this Camcorder yourself Opening or removing covers may expose you to dangerous voltage or other hazards Refer all servicing to qualified service personnel When replacement parts are required be sure the service technician has used replacement parts specified by the manufacturer and ...

Page 7: ...gital Image Stabilizer DIS The DIS compensates for any handshake reducing unstable images particularly at high magnification Various Visual Effects The Visual Effects allows you to give your films a special look by adding various special effects Back Light Compensation BLC The BLC function compensates for the bright background behind a subject you re recording Program AE The Program AE enables you...

Page 8: ...D365W i only 7 USB Cable VP D362 i D363 i D364W i D365W i only 8 Software CD VP D362 i D363 i D364W i D365W i only 9 Lens Cover 10 Lens Cover Strap ENGLISH 8 8 Getting to Know Your Camcorder Accessories Supplied with Camcorder 1 Lithium Ion Battery Pack 2 AC Power Adapter AA E9 TYPE 6 Remote Control VP D363 i D364W i D365W i only 7 USB Cable VP D362 i D363 i D364W i D365W i only 8 Software CD VP D...

Page 9: ...ge 35 7 Function Buttons 8 TFT LCD Screen 1 Lens 2 LIGHT VP D364W i D365W i only 3 Remote Sensor VP D363 i D364W i D365W i only 5 Internal MIC 8 TFT LCD Screen 7 Function Buttons 6 EASY Q Button 4 TAPE EJECT MF AF MULTI DISP Button Player Camera M Player VP D363 i D364W i D365W i only œ œ œ œ REW REC SEARCH REV FF REC SEARCH FWD PLAY STILL FADE S SHOW SLIDE SHOW STOP MF AF MULTI DISP MULTI DISPLAY...

Page 10: ...1 3 Speaker 4 Mode Switch MEMORY TAPE VP D363 i D364W i D365W i only 5 Viewfinder 6 COLOR NITE page 42 LIGHT VP D364W i D365W i only page 43 COLORNITE LIGHT MENU 1 DISPLAY 2 MACRO PB ZOOM 4 Mode Switch MEMORY TAPE VP D363 i D364W i D365W i only 3 Speaker 5 Viewfinder 6 COLOR NITE LIGHT VP D364W i D365W i only ...

Page 11: ...ower Switch CAMERA or PLAYER 7 DC Jack 8 Jack Cover 9 Jacks 10 Cassette Door 11 Hand Strap Hook 4 MENU Button 5 Start Stop Button 6 Power Switch 1 Zoom Lever VOL Menu Dial 2 PHOTO Button 3 QUICK MENU Button 7 DC Jack 8 Jack Cover 10 Cassette Door 9 Jacks See below 11 Hand Strap Hook Jacks VP D361 i D361W i External MIC IEEE1394 Multi Cable External MIC IEEE1394 USB Multi Cable VP D362 i D363 i D36...

Page 12: ... D364W i D365W i only 4 Tripod Receptacle 5 Battery Release MENU CHG QUICK MENU 4 Tripod Receptacle 3 Memory Card Slot VP D363 i D364W i D365W i only BATTERY RELEASE 1 Lithium Battery Cover 5 Battery Release 2 Charging Indicator Memory Card Slot Usable Memory Card VP D363 i VP D364W i D365W i Memory Stick Memory Stick PRO SD MMC SD MMC ...

Page 13: ...on page 62 7 FF Button 8 œ œ œ œ REW Button 9 PLAY Button 10 œ œ Direction Button page 59 11 F ADV Button page 60 12 STOP Button 13 STILL Button 14 SLOW Button 15 DATE TIME Button 16 X2 Button page 60 17 W T Zoom Button 18 DISPLAY Button 1 PHOTO 2 START STOP 3 SELF TIMER 4 ZERO MEMORY 5 PHOTO SEARCH 6 A DUB 7 FF 9 PLAY 10 œ œ Direction 18 DISPLAY 17 W T Zoom 16 X2 15 DATE TIME 14 SLOW 13 STILL 11 ...

Page 14: ... Hand Strap into the Hand Strap Hook on the front side of the Camcorder and pull its end through the hook 2 Insert your hand into the Hand Strap and adjust its length for your convenience 3 Close the Hand Strap Lens Cover Attaching the Lens Cover 1 Hook up the Lens Cover with the Lens Cover Strap as illustrated 2 Hook up the Lens Cover Strap to the Hand Strap and adjust it following the steps as d...

Page 15: ...e Lithium Battery Holder with the positive terminal face up 3 Reinsert the Lithium Battery Holder Precaution regarding the Lithium Battery 1 The Lithium Battery maintains the clock function and preset contents of the memory even if the Battery Pack or AC Power adapter is removed 2 The Lithium Battery for the Camcorder lasts about 6 months under normal operation from time of installation 3 When the...

Page 16: ...Camcorder Even with the Power switched Off the Battery Pack will still discharge Charging Recording Times based on Model and Battery Type If you close the LCD Screen it switches off and the Viewfinder switches on automatically The continuous recording times given in the table to the right are approximations Actual recording time depends on usage The continuous recording times in the operating inst...

Page 17: ...tely used Blinking The Camcorder will turn off soon change the battery as soon as possible Battery Pack Management The Battery Pack should be recharged in an environment between 32 F 0 C and 104 F 40 C The life and capacity of the Battery Pack will be reduced if it is used in temperatures below 32 F 0 C or left in temperatures above 104 F 40 C for a long period of time even when it is fully rechar...

Page 18: ...Battery reaches the end of its life please contact your local dealer The batteries have to be dealt with as chemical waste Make sure that the Battery Pack is fully charged before starting to record A brand new Battery Pack is not charged Before using the Battery Pack you need to charge it completely Fully discharging a Lithium Ion Battery damages the internal cells The Battery Pack may be prone to...

Page 19: ...g and wall socket type may differ according to your resident country 3 Connect the DC cable to the DC jack of the Camcorder 4 Set the Camcorder to each mode by holding down the tab on the Power switch and turning it to the CAMERA or PLAYER mode The operating modes are determined by the position of the Power switch and the Mode switch Set the Operation Mode by adjusting Power switch and Mode switch...

Page 20: ...lity page 71 Setting the Exposure Exposure Only can be operated by using the QUICK MENU page 47 Setting the Back Light Compensation BLC page 41 M Player Mode Setting the Memory Type Memory Type page 70 Playing Moving Images MPEG on the Memory Card M Play Select page 80 Deleting Photo Images and Moving Images Delete page 76 Protection from accidental Erasure Protect page 75 Marking Images for Print...

Page 21: ...Tape Counter 22 Zero Memory page 37 VP D363 i D364W i D365W i only 23 Record Speed Mode page 44 24 Operating Mode 25 Self Timer page 38 VP D363 i D364W i D365W i only 26 Photo image 27 Tele Macro page 39 28 Dubbed Audio Playback page 63 29 DEW page 6 30 Warning Indicator page 98 31 Message Line page 98 32 Volume Control page 58 33 DV IN DV data transfer mode VP D361i D361Wi D362i D363i D364Wi D365...

Page 22: ...ide control panel Each press of the button toggles the OSD function on and off When you turn the OSD off In Camera Mode The STBY REC modes are always displayed on the screen even when the OSD is turned off In Player Mode When you press any Function Button it is displayed on the OSD for 3 seconds before it turns off Turning the Date Time On Off To turn the Date Time on or off access the menu and ch...

Page 23: ...ar 8 Press the OK button after setting the minutes A message Complete is displayed To adjust the clock select the Year Month Day Hour or Min by pressing the OK button then move the Zoom lever to the up or down to set respective values 9 To exit press the MENU button Notes After the Lithium Battery loses its charge after about 6 months the date time appears on the screen as 00 00 1 JAN 2006 You can...

Page 24: ... OK button 6 Move the Zoom lever up or down to select On or Off then press the OK button 7 To exit press the MENU button Note If you set the Remote to Off in the menu and try to use it the remote control icon will blink for 3 seconds on the LCD Screen and then disappear Initial Setting System Menu Setting Setting the Wireless Remote Control Acceptance Remote VP D363 i D364W i D365W i only Camera M...

Page 25: ...wn to select System then press the OK button 5 Move the Zoom lever up or down to select Beep Sound then press the OK button 6 Move the Zoom lever up or down to select On or Off then press the OK button 7 To exit press the MENU button Initial Setting System Menu Setting Setting the Beep Sound Beep Sound Move Select Exit MENU OK ZOOM Off On PLAYE R CA M E R A CAM E R A PLAY E R 1 Camera Mode System ...

Page 26: ...n The menu list will appear 4 Move the Zoom lever up or down to select System then press the OK button 5 Move the Zoom lever up or down to select Shutter Sound then press the OK button 6 Move the Zoom lever up or down to select On or Off then press the OK button 7 To exit press the MENU button Setting the Shutter Sound Shutter Sound VP D363 i D364W i D365W i only Move Select Exit MENU OK ZOOM Off ...

Page 27: ... OK button 5 Move the Zoom lever up or down to select Language then press the OK button The available language options are listed 6 Move the Zoom lever up or down to select desired OSD language then press the OK button The OSD language is refreshed in selected language 7 To exit press the MENU button Note The word Language in the menu is always indicated in English Selecting the OSD Language Langu...

Page 28: ...stration then press the OK button 6 Move the Zoom lever up or down to select On then press the OK button 7 Press the MENU button The Demonstration will begin 8 To quit the Demonstration press the MENU button Notes The Demonstration function is automatically activated when the Camcorder is left idle for more than 10 minutes after switching to the Camera mode no tape is inserted in the Camcorder If ...

Page 29: ...y 3 Press the MENU button The menu list will appear 4 Move the Zoom lever up or down to select Display then press the OK button 5 Move the Zoom lever up or down to select the item you want to adjust LCD Bright or LCD Colour then press the OK button 6 Move the Zoom lever up or down to adjust the value of the selected item LCD Bright or LCD Colour then press the OK button You can set values for LCD ...

Page 30: ... to select the display type of the Date Time then press the OK button Display type of the Date Time Off Date Time Date Time 7 To exit press the MENU button Notes The Date Time will read 00 00 1 JAN 2006 in the following conditions During playback of a blank section of a tape If the tape was recorded before setting the Date Time in the Camcorder When the Lithium Battery becomes weak or dead Before ...

Page 31: ...ERA or PLAYER 2 Set the Mode switch to TAPE or MEMORY VP D363 i D364W i D365W i only 3 Press the MENU button The menu list will appear 4 Move the Zoom lever up or down to select Display then press the OK button 5 Move the Zoom lever up or down to select TV Display then press the OK button 6 To activate TV Display function move the Zoom lever up or down to select On or Off then press the OK button ...

Page 32: ...ce through the Viewfinder for a prolonged period may be harmful or cause temporary impairment When inserting a tape or closing the cassette compartment do not apply excessive force As it may cause a malfunction Do not use any tape other than Mini DV cassettes 1 Connect a power source and slide the TAPE EJECT switch The cassette door opens automatically 2 Insert a tape into the cassette compartment...

Page 33: ...g a recording viewing the LCD Screen from below 4 Self recording Making a recording viewing the LCD Screen from the front 5 Recording with the Viewfinder In circumstances where it is difficult to use the LCD Screen the Viewfinder can be used as a convenient alternative Note Please rotate the LCD Screen carefully as excessive rotation may cause damage to the inside of the hinge that connects the LC...

Page 34: ...rotection tab to record Make sure the image you want to record appears on the LCD Screen or Viewfinder Make sure the Battery Level indicates that there is enough remaining power for your expected recording time You can select a Record Mode of your choice page 44 45 46 4 To start recording press the Start Stop button REC is displayed on the LCD Screen To stop recording press the Start Stop button a...

Page 35: ...EASY Q function will not turn off while you are recording The Camcorder will return to the settings that were set prior to activating EASY Q mode Notes In EASY Q mode certain functions are not available such as Menu BLC Manual focus If you want to use these functions you must first turn the EASY Q mode off The EASY Q mode settings are deleted when the Battery Pack is removed from the Camcorder and...

Page 36: ...your Camcorder will play in reverse for 3 seconds and return to the original position automatically Notes Mosaic shaped distortion may appear on the screen while in Record Search mode Pressing Start Stop button after REC SEARCH will overwrite the images recorded after that point COLORNITE LIGHT COLORNITE LIGHT Reviewing and Searching when Recording REC SEARCH When a cassette is loaded and the Camc...

Page 37: ...the ZERO MEMORY button again 4 Finding the zero position When you have finished playback fast forward or rewind the tape in stop mode The tape stops automatically when it reaches the zero position When you have finished recording set the Power switch to PLAYER and press the œ œ œ œ REW button The tape stops automatically when it reaches the zero position 5 The tape counter with the ZERO MEMORY ind...

Page 38: ...ss the Start Stop button to start the timer SELF TIMER starts counting down from 10 with a beep sound If you want to cancel the SELF TIMER function before recording press the SELF TIMER button 5 Press the Start Stop button again when you wish to stop recording Notes Do not obstruct the remote control sensor by putting obstacles between the remote control and Camcorder The remote control range is 4...

Page 39: ...ecord a subject that is about 10mm about 0 5 inch away from the lens surface in the Wide position Tele Macro function works in both Camera and M Cam mode page 19 Effective focal distance in Tele Macro mode is 50 Cm 19 7 inches 100 Cm 39 4 inches 1 Press the MACRO PB ZOOM button Tele Macro icon is displayed 2 If you want to cancel the Tele Macro function press the MACRO PB ZOOM button again Notes W...

Page 40: ...Start Stop button and at the same time release the FADE button Recording starts and the picture and sound gradually appear fade in To Stop Recording use Fade In Fade Out 5 When you wish to stop recording press and hold the FADE button The picture and sound gradually disappear fade out 6 When the picture has disappeared press the Start Stop button to stop recording a Fade Out Approx 4 seconds b Fad...

Page 41: ...against a snowy background 1 Set the Power switch to CAMERA 2 Set the Mode switch to TAPE or MEMORY VP D363 i D364W i D365W i only 3 Press the QUICK MENU button Quick menu list will appear 4 Move the Zoom lever up or down to select BLC then press the OK button 5 Move the Zoom lever up or down to select On then press the OK button 6 To exit press the QUICK MENU button BLC icon will be displayed Not...

Page 42: ...D362 i D363 i Color N 1 25 Color N 1 13 Color N 1 13 and OFF VP D364W i D365W i Notes The COLOR NITE will not turn on or off while you are recording When using the COLOR NITE the image takes on a slow motion like effect When using the COLOR NITE the focus adjusts slowly and the white dots may appear on the screen this is not a defect COLOR NITE is not available while DIS Photo image recording or E...

Page 43: ...n until Color N 1 13 appears Notes The LIGHT will not turn on or off while you are recording The range of the LIGHT is limited up to 6 6ft 2m Danger The LIGHT can become extremely hot Do not touch it while in operation or soon after turning it off otherwise serious injury may result Do not place the Camcorder into the carrying case immediately after using the LIGHT since it remains extremely hot f...

Page 44: ...ect Rec Mode or Audio Mode then press the OK button 6 Move the Zoom lever up or down to select desired record mode or audio mode then press the OK button Record mode can be set to SP or LP Audio mode can be set to 12Bit or 16Bit 7 To exit press the MENU button The selected icon is displayed When 12Bit is selected no 12Bit indication is displayed Notes We recommend that you use this Camcorder to pl...

Page 45: ... then press the OK button 6 To activate the WindCut Plus function move the Zoom lever up or down to select On or Auto then press the OK button On It removes the low pitched wind noise Auto It minimizes the wind noise while preserving the human voice 7 To exit press the MENU button WindCut Plus On or Auto icon is displayed Notes Make sure WindCut Plus is set to off when you want the microphone to b...

Page 46: ...ton 5 Move the Zoom lever up or down to select Real Stereo then press the OK button 6 To activate the Real Stereo function move the Zoom lever up or down to select On then press the OK button 7 To exit press the MENU button Real Stereo icon is displayed S Advanced Recording Selecting the Real Stereo ENGLISH 46 46 Move Select Exit MENU OK ZOOM Camera Mode Record Rec Mode Audio Mode WindCut Plus Rea...

Page 47: ...sure value can be set between 00 and 29 7 To exit press the QUICK MENU button Selected settings are displayed Recommended Shutter Speeds when Recording Outdoor sports such as golf or tennis 1 2000 or 1 4000 Moving cars or trains or other rapidly moving vehicles such as roller coasters 1 1000 1 500 or 1 250 Indoor sports such as basketball 1 120 Notes If you manually change the Shutter Speed and th...

Page 48: ...al Focus In the following situations you may obtain better results by adjusting the focus manually a A picture containing several objects some close to the Camcorder others further away b A person enveloped in fog or surrounded by snow c Very shiny or glossy surfaces like a car d People or objects moving constantly or quickly like an athlete or a crowd 1 Set the Power switch to CAMERA 2 Set the Mo...

Page 49: ...itions Sports mode For recording people or objects moving quickly Portrait mode For focusing on the background of the subject when the background is out of focus The Portrait mode is most effective when used outdoors Spotlight mode For recording correctly when there is only light on the subject and not the rest of the picture Sand Snow mode For recording when people or objects are darker than the ...

Page 50: ...tion then press the OK button 7 To exit press the MENU button The icon of the selected mode is displayed When the Auto mode is selected no icon is displayed Notes Direct accessing the Program AE function is available simply using the QUICK MENU button page 20 The Program AE function will not operate in EASY Q mode 60min 0 00 10 SP STBY œ Auto Auto Off Off Off Off Move Select Exit MENU OK ZOOM Came...

Page 51: ...or down to select desired mode Auto Indoor Outdoor or Custom WB then press the OK button To explain about the Custom WB Select Custom WB and press the OK button set white balance will appear and blinks on the screen Place the white object under the desired lighting then press the OK button The set white balance will disappear and the Custom WB icon will be displayed 7 To exit press the MENU button...

Page 52: ...effect 3 Sepia mode This mode gives the images a reddish brown pigment 4 Negative mode This mode reverses the colours creating a negative image 5 Mirror mode This mode cuts the picture in half using a mirror effect 6 BLK WHT mode This mode changes the images to black and white 7 Emboss1 mode This mode creates a 3D effect embossing 8 Emboss2 mode This mode creates a 3D effect embossing on surroundi...

Page 53: ...des are not available while EASY Q is in use Once DIS EASY Q or COLOR NITE is set Emboss2 Pastel2 Mirror or Mosaic mode will be released 16 9 Wide modes are not available while Visual Effect is in use VP D361 i D362 i D363 i only Mirror mode is not available in the 16 9 Wide mode VP D361W i D364W i D365W i only Digital Zoom is not available in the Emboss2 Pastel2 Mirror or Mosaic mode Visual Effec...

Page 54: ...you do not want to use the 16 9 Wide function set the 16 9 Wide menu to Off 7 To exit press the MENU button The selected icon is displayed Notes Direct accessing the 16 9 Wide function is available simply using the QUICK MENU button page 20 The 16 9 Wide mode is not available while Visual Effect DIS or EASY Q is in use VP D361 i D362 i D363 i only Once COLOR NITE is set 16 9 Wide mode will be rele...

Page 55: ...t to use the DIS function set the DIS menu to Off 7 To exit press the MENU button DIS icon is displayed Notes Direct accessing the DIS function is available simply using the QUICK MENU page 20 Digital Zoom COLOR NITE Emboss2 Pastel2 Mirror or Mosaic is not available in the DIS mode 16 9 Wide mode is not available in the DIS mode VP D361 i D362 i D363 i only DIS function in 16 9 Wide mode may produ...

Page 56: ...Off 100x 200x 400x or 1200x then press the OK button 7 To exit press the MENU button Move the Zoom lever up or down to use the Digital Zoom The Digital Zoom indicator appears Notes Maximum Digital zooming may result in lower picture quality Digital Zoom is not available while DIS EASY Q still image recording COLOR NITE 16 9 Wide Emboss2 Pastel2 Mirror or Mosaic is in use Once still image recording...

Page 57: ...h process appears while you are searching After completing the search the Camcorder displays the still image When there are no still images recorded on the tape it will be fully rewound or forwarded 7 To exit press the STOP or MENU button Notes Still image recording is not available while recording You can use still image recording by using the PHOTO button on the remote control Pressing the PHOTO...

Page 58: ...tion press the STOP button Adjusting the LCD Bright LCD Colour during Playback You can adjust the LCD Bright LCD Colour during playback The adjustment method is the same procedure as used in Camera mode page 29 Adjusting the Volume When you use the LCD Screen for playback you can hear recorded sound from the built in Speaker Take the following steps to lower the volume or mute the sound while play...

Page 59: ...g playback To resume playback press the PLAY STILL button Picture Search Forward Reverse Press the œ œœ œ REW FF buttons during playback or still mode To resume normal playback press the PLAY STILL button Keep pressing œ œœ œ REW FF buttons during playback or still mode To resume normal playback release the button Slow Playback Forward Reverse VP D363 i D364W i D365W i only Forward Slow Playback P...

Page 60: ...64W i D365W i only Forward X2 Playback Press the X2 button on the remote control during playback To resume normal playback press the PLAY STILL button Reverse X2 Playback Press the œ œ button during forward X2 playback To resume normal playback press the PLAY STILL button Reverse Playback VP D363 i D364W i D365W i only To playback in reverse at normal speed press the œ œ button during normal forwa...

Page 61: ...mage 5 You can zoom in from 1 2x to 8 0x by moving the Zoom lever Zoom ratio is not displayed 6 To cancel the PB Zoom function press the PB ZOOM or STOP button Notes The PB Zoom function enlarges the centre of the screen only You cannot apply the PB Zoom function to pictures which are being input from an external video source The PB Zoom image cannot be imported to your PC from the Camcorder s DV ...

Page 62: ...order 2 Set the Mode switch to TAPE 3 Press the PLAY STILL button and find the time frame of the scene to be dubbed 4 Press the PLAY STILL button to pause the scene 5 Press the A DUB button on the remote control Audio Dubbing icon is displayed The Camcorder is ready for dubbing 6 Press the PLAY STILL button to start dubbing Press the STOP button to stop the dubbing Notes You can not use the Audio ...

Page 63: ...er up or down to select the audio playback channel then press the OK button Sound 1 play the original sound Sound 2 play the dubbed sound MIX 1 2 play back sound1 and 2 equally mixed 7 To exit press the MENU button 8 Press the PLAY STILL button to playback the dubbed tape Note When you playback added sound Sound 2 or MIX 1 2 you may experience a loss of sound quality Move Select Exit MENU OK ZOOM ...

Page 64: ...udio input of the TV 2 Set the Power switch to PLAYER 3 Set the Mode switch to TAPE VP D363 i D364W i D365W i only 4 Turn on the TV and set the TV VIDEO selector on the TV to Video Refer to the TV user s manual 5 Play the tape page 63 Notes You may use an S Video connector on the cable to obtain better quality pictures if you have a S Video connector on your TV Even if you use an S Video connector...

Page 65: ... to TAPE VP D363 i D364W i D365W i only 3 Insert the tape you wish to play back 4 Using the œ œœ œ REW FF buttons find the first position you wish to play back 5 Press the PLAY STILL button The images you recorded will appear on the TV after a few seconds If a tape reaches its end while being played back the tape will rewind automatically Notes The playback mode SP LP is selected automatically If ...

Page 66: ...nhancing the high and low pitched sounds from the audio signals Wide It magnifies the stereo effect by enhancing the left and right sounds Echo It gives an effect of echo sound heard inside a cave or on the mountain top 7 To exit press the MENU button Notes It is recommended to use stereo type output devices TV speakers for better audio effects The Audio Effect function is transmittable via extern...

Page 67: ...button If you want to see the Camcorder picture with a TV set AV In Out menu to Out 10 To exit press the MENU button 11 Press the Start Stop button to set the Camcorder to REC PAUSE mode PAUSE appears 12 Select the TV programme or playback the VHS tape 13 Press the Start Stop button to start recording If you want to pause recording for a while press the Start Stop button again 14 To stop recording...

Page 68: ...ert the Memory Card 3 Insert the Memory Card into the Slot until it softly clicks 4 Close the Memory Card Cover Ejecting a Memory Card 1 Open the Memory Card Cover 2 Slightly push the Memory Card inwards to pop it out 3 Pull the Memory Card out of the slot and close the Memory Card Cover ENGLISH 68 68 Using the Memory Card Usable Memory Card not supplied Digital Still Camera Mode VP D363 i D364W i...

Page 69: ... VP D363 i D364W i D365W i or Memory Stick Duo type VP D364W i D365W i only should be inserted by using the Adaptor not supplied In M Cam or M Player mode the 16 9 wide mode is not supported The wide mode only displays in the aspect ratio of 4 3 VP D361W i D364W i D365W i only The Camcorder supports 2GB SD MMC and lower SD MMC above 2GB may not record or play properly The photo images that you rec...

Page 70: ...on The menu list will appear 4 Move the Zoom lever up or down to select Memory then press the OK button 5 Move the Zoom lever up or down to select Memory Type then press the OK button 6 Move the Zoom lever up or down to select Int Memory or Memory Card then press the OK button 7 To exit press the MENU button Note Direct accessing the Memory Type function is available simply using the QUICK MENU bu...

Page 71: ...ne Fine Normal then press the OK button 7 To exit press the MENU button The selected icon is displayed Number of Images on the Memory Card The actual number of images that you can record varies depending on the nature of the subject to be recorded Notes Direct accessing the Photo Quality function is available simply using the QUICK MENU button page 20 The above approximation is based on a 8MB Memo...

Page 72: ...the file numbering starts from 0001 1 Set the Power switch to the CAMERA 2 Set the Mode switch to MEMORY 3 Press the MENU button The menu list will appear 4 Move the Zoom lever up or down to select Memory then press the OK button 5 Move the Zoom lever up or down to select File No then press the OK button 6 Move the Zoom lever up or down to select desired option Series or Reset then press the OK bu...

Page 73: ...d 1 Set the Power switch to CAMERA 2 Set the Mode switch to MEMORY 3 After framing your object to record fully press the PHOTO button to take the picture The picture is taken and saved into the Memory Card within a few seconds Taking another picture within this interval is not possible The indicator appears during the time it takes to save the image Notes Photo images are saved in the Memory Card ...

Page 74: ...will be played back consecutively for 2 3 seconds each The Slide is displayed The Slide Show will start from the current picture To stop the slide show press the S SHOW button again To view the Multi Display To view six stored images on single screen press the MULTI DISP button A selection mark œ œ œ œ appears under the image Press the œ œ œ œ REV FWD button to select an image To return to single ...

Page 75: ...Zoom lever up or down to select Protect then press the OK button 7 Move the Zoom lever up or down to select On then press the OK button 8 To exit press the MENU button The protection icon is displayed Notes Direct accessing the Protection function is available simply using the QUICK MENU page 20 If the write protection tab on the Memory Card is set to LOCK you cannot set image protection ENGLISH 7...

Page 76: ...the œ œ œ œ REV FWD buttons search for the photo image that you want to delete 4 Press the MENU button The menu list will appear 5 Move the Zoom lever up or down to select Memory then press the OK button 6 Move the Zoom lever up or down to select Delete then press the OK button A message Do you want to delete is displayed 7 Move the Zoom lever up or down to select Yes or No then press the OK butto...

Page 77: ...age will be displayed If an erroneous image file is found on the Memory Card the message Memory Card Error will be displayed It may be caused by copying images from different digital devices Formatting the Memory Card will delete all the stored images page 78 To protect important pictures from accidental deletion activate the image protection page 75 Deleting all files using the Delete All menu ma...

Page 78: ...t Memory or Memory Card a message All files will be deleted Do you want to format is displayed 7 Move the Zoom lever up or down to select Yes then press the OK button Complete is displayed when the format is completed 8 To exit press the MENU button Notes If you execute the Format function all photo images moving images will be erased completely and erased photo images moving images cannot be reco...

Page 79: ...ing Recording moving images is not available when a MENU or QUICK MENU is displayed on the screen To start recording press the MENU button to make it disappear Before using the Recording moving images function check whether the Memory Card is inserted into the Camcorder Moving images that you recorded are saved in avi avi 1 0 file format on the Memory Card The files that you recorded are saved in ...

Page 80: ...ICK MENU button page 20 MENU button and OK button are not available while moving image playback To use MENU button and OK button stop playback Moving image playback is not available when a menu or Quick menu is displayed on the screen To start playback press the MENU button to make it disappear There may be broken or mosaic pictures while playing moving images but it is not malfunction The moving ...

Page 81: ... Memory Card use the COPY function 1 Set the Power switch to PLAYER 2 Set the Mode switch to TAPE 3 Playback the cassette 4 Press the PHOTO button The photo image is recorded on the Memory Card During the time it takes to save an image the playback screen is paused and the OSD is displayed see illustration right Notes Photo images copied from the cassette to the Memory Card are saved in a 640x480 ...

Page 82: ...ry Card 6 The Camcorder automatically performs the still image search to find still images and copy starts 7 Press the STOP button to stop copying Copy stops when the cassette is finished or Memory Card is full Note Still images copied from the cassette to the Memory Card are saved in 640x480 format Digital Still Camera Mode VP D363 i D364W i D365W i only Copying Still Images from a Cassette to Me...

Page 83: ...t Copy to then press the OK button 6 Move the Zoom lever up or down to select options Back This File or All Files then press OK button To go back to the previous mode select Back If This File or All Files is selected Now copying is displayed and copying starts 7 To exit press the MENU button Copies Files from the Memory Card to the Built in Memory Copy to VP D365W i only Memory Card Photo Off Move...

Page 84: ...you select This File move the Zoom lever up or down to select the quantity then press the OK button 9 To exit press the MENU button Removing the Print Mark To remove all Print Marks select All Off To remove individual file s Print Mark select the file and set This File to 000 Notes Direct accessing the Print Mark function is available simply using the QUICK MENU page 20 If the Print Mark is set to...

Page 85: ...u list will appear 4 Move the Zoom lever up or down to select System then press the OK button 5 Move the Zoom lever up or down to select USB Connect then press the OK button 6 Move the Zoom lever up or down to select Printer then press the OK button Computer Connect to a computer Printer Connect to a printer To use the PictBridge function connect to a printer 7 Connect your Camcorder to the printe...

Page 86: ...be canceled Notes The Date Time Imprint Option may not supported by all printers Check with your printer manufacturer The Date Time menu cannot be setup if the printer does not support this option The PictBridgeTM is a registered trademark of CIPA Camera Imaging Products Association an image transfer standard developed by Canon Fuji HP Olympus Seiko Epson and Sony PictBridge supporting printers ar...

Page 87: ...digital format allowing high quality images to be transferred Connecting to a PC If you want to transmit data to a PC you must install an IEEE 1394 add on card into the PC not supplied The frame rate for moving image is dependent on the capacity of the PC System Requirements CPU faster Intel Pentium III 450MHz compatible Operating system Windows 98SE ME XP Mac OS 9 1 10 4 Main memory more than 64 ...

Page 88: ... this occurs please reconnect the DV cable or turn the power OFF and ON again When you transmit data from the Camcorder to PC PC function button is not available in M Player mode Do not use other DV device when using IEEE1394 Do not connect the Camcorder to a PC using both DV and USB cables It may not operate properly The IEEE1394 cable DV cable is sold separately Moving image software is commerci...

Page 89: ...Windows is a registered trademark of the Microsoft Corporation All other brands and names are property of their respective owners Operations are not guaranteed for all of the recommended computer environments mentioned above Do not connect the Camcorder to a PC using both DV and USB cables It may not operate properly In M Cam or M Player mode be sure that the Memory Card is inserted into Camcorder...

Page 90: ...ect then press the OK button 6 Move the Zoom lever up or down to select Computer or Printer then press the OK button You can select Computer to use the Camcorder as a PC Camera USB Stream or removable disk You can select Printer to use the Pictbridge feature page 84 7 To exit press the MENU button USB Interface VP D362 i D363 i D364W i D365W i only Selecting the USB Device USB Connect VP D363 i D3...

Page 91: ...tallation selection screen appears 2 If the installation selection screen does not appear after inserting the CD click Run in the Windows Start menu and execute Autorun exe file to begin installation When CD ROM drive is set to D drive type D autorun exe and press Enter 3 Click the icons listed below to install the selected software DV Driver Click USB removable Disk Driver Windows 98SE only VP D3...

Page 92: ...ission you must disconnect the cable in the following way 1 Select the removable disc icon and click the right mouse button to select Eject 2 Select Confirm and disconnect the USB cable when the Windows Splash screen appears Notes If you disconnect the USB cable from the PC or the Camcorder while transferring the data transmission will stop and the data may be damaged If you connect the USB cable ...

Page 93: ...deo conferencing software In this case connect an external microphone to the soundcard of the PC to enable voice communication Using the Camcorder with PC Net Meeting program installed you can participate in video conference The PC Camera s screen size Transferred video frame rate for the PC Camera function is max 12 5 fps 640X480 VGA pixels for USB 2 0 connection If PC is connected with the USB t...

Page 94: ...other end to the USB jack on your computer 3 Setup and execute Windows Movie Maker or the Ulead VIDEO Studio Software application provided on the CD For detailed instructions for Ulead VIDEO Studio use refer to the program s Help function Windows Movie Maker is used for WINDOWS ME and XP users C program files Movie maker moviemk exe Using the removable Disk Function VP D363 i D364W i D365W i only ...

Page 95: ...mages 3 Set the Power switch to the Off 4 Disconnect the power source or remove the Battery Pack Press the BATTERY RELEASE button located on the bottom of the Camcorder and slide the Battery Pack in the direction of the arrow When you have recorded something that you wish to keep you can protect it so that it will not be accidentally erased a Protecting a tape Push the safety tab on the cassette s...

Page 96: ...D364W i D365W i only 3 Insert the cleaning tape 4 Press the PLAY STILL button 5 Press the STOP button after 10 seconds Notes Check the quality of the picture using a videocassette If the picture quality has not improved repeat the operation Clean the video heads with a dry type cassette cleaner Some cleaning cassette products stop automatically Refer to the cleaning cassette s instructions for det...

Page 97: ...ideocassette recorder the television or VCR must be PAL compatible and have the appropriate audio video jacks Otherwise you may need to use a transcoder PAL compatible Countries Regions Australia Austria Belgium Bulgaria China CIS Czech Republic Denmark Egypt Finland France Germany Greece Great Britain Holland Hong Kong Hungary India Iran Iraq Kuwait Libya Malaysia Mauritius Norway Romania Saudi A...

Page 98: ... is displayed If this happens none of the functions except cassette ejection will work Open the cassette compartment and remove the Battery Leave the Camcorder for at least two hours in a dry warm room slow slow no slow slow slow slow the Battery pack is almost discharged Change to a charged one When the remaining time on the tape is about 2 minutes Prepare a new one the tape reached its end Chang...

Page 99: ...d Write protect slow When you try to delete to protected image Cancel the protection of image Protect slow The Camcorder can not playback Format a Memory Card or insert Memory Card recorded on this Camcorder Read error slow The Camcorder can not record Format a Memory Card or change to a new Memory Card Write error slow The Memory Card needs to format Format a Memory Card see page 78 Not formatted...

Page 100: ...ut using it The Battery pack is fully exhausted The atmospheric temperature is too low The Battery pack has not been charged fully The Battery pack is completely dead and cannot be recharged Use another Battery pack The video heads may be dirty Clean the head with a cleaning tape The contrast between the subject and the background is too great for the Camcorder to operate normally Make the backgro...

Page 101: ...unction Selecting the Digital Image Stabilizing Selecting the Digital Zoom Searching pictures recorded in Tape Copying still images from a cassette to Memory Card Selecting the Audio playback channel Selecting the Audio Effect Selecting the recording speed Selecting Sound Quality for recording Minimizing wind noise Selecting the Real Stereo Selecting the AV input output Selecting the memory type S...

Page 102: ... Setting the Date and Time Selecting OSD on off of TV Setting the Clock Set Using the remote control Setting the Beep sound Setting the Shutter sound Setting the USB Selecting the OSD language Demonstration Available mode VP D363 i D364W i D365W i only VP D363 i D364W i D365W i only VP D363 i D364W i D365W i only TM Memory Stick and are trademarks of Sony Corporation All other product names mentio...

Page 103: ...D362 i D363 i only 2 7inch wide 230K VP D361W i D364W i D365W i only TFT LCD Colour LCD 1Vp p 75Ω terminated Y 1Vp p 75Ω C 0 286Vp p 75Ω 7 5dBs 600Ω terminated 4pin special in out connector Mini B type connector Ø3 5 stereo General Power source Power source type Power consumption Recording Operating temperature Storage temperature External dimension Weight Internal MIC Remote control VP D363 i D36...

Page 104: ...e advance 60 Function buttons 9 Hand Strap 14 IEEE1394 87 88 LCD 29 Memory Card 68 Memory Stick 68 Moving Image Recording 79 OSD 21 22 Photo Copy 82 Photo Quality 71 Photo Search 57 Program AE 49 Protection 75 Photo images 73 Rec Mode 44 Rec Search 36 Remote 24 Remote control 13 Shutter Speed 47 Sound 25 26 Speaker 58 Tele Macro 39 TV Display 31 USB 89 94 Viewfinder 32 Visual Effect 52 White Balan...

Page 105: ...d or consult your dealer for assistance However if there is no alternative to cutting off the plug remove the fuse and then safely dispose of the plug Do NOT connect the plug to a mains socket as there is a risk of shock hazard from the bared flexible cord IMPORTANT The wires in the mains lead are coloured in accordance with the following code BLUE NEUTRAL BROWN LIVE As these colours may not corre...

Page 106: ...ptation in order to conform to national or local technical or safety standards in force in any Country other than the one for which the product was originally designed and manufactured This warranty will not cover and no re imbursement will be made for such adaptation nor any damage which may result 5 This warranty covers none of the following a Periodic check ups maintenance and repair or replace...

Page 107: ...ı ariqmovı oiovntoı prevpei na eivnai eukrinhvı revwsh thı SAMSUNG aforav movno thn episkeuhv oiovntoı 3 H episkeuhv tou proiovntoı prevpei na anativqetai movno se exousiodothmevna kevntra service hv exousiodothmevnouı antiproswvpouı thı SAMSUNG Kamiva apozhmivwsh den qa givnei apodekthv gia episkeuhv pou evcei givnei apov mh exousiodothmevno apov thn SAMSUNG sunergeivo 4 To proiovn autov den qa q...

Page 108: ...u antivkeintai stiı tecnikevı prodiagrafevı asfaleivaı pou iscuvoun katav thn crhvsh tou proiovntoı Episkeuhv pou evgine apov mh exousiodothmevna sunergeiva service Atuchvmata qeomhniveı hv opoiadhvpote aitiva pevra ou elevgcou thı SAMSUNG sumperilambanomevnwn allav mh periorismevnwn twn keraunwvn tou nerouv hı fwtiavı twn dhmosivwn anataracwvn tou kakouv aerismouv klp H egguvhsh authv den ephreav...

Page 109: ... com fi FRANCE 08 25 08 65 65 0 15 Min www samsung com fr GERMANY 01805 121213 0 12 Min www samsung de HUNGARY 06 40 985 985 www samsung com hu ITALIA 199 153 153 www samsung com it LUXEMBURG 02 261 03 710 www samsung lu NETHERLANDS 0900 20 200 88 0 10 Min www samsung com nl NORWAY 231 627 22 www samsung com no POLAND 0 801 801 881 www samsung com pl PORTUGAL 80 8 200 128 www samsung com pt SLOVAK...

Page 110: ...ENGLISH THIS CAMCORDER IS MANUFACTURED BY AD68 00970G ...

Reviews: