background image

Getting to Know Your Camcorder

17

ENGLISH

25. BLC (Back Light Compensation) (see page 55)

26. Volume control (see page 31)

27. Audio playback channel (see page 58)

28. Audio playback mode 

29. DV IN (VP-D

XXi

only) (DV data receiving mode) (see page 70)

30. A. DUB (see page 57)

31. USB (see page 71) (VP-D15(i) only)

Turning the OSD on/off (On Screen Display)

When you set the power switch to CAMERA, and the OSD is automatically turned on.

When you set the power switch to PLAYER, and the OSD is automatically turned off.

Refer to page 48.

• Turning 

OSD on/off

Press the ENTER (DISPLAY) button on the rear side panel.
-

Each press of the button toggles the OSD function on and off.

-

When you turn the OSD off, 
In CAMERA mode: You only see those features being used.
In PLAYER mode: All OSD messages flash for 3 seconds then disappear.

Turning 

on/off the 

DATE/TIME

- The DATE/TIME is not affected when the OSD function is switched ON or OFF.
- To turn the DATE/TIME on or off, access the menu and change the DATE/TIME mode. (see page 49 )

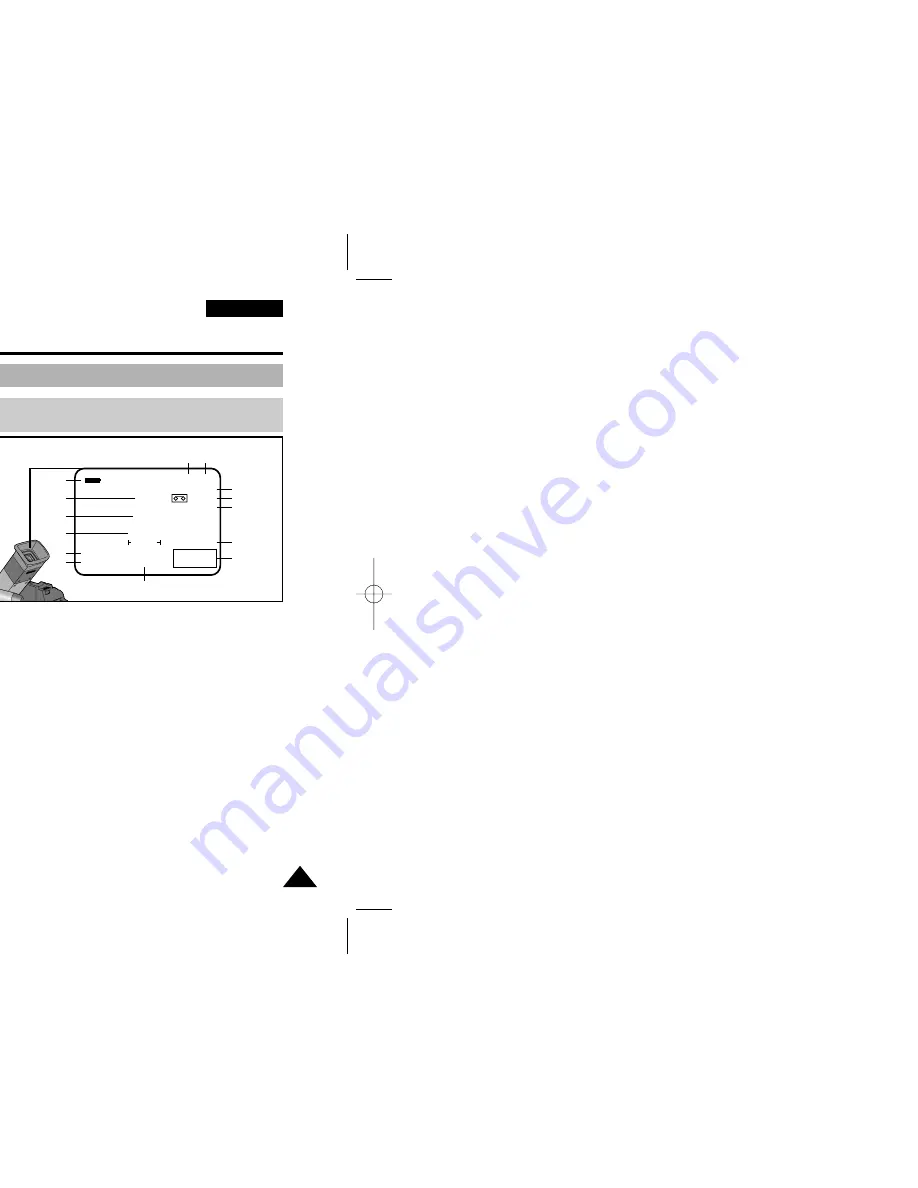
OSD (On Screen Display)

OSD in CAMCORDER PLAYBACK mode

SOUND2

SP  STILL

A.DUB

TAPE

100 MIN

DEW

USB

DV IN

VOLUME

 0 16 31 

23:30

16BIT

31.DEC.2001

0:00:00:00

17
16
30

29

10

1

13

11

26

27
28

20     19

31

00542E VP-D10 UK (~P25)  3/13/03 10:14 AM  Page 17

Summary of Contents for VP-D10

Page 1: ...ENGLISH ELECTRONICS ST AR T ST OP SE LF TIMER X2 SL OW F AD V A DU B ZE RO MEM ORY ST ILL PH OTO DISP LA Y W T ...

Page 2: ... 9 10 11 12 13 14 15 16 18 19 20 21 22 25 26 28 29 29 30 31 32 33 34 34 35 36 37 39 40 42 43 44 4 ...

Page 3: ... 45 46 46 47 48 49 50 51 52 53 54 55 56 57 59 61 62 63 64 64 65 66 75 76 3 ENGLISH 77 78 80 82 83 69 71 75 ...

Page 4: ...ge to the inside of the hinge that connects the LCD 1 2 3 4 5 90 90 90 90 ...

Page 5: ...5 ENGLISH d er warm room with the cassette compartment er gets wet it may be damaged ...

Page 6: ...block shaped noise distorts playback pictures appens clean the video heads with a dry type ...

Page 7: ...ENGLISH 7 ...

Page 8: ...e of installation five seconds when you set the power switch to it off otherwise serious injury may result eo light The video light will be hot USE WITH CAUTION TO REDUCE THE RISK OF FIRE ERIALS FROM LESS THAN FOUR FEET DURING USE ND ALLOW LAMP TO COOL BEFORE REPLACING ...

Page 9: ...9 ENGLISH used to transmit DV data high speed data transport port rd to review your recordings immediately ts tion compensates for the bright background lmed ...

Page 10: ...dapter 6 Shoulder Strap ST AR T ST OP SE LF TIM ER X2 SL OW F A DV A D UB ZE RO ME MO RY ST ILL PH OT O DIS PL AY W T apter e D15i only 11 USB cable VP D15 D15i only 12 Software CD VP D15 D15i only Digital Video Camcorder START STOP SELF TIMER X2 SLOW F ADV A DUB ZERO MEMORY WIDE TELE STILL PHOTO DISPLAY ...

Page 11: ...11 ENGLISH n see page 53 ee page 52 or page 29 10 Viewfinder 9 TFT LCD monitor 8 EASY button 7 CUSTOM button ...

Page 12: ...2 SPEAKER ...

Page 13: ...13 ENGLISH 8 OPEN EJECT button 7 Audio Video out 6 External MIC in 5 DV IN OUT VP DXXi DV OUT VP DXX 4 S VIDEO out ...

Page 14: ...e page 74 nly page 21 P button see page 26 ease button see page 75 tery holder see page 19 se button TOP button 12 Lithium Battery Holder ...

Page 15: ...15 ENGLISH see page 67 ge 57 age 17 16 DISPLAY 15 Zoom WIDE 14 Zoom TELE 13 A DUB 12 STILL 11 STOP 10 Frame Advance ...

Page 16: ... mode WAIT 10S CUSTOM SP STBY MIRROR PHOTO OUTDOOR 1 500 TAPE M FOCUS 100 MIN DEW PIP 23 30 SELF 30S 31 DEC 2001 500 0 00 00 18 17 16 15 14 13 12 11 10 1 2 3 4 5 6 25 24 23 22 21 20 19 W BLC T M x I 29 W CUT USB 9 I 8 16BIT 7 ...

Page 17: ...17 ENGLISH age 49 OSD in CAMCORDER PLAYBACK mode SOUND2 SP STILL A DUB TAPE 100 MIN DEW USB DV IN VOLUME 0 16 31 23 30 16BIT 31 DEC 2001 0 00 00 00 17 16 30 29 10 1 13 11 26 27 28 20 19 31 ...

Page 18: ...ally on again ng START STOP SELF TIMER X2 SLOW F ADV A DUB ZERO MEMORY STILL PHOTO DISPLAY W T LF ER ...

Page 19: ...19 ENGLISH battery pack or AC power adapter is removed me of installation conds when you set the power switch to CAMERA ...

Page 20: ...cording nd he buckle a c b 1 2 ...

Page 21: ...21 ENGLISH 2 1 3 ERA 4 b PLAYER ...

Page 22: ...corder camcoder camcorder after it is fully charged 2 3 1 4 ...

Page 23: ...23 ENGLISH C F 0 C or left in temperatures above 104 F 40 C for ...

Page 24: ...k a fully charged ent when you mate continuous ged or not hich indicates a b c d e ...

Page 25: ...a malfunction at 25 ENGLISH 1 3 2 4 Tape window Cassette holder Cassette door a SAVE b REC ...

Page 26: ...2 4 3 ...

Page 27: ...27 ENGLISH 27 ENGLISH without being used it will switch off automatically AMERA it forwards REC SEARCH REC SEARCH ...

Page 28: ......

Page 29: ...GLISH nables you to view mple you can adjust 29 ENTER MENU ON OFF DISPLAY MENU SP STBY LCD ADJUST CUSTOM SET DIS OFF PIP OFF D ZOOM OFF PROGRAM AE AUTO MENU LCD ADJUST SP STBY BRIGHT I 00 18 36 I COLOUR RETURN MENU ...

Page 30: ...CR see page 64 1 2 4 REW PLAYER ...

Page 31: ...31 ENGLISH 31 ENGLISH Speaker playback MENU SP STOP LCD ADJUST PHOTO SEARCH AUDIO SEL SOUND1 SPEAKER ON REC MODE SP DISPLAY LCD MENU SP PLAY 0 00 00 00 100MIN VOLUME I 0 16 20 I ...

Page 32: ...item ENTER MENU ON OFF DISPLAY MENU SP STBY LCD ADJUST CUSTOM SET DIS OFF PIP OFF D ZOOM OFF PROGRAM AE AUTO MENU ...

Page 33: ...33 ENGLISH 33 ENGLISH setting ...

Page 34: ...h item to de MENU SP STBY LCD ADJUST CUSTOM SET DIS OFF PIP OFF D ZOOM OFF PROGRAM AE AUTO MENU CUSTOM SET SP STBY DIS ON PIP OFF D ZOOM OFF PROGRAM AE AUTO DSE OFF W BALANCE AUTO MENU ...

Page 35: ...GLISH y shaking or moving of the hand holding the od MENU SP STBY LCD ADJUST CUSTOM SET DIS OFF PIP OFF D ZOOM OFF PROGRAM AE AUTO MENU MENU SP STBY LCD ADJUST CUSTOM SET DIS ON PIP OFF D ZOOM OFF PROGRAM AE AUTO MENU ...

Page 36: ...osed screen to show an original image g MENU SP STBY LCD ADJUST CUSTOM SET DIS OFF PIP OFF D ZOOM OFF PROGRAM AE AUTO MENU MENU SP STBY LCD ADJUST CUSTOM SET DIS OFF PIP ON D ZOOM OFF PROGRAM AE AUTO MENU ...

Page 37: ...37 ENGLISH 37 ENGLISH d to unprofessional looking results and e lens surface in the TELE position W T TELE WIDE 3 1 2 W T W T ...

Page 38: ...y is not changed MENU SP STBY LCD ADJUST CUSTOM SET DIS OFF PIP OFF D ZOOM OFF PROGRAM AE AUTO MENU D ZOOM SP STBY OFF 44 X 500X SEL ENTER MENU ...

Page 39: ...39 ENGLISH 39 ENGLISH nt shooting conditions e MENU SP STBY LCD ADJUST CUSTOM SET DIS OFF PIP OFF D ZOOM OFF PROGRAM AE AUTO MENU PROGRAM AE SP STBY AUTO AUTO PORTRAIT SPORT HSS RETURN SEL ENTER MENU ...

Page 40: ...special effects effect that you wish to give b d c e f h j g i a ...

Page 41: ... ENGLISH 41 ENGLISH MENU SP STBY CUSTOM SET DIS OFF PIP OFF D ZOOM OFF PROGRAM AE AUTO DSE SELECT OFF MENU DSE SELECT SP STBY OFF OFF ART MOSAIC SEPIA NEGA MIRROR SEL ENTER MENU ENTER MENU ON OFF DISPLAY ...

Page 42: ...ect in any recording condition of the image MENU SP STBY DIS OFF PIP OFF D ZOOM OFF PROGRAM AE AUTO DSE SELECT OFF W BALANCE AUTO MENU W BALANCE SP STBY AUTO AUTO HOLD INDOOR OUTDOOR RETURN SEL ENTER MENU ...

Page 43: ...43 ENGLISH 43 ENGLISH s d N MENU SP STBY PIP OFF D ZOOM OFF PROGRAM AE AUTO DSE SELECT OFF W BALANCE AUTO SHUTTER AUTO MENU SHUTTER SP STBY AUTO AUTO 1 6 1 13 1 25 1 50 1 120 SEL ENTER MENU ...

Page 44: ... MENU SP STBY D ZOOM OFF PROGRAM AE AUTO DSE SELECT OFF W BALANCE AUTO SHUTTER AUTO IRIS AUTO MENU IRIS AUTO MANUAL I 0 15 29 I RETURN SEL ENTER MENU ...

Page 45: ...ack picture may be distorted or the time MENU SP STBY PROGRAM AE AUTO DSE SELECT OFF W BALANCE AUTO SHUTTER AUTO IRIS AUTO REC MODE SP MENU MENU LP STBY PROGRAM AE AUTO DSE SELECT OFF W BALANCE AUTO SHUTTER AUTO IRIS AUTO REC MODE LP MENU ...

Page 46: ...d MENU SP STBY DSE SELECT OFF W BALANCE AUTO SHUTTER AUTO IRIS AUTO REC MODE SP REC LAMP ON MENU MENU SP STBY DSE SELECT OFF W BALANCE AUTO SHUTTER AUTO IRIS AUTO REC MODE SP REC LAMP OFF MENU ...

Page 47: ...GLISH 47 ENGLISH MENU SP STBY SHUTTER AUTO IRIS AUTO REC MODE SP REC LAMP ON WIND CUT OFF AUDIO MODE 12BIT MENU MENU SP STBY SHUTTER AUTO IRIS AUTO REC MODE SP REC LAMP ON WIND CUT OFF AUDIO MODE 16BIT MENU ...

Page 48: ...NU SP STBY REC MODE SP REC LAMP ON WIND CUT OFF AUDIO MODE 12BIT PHOTO MODE FIELD DISPLAY LCD MENU MENU SP STBY REC MODE SP REC LAMP ON WIND CUT OFF AUDIO MODE 12BIT PHOTO MODE FIELD DISPLAY LCD V OUT MENU ...

Page 49: ...49 ENGLISH 49 ENGLISH MENU SP STBY REC LAMP OFF WIND CUT OFF AUDIO MODE 12BIT PHOTO MODE FIELD DISPLAY LCD DATE TIME OFF MENU DATE TIME SP STBY OFF DATE TIME DATE TIME SEL ENTER MENU ...

Page 50: ...u may use them more easily te 3 minutes later after the tape ejecting O mode the DEMO stops for a while and MENU WIND CUT OFF AUDIO MODE 12BIT PHOTO MODE FIELD DISPLAY LCD DATE TIME OFF DEMO OFF MENU SAMSUNG DEMONSTRATION ...

Page 51: ... SETTING SP STBY 2001 23 00 1 JAN 2001 MENU CLOCK SETTING SP STBY 00 22 00 3 FEB 2002 MENU CLOCK SETTING SP STBY COMPLETE 22 25 3 FEB 2002 MENU MENU SP STBY AUDIO MODE 12BIT PHOTO MODE FIELD DISPLAY LCD DATE TIME OFF DEMO OFF CLOCK SET MENU ...

Page 52: ...ched on F een installed EASY SP STBY 0 00 00 63MIN EASY ...

Page 53: ...53 ENGLISH 53 ENGLISH ected n installed CUSTOM SP STBY 0 00 00 63MIN CUSTOM ...

Page 54: ...ntrate on the creative side of your recording nadequate o Focus mode 2 4 ENTER MENU ON OFF DISPLAY 3 MF AF MF AF ...

Page 55: ...55 ENGLISH 55 ENGLISH BLC on BLC off BLC ...

Page 56: ...eginning of a sequence or fade out at the end of a STBY 0 00 00 REC 0 00 15 REC 0 00 15 STBY 0 00 15 n a FADE OUT Gradual disappearance b FADE IN Release the FADE button FADE FADE ...

Page 57: ...57 ENGLISH 57 ENGLISH ith 12bit sound mode START STOP SELF TIMER X2 SLOW F ADV A DUB ZERO MEMORY STILL PHOTO DISPLAY W T PLAY STILL A DUB ...

Page 58: ...ss in sound quality may be experienced MENU SP STOP LCD ADJUST PHOTO SEARCH AUDIO SEL SOUND1 SPEAKER ON REC MODE SP DISPLAY LCD MENU AUDIO SEL SP STOP SOUND1 SOUND2 MIX SEL ENTER MENU ...

Page 59: ... ENGLISH ode ure MENU SP STBY IRIS AUTO REC MODE SP REC LAMP ON WIND CUT OFF AUDIO MODE 12BIT PHOTO MODE FIELD MENU MENU SP STBY IRIS AUTO REC MODE SP REC LAMP ON WIND CUT OFF AUDIO MODE 12BIT PHOTO MODE FRAME MENU ...

Page 60: ...e released menu PHOTO SEARCH SP STILL FF REW RETURN SEL ENTER MENU PHOTO ...

Page 61: ...61 ENGLISH 61 ENGLISH e LCD result it can remain extremely hot for some time camcorder may turn off automatically when you turn 20 minutes ll be switched off ON OFF ...

Page 62: ...level of brightness and assette dations g mmended red ...

Page 63: ...63 ENGLISH CD screen to the Camcorder 1 2 3 4 5 ...

Page 64: ...Camcorder TV S VIDEO OUT A V OUT When you have input terminal for video and audio on the television set S video input Audio input left White right Red Video input Yellow AUDIO VIDEO cable SCART adapter ...

Page 65: ... 10 ALARM IN ALARM OUT ALARM RESET GND TRIGGER OUT TAPE END OUT SERIES OUT GND SERIES IN 1 SHOT REC IN 1 2 3 4 5 6 7 8 9 10 1 2 3 4 5 6 7 8 9 10 IN OUT OUT IN CAMCORDER VCR TV S VIDEO S VIDEO VIDEO L R AUDIO TV ANTENNA PLAYER PLAY STILL ...

Page 66: ...emote Control ...

Page 67: ...67 ENGLISH ng various playback functions START STOP SELF TIMER X2 SLOW F ADV A DUB ZERO MEMORY STILL PHOTO DISPLAY W T F ADV ...

Page 68: ...oint you want to return to later ro memory indicator EW button tape SP STOP M 0 20 00 33MIN SP REW M 0 10 00 43MIN SP STOP 0 10 00 00 53MIN ...

Page 69: ...69 ENGLISH k 4Pin Type 6Pin Type DV format VCR Mini DV camcorder Desk top PC with DV port Portable PC with DV port ...

Page 70: ...e uneven however recorded pictures are not affected 6Pin 4Pin Not Supplied DV port linking diagram Not Supplied IN OUT ...

Page 71: ...71 ENGLISH PC without other optional add on he camcorder ...

Page 72: ......

Page 73: ...73 ENGLISH ent Format PDF CD 4 6 ...

Page 74: ...mission may stop and it could cause to damage data B devices simultaneously The camcorder may not work ormally function ...

Page 75: ...75 ENGLISH he life span of the battery Hence it should be w 1 2 4 4 3 ...

Page 76: ...76 ower es display square be dirty 1 2 3 4 ...

Page 77: ...240V 50 60 Hz local wall outlet CR must be PAL compatible and have the appropriate many Greece Great Britain Holland Hong Kong Hungary epublic Spain Sweden Switzerland Syria Thailand etc the playback picture on the LCD screen ...

Page 78: ... tape If you want to record release the protection 1 Eject the tape 2 Set to OFF 3 Detach the battery 4 Reattach the battery If unresolved contact your local service representative see below Action ndense inside the camcorder on the surface of the tape the unit may not operate correctly oisture sensor ...

Page 79: ...minutes without using it harged Use another battery pack s too great for the camcorder to operate trast or use the BLC function while you played on the viewfinder n the Manual Focus mode YER ilure or defect ution rvice centre ...

Page 80: ...sette s m lens X out only ...

Page 81: ...81 ENGLISH 81 ENGLISH V 50 60Hz ...

Page 82: ... 77 59 36 65 ER 21 39 46 45 27 ROL 18 d tab 25 18 ED 43 58 58 64 37 71 29 61 37 E 42 68 37 P R S T U V W Z ...

Page 83: ...83 ENGLISH 83 ENGLISH pproved to BS1362 of the same rating to reach a power point you should obtain e of the plug xible cord VE lug proceed as follows BLUE or BLACK ed BROWN or RED E or ...

Page 84: ... AD68 00542E ...

Reviews: