background image

English - 17

Securing the TV to the Wall

Caution

: Pulling, pushing, or climbing on the TV may cause the TV to fall. In particular, ensure your children do not 

hang over or destabilize the TV. Doing so may cause the TV to tip over, causing serious injuries or death. Follow 

all safety precautions provided in the included Safety Flyer with your TV. For added stability and safety, you can 

purchase and install the anti-fall device as described below.

The TV-Holder Kit (Sold Separately):

The parts below are included in the TV Holder kit. In addition, you need to provide a wood screw, a screw and molly, or other screw 

appropriate for the wall or cabinet you intend to secure the TV-Holder string to. We recommend a size M4xL20 wood screw.

TV-Holder (BN96-15753A)

Screw (M8 X L19)

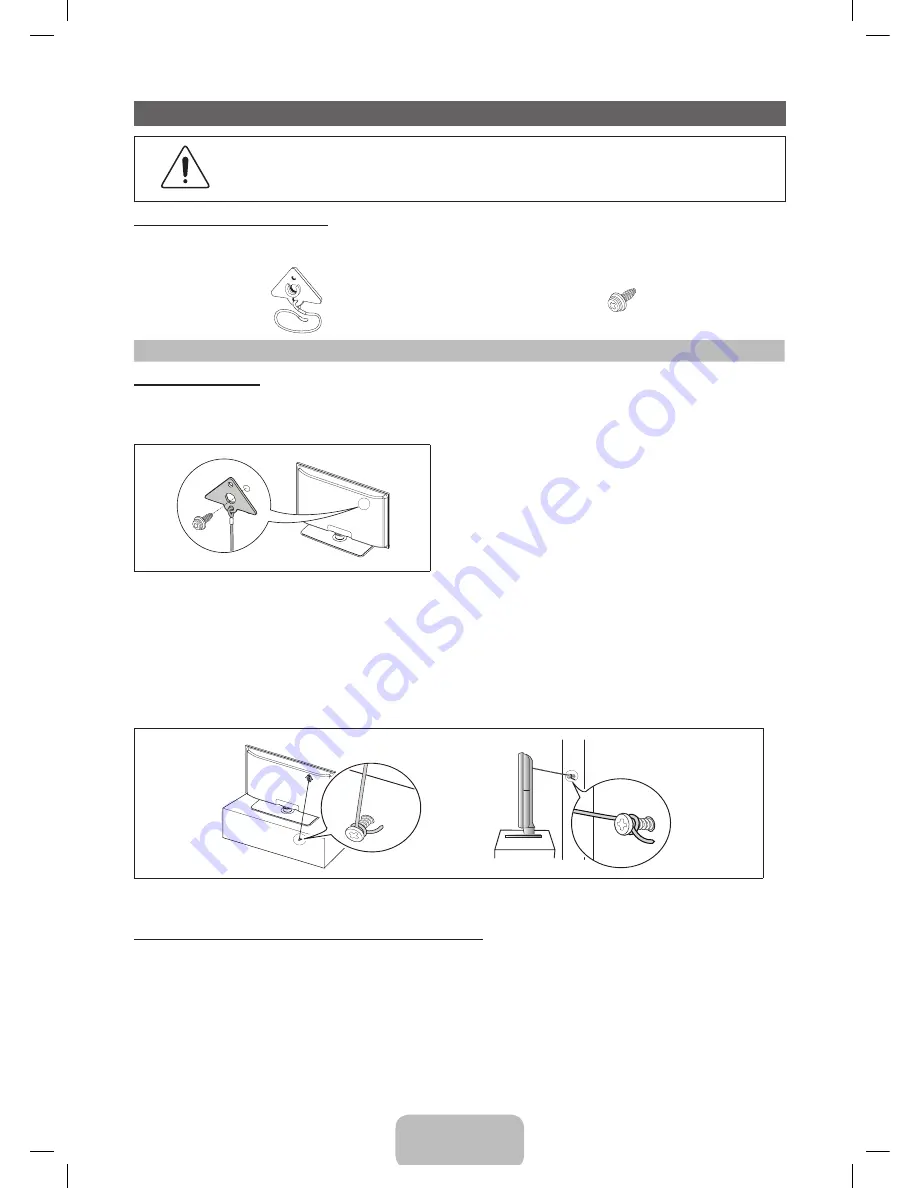
Installing the TV-Holder

1. 

Remove the screw attached to the back of your TV, and then connect the TV-Holder to the TV with the screw included in the TV-

Holder Kit that is designated for your TV.


Make sure to use only the appropriate supplied screw. If you use a different screw, you can damage your TV. 

2. 

Firmly fasten the screw you provided (size M4 x L20 or similar) to the wall or cabinet where the TV is to be installed.


If you fasten the screw to the wall, we recommend you drive the screw into a stud. If that is not possible, use a molly to anchor 

the screw.

3. 

Tie the TV-Holder cord to the screw fastened to the wall or cabinet so that the TV is fixed. See the illustrations below.


Install the TV close to the wall so that it does not fall.


When attaching the TV-Holder cord to the wall, tie the cord level with the ground or slanted downwards for safety purposes.


Check the cord occasionally to make sure it is secure.


Before moving the TV, separate the connected cord first.

Wall

4. 

Verify all connections are properly secured. Periodically check the connections for any sign of fatigue or failure. If you have any doubt 

about the security of your connections, contact a professional installer.

To purchase the TV-Holder Kit, contact Samsung Customer Care


In the United States: 1-800-SAMSUNG (1-800-726-7864)


In Canada: 1-800-SAMSUNG (1-800-726-7864)

UF6100-ZA_ENG-US.indd   17

2013-03-06   �� 7:25:12

Summary of Contents for UN40F6100

Page 1: ...s de Samsung comuníquese con el centro de atención al cliente de SAMSUNG Country CANADA U S A Address Samsung Electronics Canada Inc Customer Service 55 Standish Court Mississauga Ontario L5R 4B2 Canada Samsung Electronics America Inc 85 Challenger Road Ridgefield Park NJ 07660 Customer Care Center 1 800 SAMSUNG 726 7864 Web Site www samsung com ca English www samsung com ca_fr French www samsung ...

Page 2: ...y in particular if there are any unusual sounds or smells coming from it unplug it immediately and contact an authorized dealer or service center y Be sure to pull the power plug out of the outlet if the TV is to remain unused or if you are to leave the house for an extended period of time especially when children elderly or disabled people will be left alone in the house Accumulated dust can caus...

Page 3: ...ossible match Reduce brightness and contrast values to minimum required to achieve desired picture quality exceeded values may speed up the burnout process Frequently use all TV features designed to reduce image retention and screen burnout refer to proper user manual section for details Providing Proper Ventilation for Your TV When you install your TV maintain a distance of at least 4 inches betw...

Page 4: ... the box Remote Control AA59 00740A Batteries AAA x 2 Owner s Instructions Power Cord Cleaning Cloth Regulatory Guide 46 50 2EA 55 60 4EA Holder Ring for 46 and above models Stand Wire Holder BN61 08370A Assembling the Stand Wire Holder Input Cables Sold Separately To purchase an HDMI cable contact www SamsungParts com HDMI HDMI DVI Component Composite AV Coaxial RF Make sure you have the correct ...

Page 5: ...the HDMI IN 1 STB port For an HDMI to DVI cable connection you must use the HDMI IN 2 DVI jack If an HDMI to DVI cable is connected to the HDMI IN 2 DVI port the audio does not work For PCs with DVI video out jacks use an HDMI to DVI cable to connect the DVI out on the PC to the HDMI IN 2 DVI jack on the TV Use the PC s speakers for audio HDMIIN2 DVI ANTIN AIR CABLE HDD5V1A USB HDMIIN1 STB AUDIO V...

Page 6: ...0 800 x 600 48 077 72 188 50 000 800 x 600 46 875 75 000 49 500 1024 x 768 48 363 60 004 65 000 1024 x 768 56 476 70 069 75 000 1024 x 768 60 023 75 029 78 750 1152 x 864 67 500 75 000 108 000 1280 x 720 45 000 60 000 74 250 1280 x 800 49 702 59 810 83 500 1280 x 1024 63 981 60 020 108 000 1280 x 1024 79 976 75 025 135 000 1366 x 768 47 712 59 790 85 500 1440 x 900 55 935 59 887 106 500 1600 x 900...

Page 7: ... to directly access to channels Turns the TV on and off Display and select the available video sources Use these buttons in a specific feature E MANUAL Displays the e Manual P SIZE Lets you choose the picture size CC Controls the caption decoder Cut off the sound temporarily Turns the 3D image on or off Displays the channel list on the screen Displays information on the TV screen Quickly select fr...

Page 8: ... together If you have connected a PC to the HDMI IN 2 DVI port with an HDMI cable select PC under Edit Name to enter a device name If you have connected a PC to the HDMI IN 2 DVI port with an HDMI to DVI cable select DVI PC under Edit Name to enter a device name If you connected an AV device to the HDMI IN 2 DVI port with an HDMI to DVI cable select DVI Devices under Edit Name to enter a device na...

Page 9: ...nd a host of other features To access the main on screen menu press the MENU m button on your remote To access Tools menus press the TOOLS button Tools menus are available when the TOOLS menu Icon is displayed on the bottom right of the screen The illustration below displays the buttons on the remote you use to navigate the menus and select and adjust different functions MEDIA P 1 MENU button Disp...

Page 10: ... Enter Select a category or sub menu e Exit Exit the e Manual How to toggle between an e Manual topic and the corresponding OSD menu s E MANUAL Try Now a Try Now b Home Zoom Index L Page e Exit Basic Features Changing the Preset Picture Mode 1 1 Picture Picture Mode Standard Backlight 10 Contrast 95 Brightness 45 Sharpness 50 Color 50 Tint G R G50 R50 Changing the Preset Picture Mode Picture Mode ...

Page 11: ...mode When you are viewing an e Manual instruction page press the Yellow Zoom to magnify the screen You can scroll through the magnified screen by using the u or d buttons To return the screen to normal size press the RETURN button U Move R Return Changing the Preset Picture Mode Picture Mode t O MENUm Picture Picture Mode ENTERE Picture modes apply preset adjustments to the picture Select a mode u...

Page 12: ...ess Color Tint G R and so on Unwanted Powering Off If your Samsung TV appears to turn off by itself there may be an issue with either your Timer settings or your Eco friendly No Signal Power Off feature First make sure the Sleep Timer is not accidentally set The sleep timer turns the TV off after a certain period of time Sleep Timer User Menu System Time Sleep Timer If the Sleep Timer is not activ...

Page 13: ...TV menu go to MENU System Eco Solution Energy Saving Try resetting the picture to the default picture settings go to MENU Picture Reset Picture There is a dotted line on the edge of the screen If the picture size is set to Screen Fit change it to 16 9 Change the cable satellite box resolution The picture is black and white If you are using an AV composite input connect the video cable yellow to th...

Page 14: ... to an HDMI input on the TV Make sure your connected devices are powered on Be sure to select the TV s correct source by pressing the SOURCE button on the remote control Reboot the connected device by disconnecting and then reconnecting the device s power cable Antenna Air Cable Connection The TV is not receiving all channels Make sure the coaxial cable is connected securely Run Auto Program to ad...

Page 15: ... base from the TV and reassemble it The Broadcasting menu is greyed out unavailable The Broadcasting menu is only available when you select the TV source Your settings are lost after 30 minutes or every time the TV is turned off If TV is in the Store Demo mode it will reset audio and picture settings every 30 minutes If you want to change the settings from Store Demo mode to Home Use press the SOU...

Page 16: ...ll it may fall and result in severe personal injury NOTE Standard dimensions for wall mount kits are shown in the table below Samsung wall mount kits contain a detailed installation manual and all parts necessary for assembly are provided Do not use screws that do not comply with the VESA standard screw specifications Do not use screws that are longer than the standard length or do not comply with...

Page 17: ...e only the appropriate supplied screw If you use a different screw you can damage your TV 2 Firmly fasten the screw you provided size M4 x L20 or similar to the wall or cabinet where the TV is to be installed If you fasten the screw to the wall we recommend you drive the screw into a stud If that is not possible use a molly to anchor the screw 3 Tie the TV Holder cord to the screw fastened to the ...

Page 18: ...pped in a small amount of water Do not use a flammable liquid e g benzene thinners or a cleaning agent License Manufactured under license from Dolby Laboratories Dolby and the double D symbol are trademarks of Dolby Laboratories Manufactured under a license from U S Patent No s 5 956 674 5 974 380 5 978 762 6 487 535 6 226 616 7 212 872 7 003 467 7 272 567 7 668 723 7 392 195 7 930 184 7 333 929 a...

Page 19: ...measured diagonally 60 Class 60 0 measured diagonally Sound Output 10W x 2 Dimensions W x H x D Body With stand 44 9 x 26 1 x 1 9 inches 1142 2 x 664 3 x 49 8 mm 44 9 x 28 8 x 9 2 inches 1142 2 x 731 6 x 235 0 mm 49 4 x 28 7 x 1 9 inches 1256 0 x 729 3 x 49 2 mm 49 4 x 31 4 x 9 2 inches 1256 0 x 798 6 x 235 0 mm 54 2 x 31 4 x 1 9 inches 1377 4 x 798 0 x 49 4 mm 54 2 x 34 2 x 12 9 inches 1377 4 x 8...

Page 20: ...080 6 30 30 AC3 LPCM ADPCM IMA MS AAC HE AAC WMA DD MPEG MP3 DTS Core G 711 A Law μ Law MPEG4 SP ASP H 264 BP MP HP Motion JPEG 640 x 480 8 Window Media Video v9 1920 x 1080 30 MPEG2 MPEG1 webm WebM VP8 20 Vorbis Other Restrictions Video content will not play or not play correctly if there is an error in the content or the container Sound or video may not work if the contents have a standard bit r...

Page 21: ...onary images that exceed the above guidelines can cause uneven aging of LED Displays that leave subtle but permanent burned in ghost images in the LED picture To avoid this vary the programming and images and primarily display full screen moving images not stationary patterns or dark bars On LED models that offer picture sizing features use these controls to view different formats as a full screen...

Page 22: ...UDING BUT NOT LIMITED TO ANY IMPLIED WARRANTIES OF MERCHANTABILITY OR FITNESS FOR A PARTICULAR PURPOSE SHALL APPLY AFTER THE EXPRESS WARRANTY PERIODS STATED ABOVE AND NO OTHER EXPRESS WARRANTY OR GUARANTY GIVEN BY ANY PERSON FIRM OR CORPORATION WITH RESPECT TO THIS PRODUCT SHALL BE BINDING ON SAMSUNG SAMSUNG SHALL NOT BE LIABLE FOR LOSS OF REVENUE OR PROFITS FAILURE TO REALIZE SAVINGS OR OTHER BEN...

Reviews: