background image

English - 15

Network Connection

You can set up your TV so that it can access the Internet through your local area network (LAN) using a wired or wireless 
connection.

Network Connection - Wireless

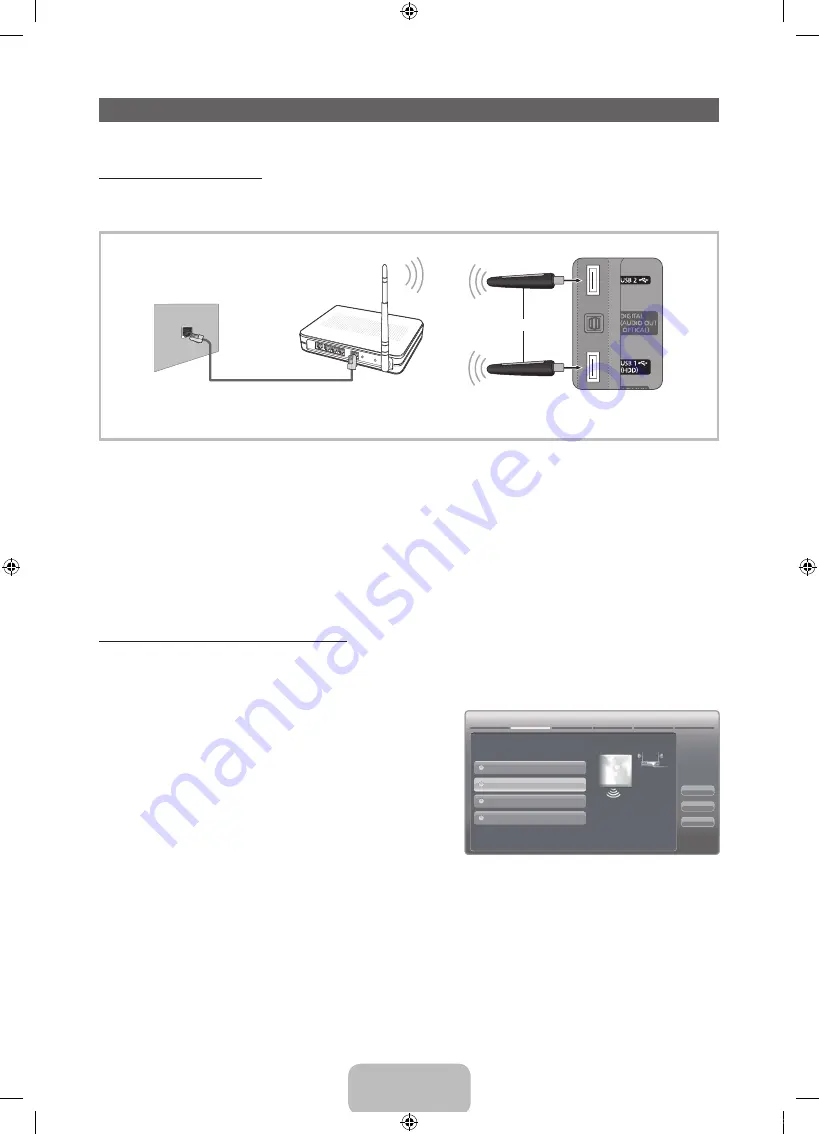
You can connect your TV to your LAN through a standard wireless router or modem. To connect wirelessly, you must first 
attach a “Samsung Wireless LAN Adapter” (WIS09ABGN, WIS09ABGN2, or WIS10ABGN - sold seperately) to either the 

USB 

1 (HDD)

 or 

USB 2

 port on the back of your TV. See the illustration below.

Samsung’s Wireless LAN adapter is sold separately and is offered by select retailers, Ecommerce sites and Samsungparts.
com. Samsung’s Wireless LAN adapter supports the IEEE 802.11a/b/g and n communication protocols. Samsung 
recommends using IEEE 802.11n. When you play the video over a IEEE 802.11b/g connection, the video may not play 
smoothly.
Most wireless network systems incorporate a security system that requires devices that access the network through an access 
point or AP (typically a wireless IP Sharer - router or modem) to transmit an encrypted security code called an access key.
Your TV is compatible with the following security protocols:


y

Authentication Mode: OPEN, SHARED, WPAPSK, WPA2PSK


y

Encryption Type: WEP, TKIP, AES

If you select Pure High-throughput (Greenfield) 802.11n mode and the Encryption type is set to WEP, TKIP or TKIP AES 
(WPS2Mixed) on your AP, Samsung TVs will not support a connection in compliance with new Wi-Fi certification specifications.

Configuring the Network Connection - Wireless

The instructions below are for networks that use the Dynamic Host Configuration Protocol (DHCP) to configure network 
connections automatically. If your have a Static IP network, see your user’s manual for configuration instructions.
To configure your network connection for a network that uses DHCP, follow these steps:

1. 

Connect your TV to your network as shown in the illustrations above.

2. 

Turn on your TV, press the 

MENU

 button on your remote, and 

then select 

Network


Network Settings

.

3. 

Select the 

Wireless (General)

, press 

ENTER

E

, and then 

press 

ENTER

E

 again.

4. 

The Network function searches for available wireless networks. 
When done, it displays a list of the available networks.

5. 

In the list of networks, press the 

 or 

 button to select a 

network, select 

Next

, and then press 

ENTER

E

.

6. 

If you have selected a wireless router that has security, the 

Security Key

 screen appears. Enter the 

Security key

 (Security 

key or PIN), select 

Next

, and then press 

ENTER

E

.


When you enter the 

Security Key 

(Security key or PIN), use the 

 / 

 / 

◄ 

 buttons on your remote to select 

numbers and characters.

7. 

The Network Connection screen appears and verifies the network connection. When the connection has been verified, the 

Internet connection successful.

” message appears. Network set up is complete.


For more detailed information, see “Wireless Network Connection” in the e-Manual.

TV Rear Panel

The LAN Port on the Wall

LAN Cable

or

Wireless IP sharer

(AP having DHCP server)

Samsung

Wireless LAN Adapter

Network Settings

Wired

Previous

Next

Cancel

Wireless(General)

WPS(PBC)

One Foot Connection

Select a network connection type.

Set up wireless network by 

selecting your Wireless Router. 

you may need to enter security 

key depending on the setting of 

the Wireless Router.

[UD5550-ZA]BN68-03372A-00Eng.indb   15

2011-01-20   오후 9:33:55

Summary of Contents for UN40D5550RF

Page 1: ...SAMSUNG WORLDWIDE If you have any questions or comments relating to Samsung products please contact the SAMSUNG customer care center Country Customer Care Center Web Site Address CANADA 1 800 SAMSUNG...

Page 2: ...anty period originally specified and to the Original Purchaser only The above described warranty repairs must be performed by a SAMSUNG Authorized Service Center Along with this Statement the Original...

Page 3: ...ontrol AA59 00520A Batteries AAA x 2 y y Power Cord y y Owner s Instructions y y Cleaning Cloth y y Warranty Card Not available in some locations Safety Guide Component Adapter Holder Wire stand Holde...

Page 4: ...y which contains controls for your TV s features y Adjusts the volume In the OSD use the y buttons as you would use the and buttons on the remote control z Changes the channels In the OSD use the z bu...

Page 5: ...n side down Place a soft cloth over the table to protect the TV and then place the TV on the cloth screen side down 3 Side View 4 NOTE y y Make sure to distinguish between the front and back of each c...

Page 6: ...y for assembly are provided x x Do not use screws that do not comply with the VESA standard screw specifications x x Do not use screws that are longer than the standard length or do not comply with th...

Page 7: ...tery usage time Returns to the previous channel Cuts off the sound temporarily Changes channels Displays channel lists on the screen Automatically shuts off the TV at a preset time Displays informatio...

Page 8: ...tton 3 ENTERE Press ENTERE to access the sub menus 4 Select the desired submenu with the or button 5 Adjust the value of an item with the or button The adjustment in the OSD may differ depending on th...

Page 9: ...T Daylight Savings Time on or off When done press ENTERE If you selected Manual you ll go to the Date and Time screen Select Date or Time and then press ENTERE Then use the number buttons or the or bu...

Page 10: ...You must use the PC DVI AUDIO IN jack for audio x x Be sure to use an HDMI cable with a thickness of 14 mm or less x x The picture may not display normally if at all or the audio may not work if you...

Page 11: ...atch the video cable yellow Using an EX Link Cable Connection Available Devices External devices that support EX Link EX LINK Connector for service only R W Y R W R W G B R Y VIDEO OUT AUDIO OUT R AUD...

Page 12: ...ital component such as a DVD player Blu ray player cable box STB Set Top Box satellite receiver and you connected it to the TV via HDMI you will only hear 2 CH audio from the home theater receiver If...

Page 13: ...00 1280 x 960 1360 x 768 1440 x 900 1440 x 900 1680 x 1050 31 469 37 861 37 500 37 879 48 077 46 875 48 363 56 476 60 023 67 500 63 981 79 976 49 702 62 795 60 000 47 712 55 935 70 635 65 290 59 940 7...

Page 14: ...V IPTV Blu ray HD DVD DMA Name the device connected to the input jacks to make your input source selection easier If you have connected a PC to the HDMI IN 1 DVI port with an HDMI cable select PC unde...

Page 15: ...ks that use the Dynamic Host Configuration Protocol DHCP to configure network connections automatically If your have a Static IP network see your user s manual for configuration instructions To config...

Page 16: ...red press ENTERE and then press ENTERE again 4 The Network Connection screen appears and verifies the network connection When the connection has been verified the Internet connection successful messag...

Page 17: ...tural for LED TV Relax for PDP TV Suitable for reducing eye strain Movie Suitable for watching movies in a dark room Entertain Suitable for watching movies and games Picture Picture Mode Standard Tint...

Page 18: ...ton Home Moves to the e Manual home screen Zoom Magnifies a screen Index Displays index screen Contents Area Contains the topic contents if you selected a sub menu To move to the previous or next page...

Page 19: ...n the sensor s transmission window on the remote Try pointing the remote directly at the TV from 5 6 feet away The cable set top box remote control doesn t turn the TV on or off or adjust the volume P...

Page 20: ...ly the appropriate supplied screw If you use a different screw you can damage your TV 2 Firmly fasten the screw you provided size M4xL20 or similar to the wall or cabinet where the TV is to be install...

Page 21: ...o 95 non condensing Stand Swivel Left Right 20 20 Model Name UN32D5550 UN40D5550 Screen Size Diagonal 32 Class 31 4 measured diagonally 40 Class 39 7 measured diagonally Sound Output 10 W X 2 Dimensio...

Page 22: ...8 UN32D5550 7 9 7 9 18 6 3 4 2 8 10 0 2 3 10 6 UN40D5550 7 9 7 9 22 3 3 5 5 9 10 7 4 4 13 8 NOTE All drawings are not necessarily to scale Some dimensions are subject to change without prior notice R...

Reviews: