background image

English - 15

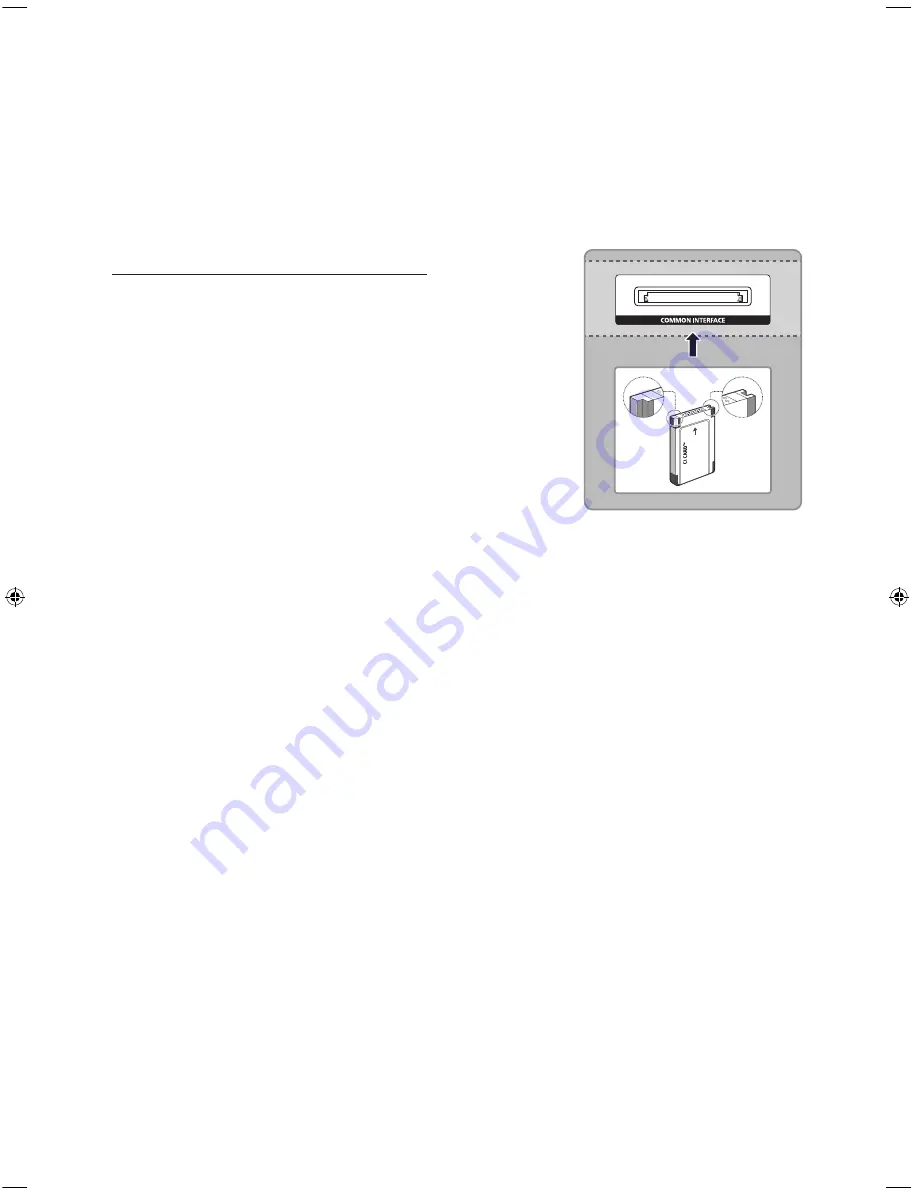
Connecting to a COMMON INTERFACE slot 
(Your TV viewing Card Slot)


-

Turn the TV off to connect or disconnect a CI card.


-

2 CI card slots are available, depending on the model.

Using the “CI or CI+ CARD”

To watch paid channels, the “CI or CI+ CARD” must be 
inserted.


-

If you don’t insert the “CI or CI+ CARD”, some channels will 

display the “Scrambled Signal” message.


-

The pairing information containing a telephone number, 
the “CI or CI+ CARD” ID, the Host ID, and other information 

will be displayed in about 2~3 minutes. If an error message 
is displayed, please contact your service provider.


-

When the configuration of channel information has 
finished, the message “Updating Completed” is displayed, 
indicating the channel list is updated.

NOTE


-

You must obtain a “CI or CI+ CARD” from a local cable service provider.


-

When removing the “CI or CI+ CARD”, carefully pull it out as dropping the “CI or CI+ CARD” 

may damage it.


-

Insert the “CI or CI+ CARD” in the direction marked on the card.


-

The location of the COMMON INTERFACE slot may differ depending on the model.


-

A “CI or CI+ CARD” is not supported in some countries and regions, therefore, check with 

your authorised dealer.


-

If you have any problems, please contact a service provider.


-

Insert the “CI or CI+ CARD” that supports the current aerial settings. The screen will be 
distorted or will not be visible.

[JS9000-XU]BN68-07184G-00ENG.indb   15

2015-02-03   오후 2:46:31

Summary of Contents for UE55JS9000

Page 1: ...Thank you for purchasing this Samsung product To receive more complete service please register your product at www samsung com register Model_______ Serial No ___________ user manual ...

Page 2: ...ay cause a danger of electric shock To avoid electric shock never touch the inside of this apparatus Only a qualified technician should open this apparatus Be sure to plug in the power cord until it is firmly seated When unplugging the power cord from a wall outlet always pull on the power cord s plug Never unplug it by pulling on the power cord Do not touch the power cord with wet hands If this a...

Page 3: ...ontrol Access and control menu options and functions using voice commands Refer to the e Manual chapter Smart Features Controlling the TV with Your Voice UHD Evolution Kit You can upgrade your TV to the latest features and functions by replacing your older One Connect with a UHD Evolution Kit Sold separately Not supported on all models For more information on how to install the UHD Kit refer to th...

Page 4: ... your TV 12 Connecting to a Network 14 TV Upgrade using UHD Evolution Kit sold separately 14 TV Camera Connection sold separately 15 Connecting to a COMMON INTERFACE slot Your TV viewing Card Slot 04 The TV Controller 16 Using the Control Stick 17 The Standard Remote Control 18 The Samsung Smart Control 20 About the Samsung Smart Control 21 Using the On Screen Remote 21 Using the POINTER to operat...

Page 5: ... password 06 Selecting Connected Devices 07 The e Manual 08 Troubleshooting and Maintenance 28 Eco sensor and screen brightness 29 Support through Remote Management 30 Caring for the TV 09 Specifications and other information 31 TV Specifications 32 Licences 34 Warranty Card ...

Page 6: ...e models Cables not included can be purchased separately Check for any accessories hidden behind or in the packing materials when opening the box An administration fee may be charged if either a an engineer is called out at your request and there is no defect with the product i e where the user manual has not been read b you bring the unit to a repair centre and there is no defect with the product...

Page 7: ... with the Samsung wall mount kit Before you install the screws for the wall mount put the Styrofoam that came with the TV s packaging on the TV to protect it Then lay the TV down and attach the screws To mount both a soundbar and the TV onto a wall using the wall mount mount the soundbar onto the TV first and then mount the TV Soundbar combination onto the wall mount For detailed information see t...

Page 8: ...ew specifications Screws that are too long may cause damage to the inside of the TV set For wall mounts that do not comply with the VESA standard screw specifications the length of the screws may differ depending on the wall mount specifications Do not fasten the screws too firmly This may damage the product or cause the product to fall leading to personal injury Samsung is not liable for these ki...

Page 9: ... a wall mount we strongly recommend you use parts provided by Samsung Electronics only Using parts provided by another manufacturer may cause difficulties with the product or result in injury caused by the product falling Installation with a stand Installation with a wall mount 10 cm 10 cm 10 cm 10 cm 10 cm 10 cm 10 cm Other Cautions The actual appearance of the TV may differ from the images in th...

Page 10: ... the type of wall Since the necessary clamps screws and string are not supplied please purchase these additionally 2 Remove the screws from the centre back of the TV put the screws into the clamps and then fasten the screws into the TV again These screws may not be supplied with the TV For a 48 65 inch model purchase M8 screws 3 Connect the clamps fixed into the TV and the clamps fixed onto the wa...

Page 11: ...er to the Quick Guide for more instructions on supported external devices For more information about Connections see the e Manual Make sure you have the correct cable before plugging it in Illustrations of common plugs and ports are shown below Cable Plugs Ports HDMI USB Optical Warning Do not plug cables in upside down Be sure to check the orientation of the plug before plugging it in ...

Page 12: ...rvices such as the Smart Hub as well as software updates The shape of the rear panel differs among the models Network Connection Wireless Connect the TV to the Internet using a standard router or modem Wireless IP Router or Modem with a DHCP Server LAN Cable Not Supplied The LAN Port on the Wall ...

Page 13: ...ied LAN Cable Not Supplied External Modem ADSL VDSL Cable TV The Modem Port on the Wall Modem Cable Not Supplied LAN Cable Not Supplied LAN Cable Not Supplied External Modem ADSL VDSL Cable TV IP Router with a DHCP Server The Modem Port on the Wall The LAN Port on the Wall LAN Cable Not Supplied The TV does not support network speeds less than or equal to 10Mbps Use Cat 7 cable for the connection ...

Page 14: ...n Kit is sold separately Purchasing UHD Evolution Kit will allow you to upgrade the software to the version from the year in which your UHD Evolution Kit was released However an UHD Evolution Kit may not be available depending on the product TV Camera Connection sold separately 2 1 Make sure to connect only the TV camera to the TV CAMERA port Remove the cover of the TV CAMERA port and then connect...

Page 15: ...ur service provider When the configuration of channel information has finished the message Updating Completed is displayed indicating the channel list is updated NOTE You must obtain a CI or CI CARD from a local cable service provider When removing the CI or CI CARD carefully pull it out as dropping the CI or CI CARD may damage it Insert the CI or CI CARD in the direction marked on the card The lo...

Page 16: ... The TV s Controller a small joystick like button at the right back of the TV lets you control the TV without the remote control Control Stick The Control Stick is located on the lower left corner of the back of the TV Remote control sensor Control Menu Opens Smart Hub Selects a source Opens the menu Turns off the TV ...

Page 17: ... EPG Number Gives direct access to channels TTX MIX Alternately selects Teletext ON Double Mix or OFF PRE H Returns to the previous channel A B C D Use these buttons according to the directions on the TV screen TOOLS Quickly selects frequently used functions INFO Displays information about the current programme or content E Enter Selects or runs a focused item Press and hold to display the Guide M...

Page 18: ...ctions conveniently refer to page 21 Press and hold this button to run the Voice Recognition function POINTER Place a finger on the POINTER button and move the Samsung Smart Control The pointer on the screen moves in the direction you moved the Samsung Smart Control Press the POINTER button to select or run a focused item Y Changes the volume P Changes the channel Moves the focus and changes the v...

Page 19: ...ve the cover completely once it comes loose 2 Insert 2 AAA alkaline batteries making sure to align the positive and negative polarities correctly 3 Place the battery cover on the remote control and insert the cover into the remote control 4 Slide the battery cover in the order shown so that the cover is completely attached to the remote control Installing batteries into the Samsung Smart Control T...

Page 20: ...en Remote refer to the e Manual The buttons on the On Screen Remote may differ from the existing models We recommend using Samsung Smart Control at a distance of less than 6m A usable distance may differ depending on the wireless environmental conditions Pairing the TV to the Samsung Smart Control If your Samsung Smart Control is not paired to your TV press and hold the buttons labeled and simulta...

Page 21: ...y vary depending on the features or functions you are using Refer to the e Manual for details Using the POINTER to operate the TV 32 17 5 Place a finger on the POINTER button of the Samsung Smart Control and then move the Samsung Smart Control The pointer on the screen moves in the direction you moved the Samsung Smart Control Press the POINTER to select or run a focused item Displays the On Scree...

Page 22: ... remote feature Setting up the universal remote control 1 Turn on the external device you want to control with the universal remote function after connecting a HDMI cable to One Connect s HDMI port 2 Press the SOURCE button on your remote to bring up the Source screen 3 Select the Universal remote setup 4 Follow the directions on the screen to complete the set up and register the device The direct...

Page 23: ... this process you will not be able to scan all channels and stores them in the TV s memory If you want to connect aerial cable to your TV select Aerial In this case you will be able to scan all channels and stores them in the TV s memory Setting up a password System Change PIN You can set a Personal Identification Number PIN to lock channels reset the TV and change TV settings Changing the TV s pa...

Page 24: ... connector names or available options may vary depending on the product Edit Device Type Changes the types of the external devices Select an external device to change Edit Name You can rename devices connected to the TV to facilitate identifying external sources For example you can use an HDMI cable to designate a computer connected to the TV as PC You can also use a HDMI to DVI cable to designate...

Page 25: ...load the corresponding page Index Select a keyword to navigate to the relevant page Recent pages Select a topic from the list of recently viewed topics Accessing the associated menu screen from an e Manual topic page Try Now Access the associated menu item and try out the feature directly Link Access a topic referred to on an e Manual topic page Accessing the associated e Manual topic from a menu ...

Page 26: ...in optimum condition upgrade to the latest software Use the Update now or Auto Update functions on the TV s menu MENU Support Software Update Update now or MENU Support Software Update Auto Update Issues Solutions and explanations The TV is not powered on Make sure that the power cord is connected and that the remote has live batteries and is functioning properly If the power cord is properly conn...

Page 27: ...ect the correct input source Reboot the connected device by unplugging it and reconnecting the device s power cable The remote control does not work Replace the remote control batteries Make sure that the batteries are installed with their poles in the correct direction Clean the sensor s transmission window on the remote Try pointing the remote directly at the TV from 1 5 1 8 m away The Cable or ...

Page 28: ...your room and optimises the brightness of the TV automatically to reduce power consumption If you want to turn this off go to System Eco Solution Eco Sensor If the screen is too dark while you are watching TV in a dark environment it may be due to the Eco Sensor Do not block the sensor with any object This can decrease picture brightness ...

Page 29: ...ry reset your TV Install recommended firmware updates How Does it Work Having a Samsung Tech remotely service your TV is easy 1 Call the Samsung Contact Centre and ask for remote support 2 Open the menu on your TV and go to the Support section 3 Select Remote Management and then read and agree to the service agreements When the PIN screen appears provide the PIN number to the agent 4 The agent acc...

Page 30: ...ent scratches Do not spray water or any liquid directly onto the TV Any liquid that goes into the product may cause a failure fire or electric shock Turn off the TV then gently wipe away smudges and fingerprints on the screen with a micro fiber cloth Clean the body of the TV with a soft cloth dampened with a small amount of water Do not use flammable liquids benzene thinners etc or a cleaning agen...

Page 31: ...ons W x H x D Body With stand 1091 8 x 626 7 x 94 4 mm 1091 8 x 703 6 x 297 1 mm 1248 5 x 713 7 x 90 7 mm 1248 5 x 790 5 x 322 3 mm Weight Without Stand With Stand 16 3 kg 18 7 kg 21 7 kg 24 3 kg Model Name UE65JS9000 Screen Size Diagonal 65 inches 163 cm Screen Curvature 4200R Sound Output 60W L 20W R 20W Woofer 10W 2 Dimensions W x H x D Body With stand 1464 6 x 836 8 x 10⁷ 7 mm 1464 6 x 915 7 x...

Page 32: ...ch as jpeg picture files still image elements such as TV channel logos stock or news bars at the bottom of the screen etc or programmes in panorama or 4 3 image format Constantly displaying still pictures can cause image burn in on the LED screen which will affect the image quality To reduce risk of this occurring please follow the recommendations below Avoid displaying the still image for long pe...

Page 33: ...ollection systems This marking on battery manual or packaging indicates that the batteries in this product should not be disposed of with other household waste at the end of their working life Where marked the chemical symbols Hg Cd or Pb indicate that the battery contains mercury cadmium or lead above the reference levels in EC Directive 2006 66 If batteries are not properly disposed of these sub...

Page 34: ...rranty 4 This product is not considered to be defective in materials nor workmanship by reason that it requires adaptation in order to conform to national or local technical or safety standards in force in any country other than the one for which the product was originally designed and manufactured 5 This warranty covers none of the following a Periodic check ups maintenance and repair or replacem...

Page 35: ...This page is intentionally left blank ...

Page 36: ...y questions or comments relating to Samsung products please contact the SAMSUNG customer care centre Country Customer Care Centre Web Site EIRE 0818 717100 www samsung com ie support UK 0330 SAMSUNG 7267864 www samsung com uk support This Nanum Gothic Eco font is provided by NAVER BN68 07184G 00 ...

Reviews: