background image

English - 17

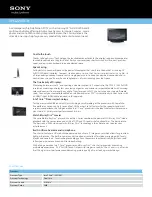
Checking the Digital-Signal Strength - Digital

Unlike analog channels, which can vary in reception quality from “snowy” to clear, 

digital(HDTV) channels have either perfect reception quality or you will not receive them at 

all. So, unlike analog channels, you cannot fine tune a digital channel. You can, however, 

adjust your antenna to improve the reception of available digital channels.
1

  Press the 

MENU

 button to display the menu. 

Press the ▲ or ▼ button to select 

Channel

, then press the 

ENTER

 button.

2

  Press the ▲ or ▼ button to select 

Signal Strength

, then press the 

ENTER

 button.  

If the signal strength meter indicates that the signal is weak, physically adjust your antenna 

to increase the signal strength. Continue to adjust the antenna until you find the best position 

with the strongest signal.


Press the 

EXIT

 button to exit. 

You can also press the 

ENTER

 button to select 

OK

, then press the 

EXIT

 button to exit.

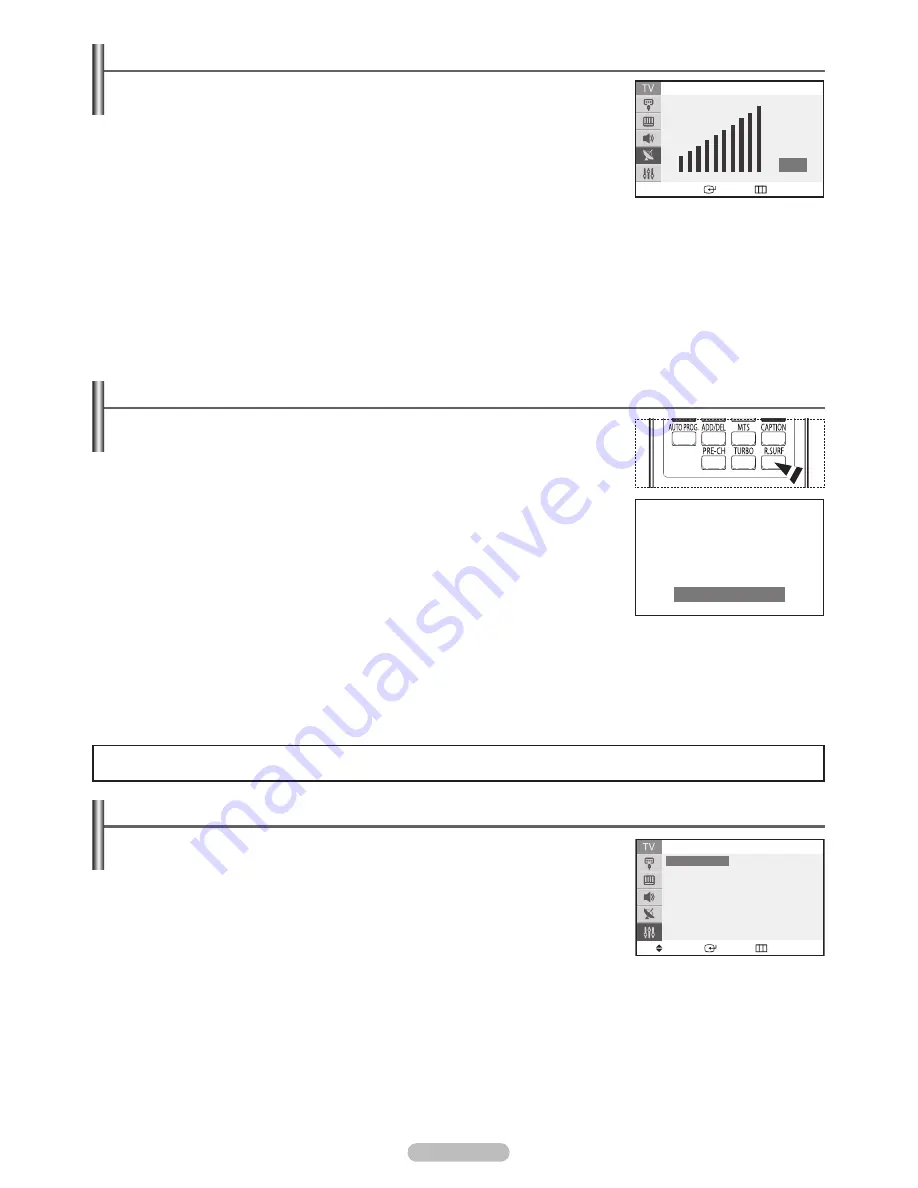
Using the R.Surf Feature

This feature allows you to set the TV to return to a particular channel after a certain amount 

of time. For example, you may be watching a channel when commercials start. You can set 

the R.Surf to “5 minutes”, then switch channels. After 5 minutes, the TV will return to the 

original channel. To use the R.Surf feature:
1

  While you are watching the channel to which you want to return, press the 

R.SURF

 button. 

The 

Surf Off

 is displayed.

2

  Press the 

R.SURF

 button again to set the timer in thirty second intervals, up to five minutes.

  The time will start decreasing while you are setting up the timer, and will reset after  

5 minutes has passed or you turn it off.

3

  The time you set will begin counting down on the screen.  

When the time runs


out, the TV will return to the channel you were watching when you set the 

timer.

Selecting a Menu Language

1

  Press the 

MENU

 button to display the menu. 

Press the ▲ or ▼ button to select 

Setup

, then press the 

ENTER

 button.

2

  Press the ▲ or ▼ button to select 

Language

, then press the 

ENTER

 button.

3

  Press the ▲ or ▼ button to select the appropriate language: 

English

Español

 or 

Français

then press the 

ENTER

 button.


Press the 

EXIT

 button to exit.

Function Description


 Enter 

 Return

Signal Strength

OK

Surf        00: 29


Move 

 Enter 

 Return

Language

English

Español

Français

AA68-03783H-00Eng.indd   17

2007-06-04   ソタネト 2:46:49

Summary of Contents for TX-T2082

Page 1: ...oad Ridgefield Park NJ 07660 0511 AA68 03783H 00 Specifications Model Name TX T2082 TX T2085 TX T2782 Screen Size Diagonal 20 inches 27 inches Sound Output 5W X 2 Dimensions WxHxD Body 23 8 x 18 6 x 14 2 inches 604 x 472 x 360 5 mm 23 8 x 18 6 x 13 4 inches 604 x 473 x 340 mm 31 3 x 23 3 x 16 6 inches 796 x 593 x 421 mm Weight 44 1 lbs 20 Kg 45 2 lbs 20 5 Kg 94 79 lbs 43 Kg Environmental Considera...

Page 2: ...N TX T2082 TX T2085 TX T2782 Owner s Instructions Register your product at www samsung com global register Record your Model and Serial number here for future reference Model _______________ Serial No _______________ ...

Page 3: ...ages not stationary patterns or dark bars On television models that offer picture sizing features use these controls to view the different formats as a full screen picture Be careful in the selection and duration of television formats used for viewing Uneven CRT aging as a result of format selection and use as well as other burned in images is not covered by your Samsung limited warranty General I...

Page 4: ... features 5 VOL Press to increase or decrease the volume In the on screen menu use the VOL buttons as you would use the and buttons on the remote control 6 CH Press to change channels In the on screen menu use the CH buttons as you would use the and buttons on the remote control Accessories Please make sure the following items are included with your TV If any items are missing contact your dealer ...

Page 5: ...as a camcorder or VCR When both the side and rear jacks AV IN are connected to external equipment the side receives priority 3 COMPONENT IN Connect Component video audio 4 SERVICE USB Connect for service and software upgrade 5 ANT IN Connect to an antenna air or cable TV system 6 Headphone Connect a set of external headphones to this jack for private listening The product color and shape may vary ...

Page 6: ... preset time interval for automatic shut off MTS Press to choose stereo mono or Separate Audio Program SAP broadcast a CAPTION Controls the caption decoder b R SURF Press to automatically return to a preferred channel after a user preset time delay c TURBO Press to select Turbo sound Remote Control You can use the remote control up to a distance of about 23 feet from the TV When using the remote c...

Page 7: ...ANT OUT VHF OUT or simply OUT 2 Connect the other end of this cable to the ANT IN terminal on the back of the TV Connecting to a Cable Box that Descrambles Some Channels If your cable box descrambles only some channels such as premium channels follow the instructions below You will need a two way splitter an RF A B switch and four lengths of Antenna cable These items are available at most electron...

Page 8: ...upplied to hook up to the right and left audio input jacks of the TV If your VCR is stereo you must connect two cables Also you can connect to AV IN on the side panel of TV When both the side and rear jacks AV IN are connected to external equipment the side receives priority Rear of the TV VCR Audio Cable Not supplied 5 Video Cable Not supplied 4 Antenna cable Not supplied 3 Connecting a Camcorder...

Page 9: ...the video cable to COMPONENT IN connect the audio cable to COMPONENT IN also This product is an SD grade DTV and must be connected in the resolution of 480i If this product is connected in the resolution of 480p 720p or 1080i the screen may be displayed abnormally or may not be displayed at all Connecting an Amplifier DVD Home Theater Analog Each Amplifier DVD Home Theater has a different back pan...

Page 10: ...ress the buttons to select the cable system for analog and digital channels respectively then press the ENTER button 9 Press the ENTER button to start The TV begins memorizing all available channels Press the ENTER button to stop After all available channels are stored the Clock Set menu is displayed When you select Cable or Air Cable it also executes Clearing Scrambled Channels simultaneously See...

Page 11: ...emorized When selecting Cable TV 7 Press the or button to select Cable then press the ENTER button The Cable System menu is displayed 8 Press the buttons to select the cable system for analog and digital channels respectively then press the ENTER button STD HRC and IRC identify various types of cable TV systems Contact your local cable company to identify the type of cable system that exists in yo...

Page 12: ...at STB AV Recv DVD Recv Game Camcorder or DVD Combo input source then press the ENTER button Press the EXIT button to exit Using Automatic Picture Settings Your TV has four automatic picture settings Dynamic Standard Movie Custom that are preset at the factory You can activate a Picture Setting by making a selection from the menu 1 Press the MENU button to display the menu Press the or button to s...

Page 13: ...d Wide is possible The TV must be connected to Digital Air Cable to view these screen sizes To identify whether the current mode is TV Mode or DTV Mode press the INFO button on the remote control To switch between Analog and Digital Air Cable mode press the TV DTV button on the remote TV Mode 3 Press the or button to select Contrast Brightness Sharpness Color or Tint then press the ENTER button 4 ...

Page 14: ... Press the EXIT button to exit Choose Standard for the standard factory settings Choose Music when watching music videos or concerts Choose Movie when watching movies Choose Speech when watching a show that is mostly dialog i e news Choose Custom to recall your personalized settings see Customizing the Sound Press the S MODE button on the remote control repeatedly to select one of the standard sou...

Page 15: ...signal Choose Stereo for channels that are broadcasting in stereo Choose SAP to listen to the Separate Audio Program which is usually a foreign language translation Press the MTS button on the remote control repeatedly to select Mono Stereo or SAP Customizing the Sound The sound settings can be adjusted to suit your personal preference Alternatively you can use one of the automatic settings 1 Pres...

Page 16: ...he EXIT button to exit Press the TURBO button on the remote control repeatedly to select On or Off Clearing Scrambled Channels Digital The Clear Scrambled Channel function is used to filter out scrambled channels after Auto Program is completed It removes the scrambled channels from the list by tuning the digital cable channels This process may take up to 20 30 minutes 1 Press the MENU button to d...

Page 17: ...field which will be selected Select a second letter or digit by pressing the or button as above Repeat the process to select the last two digits When you have finished press the ENTER button to assign the new name Press the EXIT button to exit The names of digital broadcasting channels are automatically assigned and thus cannot be assigned by users If you add or delete the TV channel the correspon...

Page 18: ...nnel after a certain amount of time For example you may be watching a channel when commercials start You can set the R Surf to 5 minutes then switch channels After 5 minutes the TV will return to the original channel To use the R Surf feature 1 While you are watching the channel to which you want to return press the R SURF button The Surf Off is displayed 2 Press the R SURF button again to set the...

Page 19: ...urn 4 Press the or button to select Off Timer then press the ENTER button 5 Press the or button to set the hour then press the button to move to the next step Set other items using the same method as above When finished press the MENU button to return Auto Power Off When you set the timer On the TV will eventually turn off if no controls are operated for 3 hours after the TV was turned on by timer...

Page 20: ... Translucent Solid and Flashing You can change the opacity of the letter Back Opacity This option consists of Default Transparent Translucent Solid and Flashing You can change the background opacity of the caption Return to Default This option sets each of Size Font Style Fore Color Back Color Fore Opacity and Back Opacity to its factory default You can also press the CAPTION button on the remote ...

Page 21: ... the or button to select Setup then press the ENTER button 2 Press the or button to select Melody then press the ENTER button Press the or button to select On or Off then press the ENTER button Press the EXIT button to exit Manufactured under license from Dolby Laboratories Dolby and the double D symbol are trademarks of Dolby Laboratories TRADEMARK LABEL LICENSE NOTICE Using the V Chip U S A Only...

Page 22: ...s selected press the button to go to a sub rating Press the or to block the sub rating Press the MENU button to save To select a different TV Rating press the or button and then repeat the process The V chip will automatically block certain categories that are more restrictive For example if you block L sub rating in TV PG then the L sub ratings in TV 14 and TV MA will automatically be blocked The...

Page 23: ...3 ans 16 ans and 18 ans will automatically be blocked also Using the V Chip for Digital channels Parental restriction information can be used while watching DTV channels 16 Press the or button to select Downloadable U S Rating then press the ENTER button If information is not downloaded from the broadcasting station the Downloadable U S Rating menu is deactivated Parental restriction information i...

Page 24: ...ethod is digital High visual quality program If the original production method is analog The digital program displayed on the screen is originally an analog program which has been converted to digital The visual quality is of an SD Standard Definition grade Although the TV caption shows HD the visual quality is not satisfactory The HD High Definition caption that appears when switching channels or...

Reviews: