background image

English-9

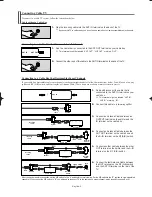
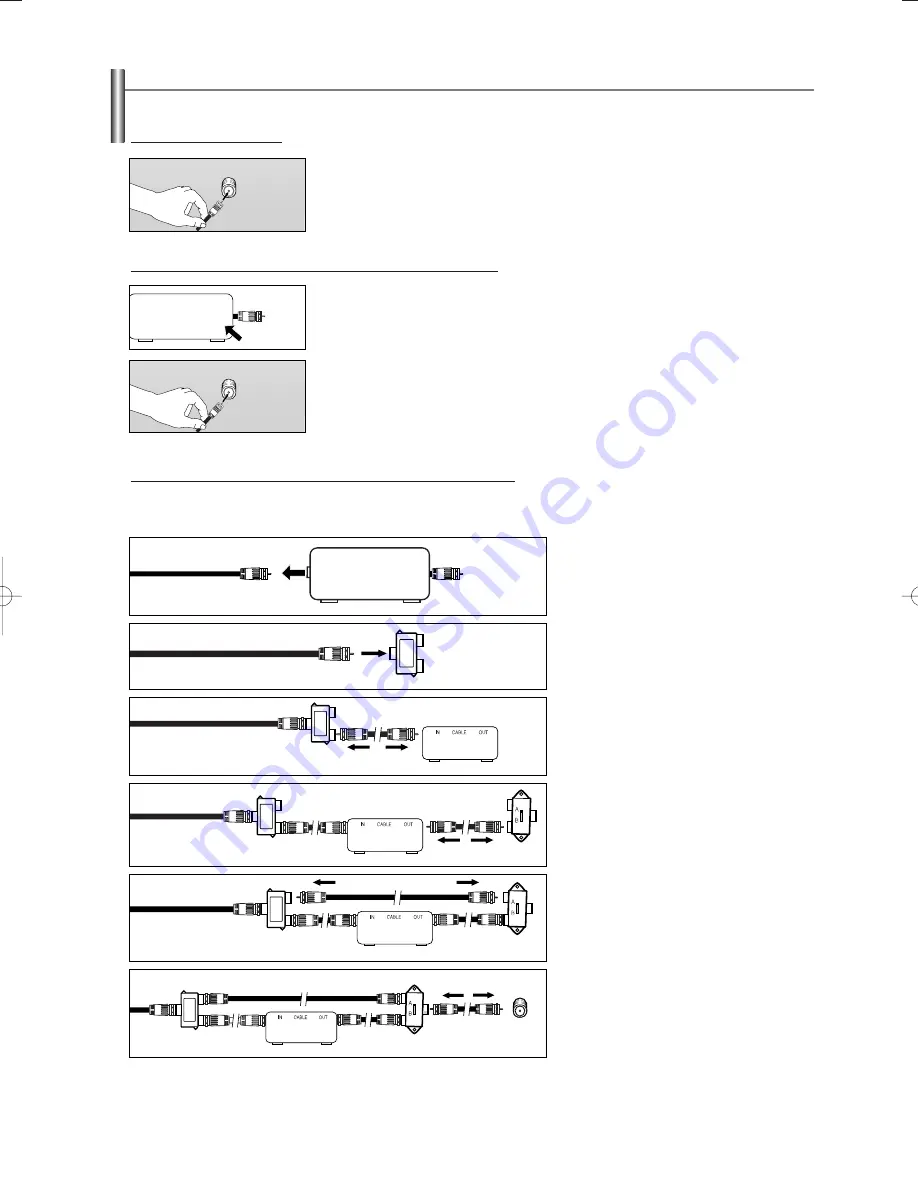
Connecting Cable TV

To connect to a cable TV system, follow the instructions below.

Cable without a Cable Box

1.

Plug the incoming cable into the ANT IN terminal on the back of the TV.

Because this TV is cable-ready, you do not need a cable box to view unscrambled cable channels.

2.

Connect the other end of this cable to the ANT IN terminal on the back of the TV. 

Connecting to a Cable Box that Descrambles All Channels

1.

Find the cable that is connected to the ANT OUT terminal on your cable box.

This terminal might be labeled “ANT OUT”, “VHF OUT” or simply, “OUT”.

ANT OUT

ANT IN

After you have made this connection, set the A/B switch to the “A” position for normal viewing. Set the A/B switch to the “B” position to view scrambled
channels. (When you set the A/B switch to “B”, you will need to tune your TV to the cable box’s output channel, which is usually channel 3 or 4.)

2.

Connect this cable to a two-way splitter.

Splitter

Incoming

cable

3.

Connect an Antenna Cable between an
OUTPUT terminal on the splitter and the
IN terminal on the cable box.

Splitter

Cable Box

Incoming

cable

4.

Connect an Antenna Cable between the 
ANT OUT terminal on the cable box and 
the B–IN terminal on the RF(A/B) switch.

Splitter

Cable Box

RF (A/B)

Switch

Incoming

cable

5.

Connect another cable between the other
OUT terminal on the splitter and the A–IN 
terminal on the RF (A/B) switch.

Splitter

Cable Box

Incoming

cable

6.

Connect the last Antenna Cable between
the OUT terminal on the RF (A/B) switch
and the ANT IN terminal on the rear of the
TV.

Splitter

Cable Box

Incoming

cable

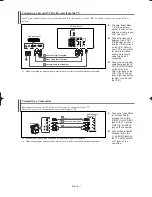
Connecting to a Cable Box that Descrambles Some Channels

If your cable box descrambles only some channels (such as premium channels), follow the instructions below. You will need a two-way
splitter, an RF (A/B) switch, and four lengths of Antenna Cable. (These items are available at most electronics stores.)

1.

Find and disconnect the cable that is 
connected to the ANT IN terminal on your 
cable box.

This terminal might be labeled “ANT IN”, 
“VHF IN” or simply, “IN”.

ANT IN

RF (A/B)

Switch

TV Rear

RF (A/B)

Switch

ANT IN

ANT IN

ANT IN

AA68-03805A-00Eng_√÷¡æ   5/3/06  9:47 AM  Page 9

Summary of Contents for TX-S2740

Page 1: ...Register your product at www samsung com global register Owner s Instructions TX S2740X COLOR TELEVISION ...

Page 2: ...cs and images on screen such as the dark side bars on non expanded standard format television video and programming should be limited to no more than 15 of the total television viewing per week Additionally viewing other stationary images and text such as stock market reports video game displays station logos web sites or computer graphics and patterns should be limited as described above for all ...

Page 3: ...Source 17 To Edit the Input Source Name 17 PICTURE CONTROL Using Automatic Picture Settings 18 Customizing the Picture 18 Adjusting the Color Tone 19 Changing the Screen Size 19 Digital Noise Reduction 20 DNIe Jr Digital Natural Image engine Junior 20 Tilt 20 Viewing Picture in Picture 21 SOUND CONTROL Using Automatic Sound Settings 22 Customizing the Sound 23 Choosing a Multi Channel Sound MTS tr...

Page 4: ... provides life like clear images Remote Control AAA Batteries Owner s Instructions Safety Guide Manual Warranty Cards Registration Card Not available in all locations Accessories Please make sure the following items are included with your TV If any items are missing contact your dealer S VIDEO Cable Video Cable Audio Cable Antenna Cable Component Cable The following parts are sold separately and a...

Page 5: ... the ENTER button on the remote control 2 MENU Press to see an on screen menu of your TV s features 3 VOL Press to increase or decrease the volume In the on screen menu use the VOL buttons as you use the œ œ and buttons or ENTER button on the remote control 4 CH Press to change channels In the on screen menu use the CH button as you would use the and button on the remote control 5 REMOTE CONTROL S...

Page 6: ...ideo input jacks of a recording VCR 3 COMPONENT IN 480i Connect to the Component audio and video outputs of a DVD or DTV set top box 480i video signal input is available 4 ANT IN Connect to an antenna air or cable TV system 1 S VIDEO Video inputs for external devices with an S Video output 2 AV IN 2 Video and audio inputs for external devices Viewing the Connection Panel Side Panel Jacks Use the l...

Page 7: ...ION Controls the caption decoder 0 MTS Press to choose stereo mono or Separate Audio Program SAP broadcast R SURF Press to automatically return to a preferred channel after a user preset time delay TURBO Press to select Turbo sound SOURCE Press to display all of the available video sources INFO Press to display information on the TV screen PRE CH Tunes to the previous channel CH Press to change ch...

Page 8: ...e screws on a 300 75 Ω adapter not supplied Use a screwdriver to tighten the screws 2 Plug the adaptor into the ANT IN terminal on the back of the TV If your antenna has a set of leads that look like this see Antennas with 300 Ω Flat Twin Leads below If your antenna has one lead that looks like this see Antennas with 75 Ω Round Leads If you have two antennas see Separate VHF and UHF Antennas Anten...

Page 9: ...ble 3 Connect an Antenna Cable between an OUTPUT terminal on the splitter and the IN terminal on the cable box Splitter Cable Box Incoming cable 4 Connect an Antenna Cable between the ANT OUT terminal on the cable box and the B IN terminal on the RF A B switch Splitter Cable Box RF A B Switch Incoming cable 5 Connect another cable between the other OUT terminal on the splitter and the A IN termina...

Page 10: ...ion When connecting an external device match the color of the connection terminal to the cable Also you can connect to AV IN 2 on the side panel of TV VCR Rear Panel TV Rear Panel Antenna Cable Not supplied Video Cable Not supplied Audio Cable Not supplied 2 3 4 5 Connecting an S VHS VCR Your Samsung TV can be connected to an S Video signal from an S VHS VCR This connection delivers a better pictu...

Page 11: ...onnecting an external device match the color of the connection terminal to the cable Connecting a Camcorder The side panel jacks on your TV make it easy to connect a camcorder to your TV They allow you to view the camcorder tapes without using a VCR 1 Connect a Video Cable or S Video Cable between the AV IN 2 VIDEO or S VIDEO jack on the TV and the VIDEO or S VIDEO jack on the camcorder 2 Connect ...

Page 12: ...o connect a DVD player Set Top Box to your TV 1 Connect a Component Cable between the COMPONENT IN 480i Y PB PR jacks on the TV and the COMPONENT Y PB PR jacks on the DVD Player Set Top Box 2 Connect Audio Cables between the AV IN 2 L AUDIO R jacks on the TV and the AUDIO OUT jacks on the DVD Player Set Top Box DVD Player Set Top Box TV Rear Panel Component Cable Not supplied Audio Cable Not suppl...

Page 13: ...ton The message Auto Program is displayed Contact your local cable company to identify the type of cable system that exists in your particular area 5 Press the ENTER button to select Start The TV will begin memorizing all of the available channels Press the ENTER button to stop Refer to Memorizing the Channels on page 16 6 After all available channels are stored the Time is displayed Press the ENT...

Page 14: ...annel 122 press then 2 then 2 Using the Button Changing Channels 1 Press the CH or CH button to change channels When you press the CH or CH button the TV changes channels in sequence You will see all the channels that the TV has memorized The TV must have memorized at least three channels You will not see channels that were either erased or not memorized See page 16 to memorize channels Using the ...

Page 15: ...in picture and sound settings The display identifies the current channel and the status of certain audio video settings Press the INFO button once more or wait approximately 10 seconds and it disappears automatically Air 3 Signal Mono Picture Dynamic Sound Custom MTS Stereo 12 00 am The on screen menus disappear from the screen after a few seconds Viewing the Menus 1 With the power on press the ME...

Page 16: ...nnel digits There are three steps for memorizing channels selecting a broadcast source memorizing the channels automatic and adding and deleting channels manual Selecting the Video Signal source Before your television can begin memorizing the available channels you must specify the type of signal source that is connected to the TV i e an antenna or a cable system 1 Press the MENU button to display...

Page 17: ...ce connected to the input jacks to make your input source selection easier 1 Press the MENU button to display the menu Press the ENTER button to select Input Press the or button to select Edit Name then press the ENTER button 2 Press the or button to select AV1 AV2 S Video or Component input jack then press the ENTER button 3 Press the or button to select VCR DVD Cable STB Sat STB AV Recv DVD Recv...

Page 18: ...e when watching movies Choose Custom if you want to adjust the settings according to personal preference Press the P MODE button on the remote control to select one of the standard picture settings Move Enter Return Picture Mode Dynamic Custom Color Tone Normal Size Normal More TV Move Enter Return Custom Contrast 100 Brightness 45 Sharpness 65 color 43 Tint G 50 R 50 TV Move Enter Return Picture ...

Page 19: ...e the picture size Move Enter Return Picture Mode Dynamic Custom Color Tone Normal Size Normal More TV Move Enter Return Picture Mode Dynamic Custom Color Tone Waram1 Size Normal More TV Cool2 Cool1 Normal Warm1 Warm2 Move Enter Return Picture Mode Dynamic Custom Color Tone Normal Size Normal More TV Normal Zoom TV Mode Normal Zoom Adjusting the Color Tone You can change the color of the entire sc...

Page 20: ...tion When this occurs follow the steps below 1 Press the MENU button to display the menu Press the or button to select Picture then press the ENTER button 2 Press the or button to select Tilt then press the ENTER button Press the œ œ or button to adjust screen tilt Press the EXIT button to exit Move œ œ Adjust Return TV Picture More Digital NR Off DNIe Jr On Tilt 0 PIP Move Enter Return Picture Mo...

Page 21: ...ton to select Picture then press the ENTER button Press the or button to select PIP then press the ENTER button Move Enter Return TV Picture More Digital NR Off DNIe Jr On Tilt 0 PIP Move Enter Return TV PIP PIP Off Off On Selecting a Signal Source External A V for PIP 3 Press the or button to select Source then press the ENTER button Select the source of the sub picture PIP by pressing the or but...

Page 22: ...Choose Speech when watching a show that is mostly dialog i e news Choose Custom to recall your personalized settings see Customizing the Sound Move Enter Return Sound Mode Custom Custom MTS Stereo Auto Volume Off More TV Move Enter Return Sound Mode Custom Custom MTS Stereo Auto Volume Off More TV Standard Music Movie Speech Custom Press the PIP CH button on the remote control Changing the PIP Cha...

Page 23: ...Move œ œ Adjust Return Move Enter Return Sound Mode Custom Custom MTS Stereo Auto Volume Off More TV Move Enter Return Sound Mode Custom Custom MTS Stereo Auto Volume Off More TV Mono Stereo SAP Choosing a Multi Channel Sound MTS track Multi Track Sound 1 Press the MENU button to display the menu Press the or button to select Sound then press the ENTER button 2 Press the or button to select MTS th...

Page 24: ...r On the setting applies to the sound effects such as Standard Music Movie and Speech 1 Press the MENU button to display the menu Press the or button to select Sound then press the ENTER button 2 Press the or button to select Pseudo Stereo then press the ENTER button Continued Move Enter Return TV Sound More Turbo Sound Off Pseudo Stereo Off Automatic Volume Control Reduces the differences in volu...

Page 25: ...h cable broadcasting it may take some time for a channel name to be displayed due to the time it takes to receive data If you add or delete the TV channel the corresponding label information will also be added or deleted Adding and Erasing Channels Channel Control 1 Press the MENU button to display the menu Press the or button to select Channel then press the ENTER button 2 Press the or button to ...

Page 26: ...gram Add Delete Deleted Air CATV Air Name LNA Off TV Off On Surf 0 30 Using the R Surf Feature This feature allows you to set the TV to return to a particular channel after a certain amount of time For example you may be watching a channel when commercials start You can set the R Surf to 5 minutes then switch channels After 5 minutes the TV will return to the original channel To use the R Surf fea...

Page 27: ...al then press the ENTER button 4 Press the or button to select Clock Set then press the ENTER button 5 Press the œ œ or button to move to the hour or minute Set the clock by pressing the or button then press the MENU button Press the EXIT button to exit The current time will appear every time you press the INFO button Time Setting Move Enter Return Setup Time Plug Play V Chip Caption More TV Time ...

Page 28: ... button to select Auto then press the ENTER button 4 Press the or button to select PBS Channel then press the œ œ or button to select the channel 5 Press the or button to select Time Zone then press the ENTER button Press the or button to select the time zone for your local area then press the ENTER button 6 Press the or button to select DST Daylight Saving Time then press the ENTER button Press t...

Page 29: ...erheating which may occur if a TV is on for too long 4 Press the ENTER button to select Time 5 Press the or button to select On Timer Volume then press the œ œ or button to adjust volume level 6 Press the or button to select Off Timer then press the ENTER button 7 Press the œ œ or button to move to the hour or minute Set the clock by pressing the or button Press the œ or button to move to Off To a...

Page 30: ...ge PIN screen will appear Press the number buttons 0 9 to enter a new password Re enter the new password to confirm Press the EXIT button to exit If you forget the PIN press the remote control buttons in the following sequence which resets the pin to 0 0 0 0 Power Off Mute 8 2 4 Power On Move Enter Return Setup Time Plug Play V Chip Caption More TV Enter PIN Enter PIN 2 Press the or button to sele...

Page 31: ...up Restrictions Using the TV Parental Guidelines First set up a personal identification number PIN and enable the V Chip See previous section Parental restrictions can be set up using either of two methods The TV guidelines or the MPAA rating 1 Press the MENU button to display the menu Press the or button to select Setup then press the ENTER button Press the or button to select V Chip then press t...

Page 32: ...5 How to set the FV D L S and V sub ratings First select one of these TV Ratings TV Y TV Y7 TV G TV PG TV 14 or TV MA See Step 3 and press the ENTER or button Press or to block the sub rating To select a different TV Rating press the MENU button and then repeat the process The V chip will automatically block certain categories that are More restrictive For example if you block L sub rating in TV P...

Page 33: ...press the ENTER button 4 Press the or button to select one of the categories then press the ENTER or button Press the or button to select B or U Press the EXIT button to exit Move Enter Return Setup Time Plug Play V Chip Caption More TV Move Enter Return V Chip V Chip Lock No TV Parental Guidelines MPAA Rating Canadian English More TV Enter PIN Enter PIN The V Chip will automatically block any cat...

Page 34: ...rogramming talk shows music videos and variety programming C Programming intended for children under age 8 C8 Programming generally considered acceptable for children 8 years and over to watch on their own G General programming suitable for all audiences PG Parental Guidance 14 Programming contains themes or content which may not be suitable for viewers under the age of 14 18 Adult programming Mov...

Page 35: ... includes news sports documentaries and other information programming talk shows music videos and variety programming G General 8 ans Not recommended for young children 13 ans Programming may not be suitable for children under the age of 13 16 ans Programming is not suitable for children under the age of 16 18 ans Programming restricted to adults Move Enter Return Setup Time Plug Play V Chip Capti...

Page 36: ... button Press the or button to select 1 or 2 then press the ENTER button Different channels and fields display different information Field 2 carries additional information that supplements the information in Field 1 For example Channel 1 may have subtitles in English while Channel 2 has subtitles in Spanish The availability of captions depends on the program being broadcast Press the EXIT button t...

Page 37: ...ress the ENTER button Press the EXIT button to exit Move Enter Return Setup More Language English Blue Screen On Melody On Demonstration TV Move Enter Return Setup Time Plug Play V Chip Caption More TV Off On Selecting a Menu Language 1 Press the MENU button to display the menu Press the or button to select Setup then press the ENTER button Press the or button to select Language 2 Press the œ œ or...

Page 38: ... Return TV Move Enter Return Setup Time Plug Play V Chip Caption More TV Setup More Language English Blue Screen On Melody On Demonstration Setting the On Off Melody 1 Press the MENU button to display the menu Press the or button to select Setup then press the ENTER button 2 Press the or button to select Melody then press the ENTER button Press the or button to select Off or On then press the ENTE...

Page 39: ...RCE button Make sure the TV is plugged in Check the antenna connections Make sure the MUTE button is off First check the volume of units connected to your TV digital broadcasting receiver DVD cable broadcasting receiver VCR etc Then adjust the TV volume accordingly Check all wire connections Unplug the TV for 30 seconds then try operating it again Make sure the wall outlet is working Replace the r...

Page 40: ...Center 1 800 SAMSUNG 7267864 1 800 SAMSUNG 7267864 Web Site www samsung com ca www samsung com Address Samsung Electronics Canada Inc Customer Service 55 Standish Court Mississauga Ontario L5R 4B2 Canada Samsung Electronique Canada Inc Service à la Clientèle 55 Standish Court Mississauga Ontario L5R 4B2 Canada Samsung Electronics America Inc 105 Challenger Road Ridgefield Park NJ 07660 0511 ...

Reviews: