background image

Y

O U R

N

E W

T V

8

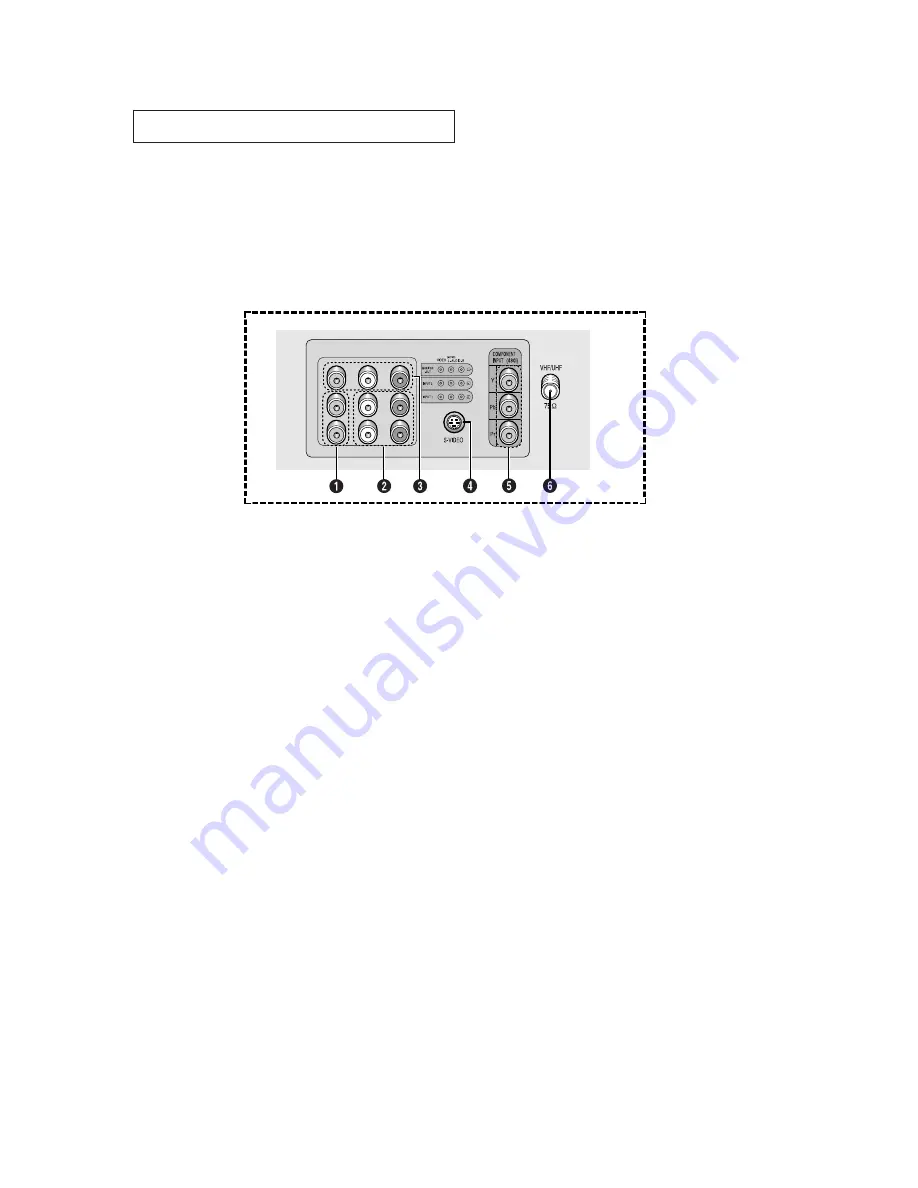
Rear Panel Jacks

Use the rear panel jacks to connect an A/V component that will be connected 
continuously, such as a VCR or a DVD player. 
Because there are two sets of input jacks, you can connect two different A/V 
components (i.e., a VCR and a DVD, 2 VCRs, etc.)

For more information on connecting equipment, see pages 11 – 17.

˛

VIDEO INPUT jack 

Video signals from VCRs, DVD players and similar
devices.

«

AUDIO INPUTS 

(INPUT1 

and 2)

/DVD AUDIO INPUTS

(INPUT 2)

Audio signals from VCRs, DVD players and similar
devices.
Use these jacks to connect the audio signals from
a DVD player when using the DVD video input
jacks.  When not using the DVD jacks, these audio
jacks function as audio for Video 2 or S-VIDEO.

AUDIO-VIDEO MONITOR
OUTPUT jacks 

These audio-video signals are identical to A/V 
signals being displayed on the big screen.
(Typically used as the input signals for a recording
VCR.)

SUPER VIDEO INPUT jack

S-Video signal from an S-VHS VCR or DVD player.
Note: In S-Video mode, Audio Output depends
what kind of audio input source is connected to
the side audio input jacks (AV2).

COMPONENT VIDEO INPUT
jacks 

Connect video from a DVD player.
Note: Only black and white signals are output
from a monitor in DVD mode.

fl

VHF/UHF 

Connect to an antenna or to a cable TV system.

Summary of Contents for TX-R2728

Page 1: ...Owner s Instructions COLOR TELEVISION TX R2728 ...

Page 2: ...nd images on screen such as the dark side bars on non expanded standard format television video and programming should be limited to no more than 15 of the total television viewing per week Additionally viewing other stationary images and text such as stock market reports video game displays station logos web sites or computer graphics and patterns should be limited as described above for all tele...

Page 3: ...corder 18 Installing Batteries in the Remote Control 19 Chapter 3 Operation 20 Turning the TV On and Off 20 Plug Play Feature 20 Viewing the Menus and On Screen Displays 22 Viewing the Menus 22 Viewing the Display 22 Selecting a Menu Language 23 Memorizing the Channels 24 Selecting the Video Signal source 24 Storing Channels in Memory Automatic Method 25 Adding and Erasing Channels Manual Method 2...

Page 4: ...the On Off Timer 46 Setting the Sleep Timer 47 Setting the Preferred Volume Level 48 Using the V Chip 49 Viewing Closed Captions 56 Setting the Blue Screen Mode 57 Setting The On Off Melody 58 Viewing the Demonstration 59 Customizing Your Remote Control 60 Setting Up Your Remote Control to Operate Your VCR Cable box or DVD player 60 Chapter 5 Troubleshooting 62 Identifying Problems 62 Appendix 63 ...

Page 5: ...hat can be stored in the TV s memory Automatic channel tuning for up to 181 channels A special filter to reduce or eliminate reception problems A built in multi channel sound decoder for stereo and bilingual listening Built in dual channel speakers A special sleep timer V Chip function Accessories Once you have unpacked your TV check to make sure that you have all the parts shown here If any piece...

Page 6: ...he on screen menu CH and CH Press to change channels Also press to high light various items on the on screen menu Remote Control Sensor Aim the remote control towards this spot on the TV TIMER indicator When the TV is turned on the TIMER indicator blinks five times This indicator illuminates when the TIMER mode is set to the On position after setting the clock and either the On timer or Off timer ...

Page 7: ...ponent that is used only occa sionally such as a camcorder or video game For information on connecting equipment see page 18 AUDIO INPUT jacks Used to connect the audio signals from a cam corder or video game VIDEO INPUT jack Used to connect a video signal from a camcorder or video game ...

Page 8: ...o connect the audio signals from a DVD player when using the DVD video input jacks When not using the DVD jacks these audio jacks function as audio for Video 2 or S VIDEO AUDIO VIDEO MONITOR OUTPUT jacks These audio video signals are identical to A V signals being displayed on the big screen Typically used as the input signals for a recording VCR SUPER VIDEO INPUT jack S Video signal from an S VHS...

Page 9: ...ff the sound SLEEP Press to select a preset time inter val for automatic shutoff MENU Displays the main on screen menu P SIZE Press to change the screen size Your choices are Normal Zoom R SURF Press the R SURF button to auto matically return to a preferred channel after a user preset time delay MODE Selects a target device to be con trolled by the Samsung remote control i e TV Set Top Box VCR Cab...

Page 10: ...celled PLAY PAUSE Press the PLAY PAUSE button to play back prerecorded tapes or pause the tape FF Press to fast forward the tape in your VCR SET Use this button when you are set ting up your remote control to operate your Set Top Box VCR Cable box or DVD RESET If your remote control is not func tioning properly take out the bat teries and press the reset button for about 2 3 seconds Re insert the ...

Page 11: ... next page If you have two antennas see Separate VHF and UHF Antennas on next page Antennas with 300 ohm Flat Twin Leads If you are using an off air antenna such as a roof antenna or rabbit ears that has 300 ohm twin flat leads follow the directions below 1 Place the wires from the twin leads under the screws on the 300 75 ohm adaptor not supplied Use a screwdriver to tighten the screws 2 Plug the...

Page 12: ...lug the combiner into the VHF UHF terminal on the bottom of the rear panel Separate VHF and UHF Antennas If you have two separate antennas for your TV one VHF and one UHF you must combine the two antenna signals before connecting the antennas to the TV This procedure requires an optional combiner adaptor available at most electronics shops 1 Connect both antenna leads to the combiner Antennas with...

Page 13: ...descrambles only some channels such as premium channels follow the instructions below You will need a two way splitter an RF A B switch and four lengths of coaxial cable These items are available at most electronics stores 1 Find and disconnect the cable that is connected to the ANTENNA IN terminal on your cable box This terminal might be labeled ANT IN VHF IN or simply IN 2 Connect this cable to ...

Page 14: ...al on the RF A B switch and the VHF UHF terminal on the rear of the TV After you ve made this connection set the A B switch to the A position for normal view ing Set the A B switch to the B position to view scrambled channels When you set the A B switch to B you will need to tune your TV to the cable box s output channel which is usually channel 3 or 4 Incoming Cable Cable Box RF A B Switch Splitt...

Page 15: ...e is usually included with a VCR If not check your local electronics store Connecting a VCR These instructions assume that you have already connected your TV to an antenna or a cable TV system according to the instructions on pages 11 14 Skip step 1 if you have not yet connected to an antenna or a cable system 1 Unplug the cable or antenna from the back of the TV 2 Connect the cable or antenna to ...

Page 16: ...of audio cables between the AUDIO OUT jacks on the VCR and the 2 AUDIO INPUT jacks on the TV 1 To begin follow steps 1 3 in the previous section to connect the antenna or cable to your VCR and your TV Connecting an S VHS VCR Your Samsung TV can be connected to an S Video signal from an S VHS VCR This connection delivers a better picture as compared to a standard VHS VCR VCR Rear Panel Coaxial Cabl...

Page 17: ...tion The VCR input jacks might be either on the front or on back of the VCR Connecting a DVD Player The rear panel jacks on your TV make it easy to connect a DVD player to your TV 1 Connect a set of audio cables between the AUDIO INPUT 2 jacks on the TV and the AUDIO OUT jacks on the DVD player 2 Connect a video cable between the COMPO NENT INPUT Y Pb Pr jacks on the TV and the COMPONENT VIDEO OUT...

Page 18: ...he camcorder Connecting a Camcorder The side panel jacks on your TV make it easy to connect a camcorder to your TV They allow you to view the camcorder tapes without using a VCR Also see Viewing an External Signal Source on page 37 The audio video cables shown here are usually included with a Camcorder If not check your local electronics store If your camcorder is stereo you need to connect a set ...

Page 19: ... a long time The remote control can be used up to about 23 feet from the TV Assuming typical TV usage the batteries last for about one year 2 Install two AAA size batteries Make sure to match the and ends of the batteries with the diagram inside the compartment Installing Batteries in the Remote Control 1 Slide the cover out com pletely ...

Page 20: ...ally and subsequently Setting the language Video signal source Ant input check Auto program and Clock Plug Play 3 Press the MENU button then the Ant Input check is automatically displayed Make sure that the anten na is connected to the TV Press the ENTER button and then the Channel menu is automatically displayed 2 Press the ˇ or ˆ button to select the desired language Adjust Skip Setup More Langu...

Page 21: ...lug Play then press the ENTER button The message Plug Play is displayed Note Plug Play feature doesn t work when in the AV mode Enjoy your watching Move Enter Return Time Clock am On Timer am Off Off Timer am Off Sleep Timer Off On Timer Volume 10 Move Enter Return Setup Time ˆ ˆ Plug Play ˆ ˆ V Chip ˆ ˆ Caption ˆ ˆ More 6 Press the ENTER button to start Auto Program or press the MENU button to re...

Page 22: ...creen menus disappear from the screen after two minutes You can also use the MENU CH and VOL buttons on the control panel of the TV to make selections 1 Press the INFO button The on screen display shows any or all of the fol lowing Active channel the channel label signal picture mode sound mode MTS and the cur rent time 2 Use the and buttons to highlight one of the 5 icons Then press the ENTER but...

Page 23: ...nglish Español or Français Press the EXIT button to exit Move Enter Return Setup Time ˆ ˆ Plug Play ˆ ˆ V Chip ˆ ˆ Caption ˆ ˆ More 2 Press the or button to select Language then press the ENTER but ton Move Adjust Return Setup More Language English Blue Screen On ˆ ˆ Melody On ˆ ˆ Demonstration ˆ ˆ Mover Ajustar Regresar Configuración Más Idioma Español Pantalla Azul Enc ˆ ˆ Melodía Enc ˆ ˆ Demost...

Page 24: ...e an antenna or a cable system 1 Press the MENU button to display the menu Press the or button to select Channel then press the ENTER button 2 Press the or button to select Air CATV Note STD HRC and IRC identify various types of cable TV systems Contact your local cable company to identify the type of cable system that exists in your particular area At this point the signal source has been selecte...

Page 25: ...les through all of the available channels and stores them in memory This takes about one to two minutes 2 Press the or button to select Auto Program and then press the ENTER button The Auto Program is automatically displayed 1 First select the correct signal source Air STD HRC IRC See steps 1 3 on previous page Move Adjust Return Channel Auto Program ˆ ˆ Add Delete Deleted ˆ ˆ Air CATV Air Name Mo...

Page 26: ...e ENTER button 2 Press the or button to select Add Delete then press the ENTER button 3 Press the or button to select Added or Deleted then press the ENTER button Press the EXIT button to exit Move Enter Return Channel Auto Program ˆ ˆ Add Delete Deleted ˆ ˆ Air CATV Air Name Move Enter Return Channel Auto Program ˆ ˆ Add Delete Deleted Air CATV Air Name Deleted Added Move Enter Return Channel Aut...

Page 27: ... 27 press 2 then 7 The TV will change chan nels when you press the second number When you use the number buttons you can directly select channels that were either erased or not memorized To select a channel over 100 press the 100 button For channel 122 press 100 then 2 then 2 To change to single digit channels 0 9 faster press 0 before the single digit For channel 4 press 0 then 4 Using the PRE CH...

Page 28: ...e highlight Each label has four fields See top paragraph 4 Press the or button to select a letter a number or a blank Pressing or button results in this sequence A B Z blank 0 1 9 Note You cannot select Name in the AV mode 5 Press the ˆ button to switch to the next field which will be highlight Select a second letter or digit using the or button as above Repeat the process to select the last two d...

Page 29: ...ar every time you press the INFO button 3 Press the ENTER button to select Clock Mode Press the or button to select Manual then press the ENTER button Move Enter Return Setup Time ˆ ˆ Plug Play ˆ ˆ V Chip ˆ ˆ Caption ˆ ˆ More Move Enter Return Time Clock am ˆ ˆ On Timer am Off Off Timer am Off Sleep Timer Off On Timer Volume 10 Move Enter Return Clock Clock Mode Manual ˆ ˆ Clock Set am 4 Press the...

Page 30: ...e ˆ ˆ Plug Play ˆ ˆ V Chip ˆ ˆ Caption ˆ ˆ More Move Enter Return Time Clock am ˆ ˆ On Timer am Off Off Timer am Off Sleep Timer Off On Timer Volume 10 Move Enter Return Clock Clock Mode Manual ˆ ˆ Clock Set am 4 Press the or button to select PBS Channel Press the ˇ or ˆ button to select your local PBS channel 2 Press the ENTER button to select Time Press the ENTER button to select Clock Manual Au...

Page 31: ...Time Zone ATL ˆ ˆ DST No ˆ ˆ 6 Press the or button to select DST Daylight Saving Time then press the ENTER button Press the or button to select Yes or No then press the ENTER button Press the EXIT button to exit Move Enter Return Clock Clock Mode Auto ˆ ˆ PBS Channel Air 3 Time Zone ATL ˆ ˆ DST No ATL EAST CEN MTN PAC ALAS HAW The set time can be changed according to the broadcasting station and s...

Page 32: ... button increases it Press the EXIT button to exit After adjusting an item the gauge will automatically disappear after about 10 seconds 2 Press the or button to select Custom then press the ENTER button The words Contrast Brightness Sharpness Color and Tint will appear on the screen 3 Press the or button to select a particular item then press the ENTER button Move Enter Return Mode Dynamic ˆ ˆ Cu...

Page 33: ...r the standard factory settings Choose Movie when viewing the movie Choose Custom if you want to adjust the settings according to personal preference see Customizing the Picture page 32 1 Press the MENU button to display the menu Press the or button to select Picture then press the ENTER button 2 Press the ENTER button again Press the or button to select the Dynamic Standard Movie or Custom pictur...

Page 34: ...ing the MUTE Button At any time you can temporarily cut off the sound using the MUTE button 1 Press the MUTE button and the sound cuts off The word Mute will appear in the lower left corner of the screen 2 To turn mute off press the MUTE button again or simply press either the VOL or VOL button Mute ...

Page 35: ...utomatic settings See next page 3 Press the or button to select a particular item then press the ENTER button Move Enter Return Sound Mode Custom ˆ ˆ Custom ˆ ˆ MTS Stereo ˆ ˆ Auto Volume Off ˆ ˆ More Move Enter Return Sound Mode Custom ˆ ˆ Custom ˆ ˆ MTS Stereo ˆ ˆ Auto Volume Off ˆ ˆ More Move Enter Return Custom Bass 50 Treble 50 Balance L 50 R 50 4 Press the ˇ or ˆ button to increase or decrea...

Page 36: ...s when watching movies Choose Speech when watching a show that is mostly dialogue i e news Choose Custom to recall your personalized settings see Customizing the Sound page 35 2 Press the ENTER button again Press the or button repeatedly to select the Standard Music Movie Speech or Custom sound settings then press the ENTER button Press the EXIT button to exit 1 Press the MENU button to display th...

Page 37: ...rom connected equipment such as VCRs DVD Set Top Box and the TV source broadcast or cable Setting the Signal Source 1 Press the MENU button to display menu then press the ENTER button 2 Press the ENTER button again Press the or button to select signal source then press the ENTER button Move Enter Return Source List TV ˆ ˆ Edit Name ˆ ˆ Input Move Enter Return TV AV1 AV2 S Video Component Source Li...

Page 38: ...n to select the Source List then press the ENTER button Move Enter Return AV1 ˆ ˆ AV2 ˆ ˆ S Video ˆ ˆ Component ˆ ˆ Edit Name 4 Press the or button to select external device VCR DVD Cable STB Sat STB AV Recv DVD Recv Game Camcorder DVD Combo then press the ENTER button Set other signal sources AV2 S Video Component using the same method as listed above Press the EXIT button to exit Move Enter Retu...

Page 39: ...ss the or button to select Cool2 Cool1 Normal Warm1 or Warm2 according to personal preference then press the ENTER button Press the EXIT button to exit Move Enter Return Mode Dynamic ˆ ˆ Custom ˆ ˆ Color Tone Warm1 ˆ ˆ Size Normal ˆ ˆ More Picture Move Enter Return Mode Dynamic ˆ ˆ Custom ˆ ˆ Color Tone Normal Size Normal ˆ ˆ More Picture Cool2 Color1 Normal Warm1 Warm2 Move Enter Return Mode Dyna...

Page 40: ...ENTER button 3 Press the or button to select Normal or Zoom then press the ENTER button Press the EXIT button to exit Move Enter Return Mode Custom ˆ ˆ Custom ˆ ˆ Color Tone Warm1 ˆ ˆ Size Normal ˆ ˆ More Picture Move Enter Return Mode Custom ˆ ˆ Custom ˆ ˆ Color Tone Warm1 ˆ ˆ Size Normal More Picture Normal Zoom Move Enter Return Mode Custom ˆ ˆ Custom ˆ ˆ Color Tone Warm1 ˆ ˆ Size Normal ˆ ˆ Mo...

Page 41: ...to select the Picture then press the ENTER but ton 2 Press the or button to select Digital NR then press the ENTER but ton 3 Press the or button to select On then press the ENTER button Press the EXIT button to exit Pressing the or button will alternate between On and Off Move Enter Return More Digital NR Off ˆ ˆ Tilt 0 Picture Move Enter Return More Digital NR Off Tilt 0 Picture Off On Move Enter...

Page 42: ...he menu Press the or button to select the Picture then press the ENTER but ton 2 Press the or button to select Tilt 3 Press the ˇ or ˆ button to adjust the Tilt Press the EXIT button to exit Move Adjust Return More Digital NR Off ˆ ˆ Tilt 0 Picture Move Adjust Return Picture Move Enter Return Mode Dynamic ˆ ˆ Custom ˆ ˆ Color Tone Warm1 ˆ ˆ Size Normal ˆ ˆ More Picture More Digital NR Off ˆ ˆ Tilt...

Page 43: ... Surf feature 1 While you are watching the channel to which you want to return press the R SURF button The on screen display will read Surf off 2 Press the R SURF button again to set the timer in thirty second intervals up to five minutes 3 The time you set will begin counting down on the screen When the time runs out the TV will return to the channel you were watching when you set the timer Surf ...

Page 44: ...or SAP 1 Press the MENU button to display the menu Press the or button to select the Sound then press the ENTER but ton Choose Mono for channels that are broadcasting in mono or if you are having difficulty receiving a stereo signal Choose Stereo for channels that are broadcasting in stereo Choose SAP to listen to the Separate Audio Program which is usually a foreign language translation Quick way...

Page 45: ...ing the TURBO button on the remote control Pseudo Stereo Pseudo Stereo converts a monaural sound signal into two identical left and right channels Once the Pseudo Stereo is set to On or Off the setting applies to the sound effects such as Standard Music Movie and Speech 1 Press the MENU button to display the menu Press the button to select the Sound then press the ENTER button 2 Press the or butto...

Page 46: ...Timer Off On Timer Volume 10 Move Enter Return Time Clock 09 30am ˆ ˆ On Timer 06 00am Off Off Timer am Off Sleep Timer Off On Timer Volume 10 4 Press the ˆ button to select the minutes The minutes digits will be highlighted Press the or button to select the appropriate minutes Move Adjust Return Time Clock 09 30am ˆ ˆ On Timer 06 30am OffOff Timer am Off Sleep Timer Off On Timer Volume 10 Move En...

Page 47: ...entually be turned off if you do not operate any controls during the 3 hours after the TV is turned on by timer This function is available in only the timer On mode and will prevent a leakage accident or overheating caused by your TV left on for a long time due to the timer On when you are away on holiday for example Move Adjust Return Time Clock 09 30am ˆ ˆ On Timer 06 30am On Off Timer am Off Sl...

Page 48: ...ENTER button to select Time Move Enter Return Setup Time ˆ ˆ Plug Play ˆ ˆ V Chip ˆ ˆ Caption ˆ ˆ More 3 Press the or button to select On Timer Volume Press the ˇ or ˆ button to adjust volume level Press the EXIT button to exit Move Adjust Return Time Clock 09 30am ˆ ˆ On Timer 06 30am On Off Timer 12 00pm On Sleep Timer Off On Timer Volume 15 Move Enter Return Time Clock 09 30am ˆ ˆ On Timer 06 3...

Page 49: ...umber for a new TV set is 0 0 0 0 1 Press the MENU button to display the menu Press the or button to select the Setup then press the ENTER button Move Enter Return Setup Time ˆ ˆ Plug Play ˆ ˆ V Chip ˆ ˆ Caption ˆ ˆ More 3 After entering a valid PIN number the V Chip screen will appear Press the or button and select Change PIN Move Enter Return V Chip V Chip Lock No TV Parental Guidelines ˆ ˆ MPAA...

Page 50: ...ter Return Setup Time ˆ ˆ Plug Play ˆ ˆ V Chip ˆ ˆ Caption ˆ ˆ More 2 Press the or button to select the V Chip then press the ENTER but ton The Enter PIN screen will appear Enter your 4 digit PIN number Enter PIN Enter PIN 1 Press the MENU button to display the menu Press the or button to select the Setup then press the ENTER button Move Enter Return Setup Time ˆ ˆ Plug Play ˆ ˆ V Chip ˆ ˆ Caption...

Page 51: ...point one of the TV Ratings is selected Press the ENTER button Depending on your existing setup a letter U or B will be selected U Unblocked B Blocked While the U or B is red press the or button to block or unblock the category Press the MENU button once to save the TV Parental Guidelines A TV Rating will be selected and no let ters will be selected To exit this screen press the MENU button again ...

Page 52: ...ck L sub rating in TV PG then the L sub ratings in TV 14 and TV MA will automatically be blocked 7 Press the EXIT button to clear all the screens Or proceed to the next section and set up additional restric tions based on the MPAA codes How to Set up Restrictions using the MPAA Ratings G PG PG 13 R NC 17 X The MPAA rating system uses the Motion Picture Association of America MPAA system and its ma...

Page 53: ...t rated While a particular category is selected press ENTER to activate it A letter U or B will be selected Press the or button to select U or B Press the EXIT button to save the settings and to clear all screens 3 Press the or button to select the MPAA Rating then press the ENTER button Move Enter Return V Chip V Chip Lock Yes TV Parental Guidelines ˆ ˆ MPAA Rating ˆ ˆ Change PIN ˆ ˆ USA Move Ent...

Page 54: ...amming contains themes or content which may not be suitable for viewers under the age of 14 18 Adult programming While a particular category is selected press ENTER to activate it A letter U or B will be selected Press the or button to select U or B Press the EXIT button to save the settings and to clear all screens 3 Press the or button to select the Canadian English then press the ENTER button M...

Page 55: ...l be selected Press the or button to select U or B Press the EXIT button to save the settings and to clear all screens 3 Press the or button to select the Canadian French then press the ENTER button Move Enter Return V Chip More Canadian French ˆ ˆ Change PIN ˆ ˆ How to Reset the TV after the V Chip Blocks a Channel Emergency Escape If the TV is tuned to a restricted channel the V Chip will block ...

Page 56: ...television programs so home recorded video tapes also provide closed captions Most pre recorded commercial video tapes provide closed captions as well Check for the closed caption symbol in your television schedule and on the tape s packaging 1 Press the MENU button to display the menu Press the or button to select the Setup then press the ENTER button 2 Press the or button to select the Caption t...

Page 57: ...ternate between On and Off Setting the Blue Screen Mode If no signal is being received or the signal is very weak a blue screen automatically replaces the noisy picture background If you wish to continue viewing the poor picture you must set the Blue screen mode to Off Move Enter Return Setup Move Enter Return Setup More Language English Blue Screen On Melody On ˆ ˆ Demonstration ˆ ˆ Off On Move E...

Page 58: ...u can hear clear a melody sound when the TV is powered On or Off Move Enter Return Setup More Language English Blue Screen On ˆ ˆ Melody On ˆ ˆ Demonstration ˆ ˆ 3 Press the or button to select On then press the ENTER button Press the EXIT button to exit Move Enter Return Setup More Language English Blue Screen On ˆ ˆ Melody On Demonstration ˆ ˆ Off On Move Enter Return Setup Time ˆ ˆ Plug Play ˆ ...

Page 59: ...television you can view the in built demonstration 1 Press the MENU button to display the menu Press the or button to select the Setup then press the ENTER button 2 Press the or button to select Demonstration then press the ENTER button Move Enter Return Setup More Language English Blue Screen On ˆ ˆ Melody On ˆ ˆ Demonstration ˆ ˆ Move Enter Exit Source List AV1 ˆ ˆ Edit Name ˆ ˆ Input Move Enter...

Page 60: ...layer ˇ Make sure you enter 3 digits of the code even if the first digit is a 0 If more than one code listed try the first one 5 Press the POWER button on the remote control Your VCR Cable box or DVD player should turn on If your VCR Cable box or DVD player turns on your remote control is now set correctly ˇ If your VCR Cable box or DVD player does not turn on repeat steps 2 3 and 4 but try one of...

Page 61: ...son KLH Panasonic Daewoo Panasonic Admiral 036 037 038 039 040 041 042 043 044 045 046 047 048 050 051 052 053 054 055 056 057 058 Electrohome Emerson Radio Shack Realistic Sharp RCA Magnavox Marantz Philco Philips Sylvania JC Penny JCL Kenwood Marantz NEC Tatung Teac Logik Multitech Shintom General Electric Multitech Samsung Pioneer Emerson Hitachi JC Penny Pentax RCA Sears Hitachi RCA Sony Sharp...

Page 62: ...er channel Adjust the antenna No picture or sound Try another channel Press the TV VIDEO button Make sure the TV is plugged in Check the antenna connections No color wrong colors or tints Make sure the program is broadcast in color Adjust the picture settings If the set is moved or turned in a different direction the power should be OFF for at least 30 minutes Picture rolls vertically Adjust the a...

Page 63: ...inet Never open the cabinet or touch the parts inside Wipe your TV with a clean dry cloth Never use water cleaning fluids wax or chemicals Do not put heavy objects on top of the cabinet Temperature If your TV is suddenly moved from a cold to a warm place unplug the power cord and allow at least two hours for moisture that may have formed inside the unit to dry completely Using Your TV in Another C...

Page 64: ...00 726 7864 U S A Samsung Electronics America Service Division 400 Valley Road Suite 201 Mount Arlington NJ 07856 www samsung com CANADA Samsung Electronics Canada Inc Samsung Customer Care 7037 Financial Drive Mississauga Ontario L5N 6R3 www samsung ca ...

Reviews: