background image

5

056  Volume
056    Start up sound
056  Shutter 

sound

056  Beep 

sound

057  AF 

sound

057 Setup 

menu

057 Display

057  Language
057  Function 

Description

058    Start up image
058  Display 

Brightness

058  Quick 

view

058  Display 

Save

059 Settings

059    Formatting a memory
059  Initialization
060    Setting up the Date / Time / Date type
060  Time 

Zone

060  File 

name

061    Imprinting the recording date
061    Auto power off
062    Auto Focus lamp
062    Selecting Video out type
063    Setting the USB

PLAY

064  Starting play mode

064    Playing back a still image
064    Playing back a movie clip
065    Movie clip capture function
065    Playing back a recorded voice
066    Playing back a voice memo

066  LCD monitor Indicator
067

Using the camera buttons to set the camera

067 Play 

mode 

button

067  Thumbnail / Enlargement Lever

067  Smart 

Album

070  Info (DISP) / Up button
070  Play & Pause / OK button
071  Left / Right / Down / MENU button
071 Delete 

button

072

Setting up the play back function using 
the LCD monitor

074 Edit

074  Resize
075    Rotating an image
075    Photo Style Selector
076  Smart 

Filter

077  Image 

Adjust

079  Starting the Multi Slide Show

079    Start the Multi Slide Show

Contents

Summary of Contents for TL105

Page 1: ......

Page 2: ...hange without prior notice for upgrading the camera functions Microsoft Windows and Windows logo are registered trademarks of Microsoft Corporation incorporated in the United States and or other count...

Page 3: ...e do not cover the camera or Charger This may cause heat to build up and distort the camera body or cause a fire Always use the camera and its accessories in a well ventilated area Danger DANGER indic...

Page 4: ...unclear image and possibly causing camera malfunction Avoid obstructing the lens or the flash when you capture an image When using this camera in low temperatures you may experience the following The...

Page 5: ...to use Smart Movie Clip mode 056 Sound menu 056 Sound SETUP 026 Recording the movie clip without sound 027 Things to Watch Out for When Taking Pictures 028 Using the camera buttons to set the camera 0...

Page 6: ...PLAY 064 Starting play mode 064 Playing back a still image 064 Playing back a movie clip 065 Movie clip capture function 065 Playing back a recorded voice 066 Playing back a voice memo 066 LCD monito...

Page 7: ...ice memo 083 DPOF 085 Copy to Card 086 PictBridge 087 PictBridge Picture Selection 087 PictBridge Print Setting 088 PictBridge Reset 088 Important notes 090 Warning indicator 091 Before contacting a s...

Page 8: ...sung service center Parts and accessories illustrated below may differ from exact appearance Package Contents Camera Rechargeable battery AD43 00194A AC adapter USB cable AD44 00143A AD39 00165A Camer...

Page 9: ...8 Identification of features Front Top Lens Lens cover Self timer lamp AF Lamp POWER button Smart button Shutter button Flash Zoom T Lever Digital zoom Zoom W Lever Thumbnail Microphone Strap eyelet...

Page 10: ...9 Identification of features Back 5 function button Play mode button MENU button LCD monitor Camera status lamp Fn Delete button MODE button USB AV DC terminal...

Page 11: ...n the battery chamber cover slide it in the direction shown above Information Up button Flash Left button Self timer Right button Macro Down button OK Play Pause button Speaker Tripod socket Memory ca...

Page 12: ...ture When flash battery is charging The lamp blinks When the USB cable is inserted to a PC The lamp lights up LCD monitor turns off after initializing the device Transmitting Data with a PC The lamp b...

Page 13: ...e These figures are measured under Samsung s standard conditions and shooting conditions and may vary depending on the user s methods Important information about battery usage When camera is not in us...

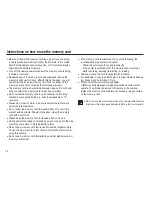
Page 14: ...harging LED of the AC Charger does not turn on or blink after inserting the rechargeable battery please check whether the battery is inserted correctly If you charge the battery with the camera power...

Page 15: ...like necklace coin key watch and so on Use the 2nd Advanced Lithium Batteries with the guarantee under the manufacturing company Do not try to disassemble or perforate the product by using the sharp p...

Page 16: ...the actual battery status Insert the battery as shown If the camera does not turn on after you have inserted battery please check whether the battery direction is right When the battery chamber cover...

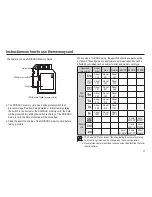
Page 17: ...e memory card will eventually reduce the memory card s performance Should this be the case you will need to purchase a new memory card Wear and tear on the memory card is not covered by the Samsung wa...

Page 18: ...00 28 07 About 00 41 16 About 01 50 06 About 01 29 16 About 02 37 17 About 03 46 15 The Zoom W T lever doesn t function during the movie recording The recording times can be changed by the zoom opera...

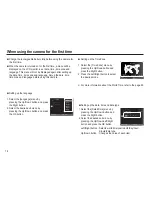
Page 19: ...displayed again after setting up the date time time zone and language Set up the date time time zone and language before using this camera Setting up the language 1 Select the Language menu by pressi...

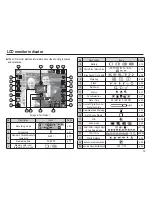
Page 20: ...38 8 Metering p 46 9 Flash p 33 10 Self timer p 35 11 Macro p 31 12 Face Detection p 41 13 Date Time 2010 01 01 01 00 PM p 60 14 Optical Digital Zoom bar Digital Zoom rate p 29 15 Camera shake Warnin...

Page 21: ...tter Sound 1 Beep Sound 1 AF Sound On Volume Medium Off Low Medium High Start Sound Off Shutter Sound 1 Beep Sound 1 AF Sound On Volume Medium Exit Back Start Sound Shutter Sound Beep Sound AF Sound V...

Page 22: ...ry card If the memory card is not inserted an image will be stored on the internal memory If the memory card is inserted an image will be stored on the memory card 3 Close the battery chamber cover 4...

Page 23: ...conditions Landscape When shooting outdoor scenes White When shooting a white background Nights When shooting the nighttime scenes Night Portrait When shooting people in a dark outdoor place Backlight...

Page 24: ...ter button to capture an image How to use the Scene modes The scene modes are listed below Beauty Shot Take a photo of a person with options to hide facial imperfections Frame Guide Use this mode when...

Page 25: ...Shutter mode This camera automatically adjusts the shutter speed and aperture values to the shooting environment However in Night scene mode you can set the shutter speed and aperture values to your p...

Page 26: ...time allows Movie clips will still be recorded if the shutter button is released If you wish to stop recording press the shutter button again Movie clip size and type are listed below Movie clip size...

Page 27: ...ound Starting the recording mode Recording HD High Definition movie clips You can record HD High Definition movie clips 1280X720HQ 30 fps H 264 MPEG4 AVC is a standard for the digital video codec It s...

Page 28: ...see page 49 function Avoid obstructing the lens or the flash when you capture an image Compose the image by using the LCD monitor Pressing the shutter button down half way Lightly press the shutter b...

Page 29: ...fully starts the process for recording a movie clip Press the shutter button once and the movie clip is recorded for as long as the available recording time in the memory allows If you wish to stop re...

Page 30: ...Optical zoom When the menu window is not displayed this lever is used to control the optical or digital zoom This camera has a 4X optical zoom and a 5X digital zoom function Using both will offer a t...

Page 31: ...e Take care not to touch the lens to avoid taking an unclear image and possibly causing camera malfunction If the image is dim turn the camera power off and on again to modify the lens position Take c...

Page 32: ...e macro mode is selected be particularly careful to avoid camera shake When you take a picture within 40cm Wide zoom or 50cm Tele zoom in the Macro mode select the Flash off mode Macro Down button Whi...

Page 33: ...the shutter button halfway and focus on the subject Using the Focus Lock 1 Ensure the subject is in the center of the autofocus frame 2 Press the shutter button halfway When the green auto focus frame...

Page 34: ...Selecting the Auto flash Flash Left button If you press the shutter button after selecting the flash the first flash fires to check the shooting condition Flash range and Power ratio of flash Do not m...

Page 35: ...ash operates with a slow shutter speed to obtain a balanced correct exposure In poor lighting conditions the camera shake warning indicator will display on the LCD monitor Red eye reduction When a sho...

Page 36: ...ng mode p 21 2 Press the Self timer Right button until the desired mode indicator displays on the LCD monitor A 10 second 2 second or Double Selftimer icon appears on the LCD monitor 3 When you press...

Page 37: ...at enables the functions or the Fn button to bring up the menus below Mode Menu Available mode Page Shooting Photo Size Movie Size p 38 Quality Frame Rate p 38 EV p 39 ISO p 39 White Balance p 40 Face...

Page 38: ...e Left Right button and then press the OK button Left Right button Up Down button Right OK button Exit Back Quality EV ISO White Balance Face Detection Photo Size Smart FR Edit Exit Back Quality EV IS...

Page 39: ...ies with the DCF Design rule for Camera File system JPEG Joint Photographic Experts Group JPEG is the image compression standard developed by the Joint Photographic Experts Group This type of compress...

Page 40: ...he LCD monitor will appear white or you may not get good pictures EV Back Move ISO Auto The camera s sensitivity is automatically changed by variables such as lighting value or subject brightness ISO...

Page 41: ...ance according to the shooting condition Different lighting conditions may cause a color cast on your images White Balance Back Move Using the Custom White Balance White balance settings may vary slig...

Page 42: ...detect up to 10 persons When the camera recognizes many people at the same time it will focus on the nearest person The Digital zoom is not activated in this mode When the camera detects a target face...

Page 43: ...n If you press the Shutter button the picture is taken in the normal way When taking a picture of smile shot showing teeth or keeping the smiley face of your subject helps detecting the smile face of...

Page 44: ...egister favorite faces see page 44 Indicate faces that the camera automatically registers The same person can be recognized as a different person and vice versa depending on glasses brightness extreme...

Page 45: ...rs Your favorite faces are indicated with a on the face list Smart FR Edit You can register frequently shot faces or edit the registered face list prior to shooting This feature is available only when...

Page 46: ...Retouch by pressing the Up Down button 2 Select a desired face retouch by pressing the Left Right button and then press the OK button 3 Press the Shutter button to take an image Face Tone Back Move Fa...

Page 47: ...icture of small object like a flower or insects If the subject is not the center of the focus area do not use the spot metering as this may result in an exposure error In this circumstance it is bette...

Page 48: ...t Filter Back Move 1 Select the desired Smart Filter by pressing the Left Right button and press the OK button 2 Press the Shutter button to take an image Smart Filter Icon Description Normal No effec...

Page 49: ...only when the captured image is stored on the memory 1 Select Sharpness by pressing the Up Down button 2 Change the Sharpness by pressing the Left Right button 3 Press the Shutter button to take an im...

Page 50: ...EV High resolution and picture quality increases file saving time which increases stand by time If the Continuous Motion Capture AEB sub menu is selected the flash will be off automatically If less th...

Page 51: ...ing conditions camera shake warning indicator will display For best results only take pictures in situations where the camera shake warning indicator is not displayed 4 If the subject is moving the ca...

Page 52: ...eleased If you wish to stop recording press the shutter button again File type wav Record Back Move Record Exit Voice recording mode Voice Memo You can add your voice over to a stored still image Max...

Page 53: ...recording is paused the voice recording is cancelled The zoom sound may be recorded if you use the zoom while recording a video Voice recording mode Stop Record Recording the movie clip without voice...

Page 54: ...Full Status Smart mode Smart mode Smart mode allows users to take a photo simply without setting any of the more complex functions available Even beginners can easily learn how to operate it Smart Mov...

Page 55: ...e p 38 7 Flash p 34 8 Self timer p 35 9 Date Time 2010 01 01 01 00 PM p 60 10 Optical Zoom bar p 29 11 Auto Focus Frame p 45 Smart mode display Mode selection using the Smart button You can use the Sm...

Page 56: ...d a movie clip simply without setting any of the more complex functions available 1 Use the Smart button to select Smart Movie Clip mode 2 Point the camera towards the subject and compose the image by...

Page 57: ...1 2 3 Start up sound You can select the shutter sound Shutter sound Off 1 2 3 Shutter sound Sound menu If you set sound to ON a beep will sound when buttons are pressed letting you know the camera op...

Page 58: ...efault settings Menus are subject to change without prior notice You can select whether the function description can be displayed on the window in recording mode Function Description sub menus Off The...

Page 59: ...the LCD brightness Sub menus Auto Dark Normal Bright Display Brightness You can select the image that is first displayed on the LCD monitor whenever the camera is turned on Sub menus Off Logo User Im...

Page 60: ...can t recognize or one that has been taken from another camera Always format the memory card using this camera If you insert a memory card that has been formatted using other cameras memory card reade...

Page 61: ...ities London Cape Verde Mid Atlantic Buenos Aires Sao Paulo Newfoundland Caracas La Paz NewYork Miami Chicago Dallas Denver Phoenix LA San Francisco Alaska Honolulu Hawaii Samoa Midway Wellington Auck...

Page 62: ...set amount of time in order to prevent unnecessary battery drainage Sub menus Off The power off function will not operate 1 min 3 min 5 min 10 min The power will turn off automatically if not used fo...

Page 63: ...s connected to an external monitor the image and menus on the LCD monitor will be visible on the external monitor Selecting Video out type You can turn on and off the Auto Focus lamp Sub menus Off The...

Page 64: ...ome parts of the image may not be displayed When the camera is connected to an external monitor the menu will be visible on the external monitor and the menu functions are the same as those indicated...

Page 65: ...ed in the camera all the camera functions apply only to the internal memory Playing back a still image 1 Select the Play mode by pressing the play mode button Playing back a movie clip 1 Select the re...

Page 66: ...e movie clip the first frame of the movie clip will be saved as a still image Press the down button Paused Playing back a recorded voice 1 Select the recorded voice that you want to play back by using...

Page 67: ...15 8 ISO 80 3200 p 39 9 Aperture value F3 2 F5 9 p 24 10 Shutter speed 8 1 2 000 11 Flash On Off p 33 12 Image size 4000X3000 320X240 p 38 13 Recording date 2010 01 01 p 60 Playing back a voice memo...

Page 68: ...01 Using the camera buttons to set the camera In Play mode you can use the buttons on the camera to conveniently set up the Play mode functions Play mode button If you have turned on the camera by pre...

Page 69: ...1 3 12 11 5 Filter 2010 01 01 1 3 1 3 12 11 5 Filter 2010 01 01 1 3 1 3 12 11 5 Filter 2010 01 01 Smart Album Filter 1 Press the MENU button in Smart Album mode 2 Selecting the desired category enable...

Page 70: ...d Image size Maximum enlargement rate X12 5 X10 4 X10 3 X10 2 X8 1 X6 4 X3 2 Image enlargement 1 Select the picture you want to enlarge and move the Digital Zoom lever to the right Then the selected p...

Page 71: ...age with a voice memo a voice file or a movie clip During playback Temporarily stops playback In Pause mode Resumes playback Info DISP Up button When the menu is displayed on the LCD monitor the Up bu...

Page 72: ...Left Right Down MENU buttons activate the following Left button While the menu is showing the Left button operates as a direction button While the menu is not showing press the Left button to select t...

Page 73: ...the LCD monitor In the Play mode pressing the MENU button displays the menu on the LCD monitor The menus you can set up in Play mode are as follows To capture an image after setting up the play menu...

Page 74: ...he camera is connected to a PictBridge supporting printer direct connection to the camera sold separately with a USB cable Setting up the play back function using the LCD monitor Menu Tab Main Menu Su...

Page 75: ...o o o o Resize A large sized image can be resized to a smaller sized image but not vice versa Only JPEG images can be resized Movie clip MP4 Voice recording WAV files can t be resized You can change t...

Page 76: ...e to add various effects to your images by using this function 1 Press the play mode button and press the MENU button 2 Click the Up Down button from the Edit menu to select Photo Style Selector menu...

Page 77: ...enu to select Smart Filter menu tab and press the OK button 3 Select a desired sub menu by pressing the Left Right button and press the OK button Back Move Smart Filter Smart Filter Smart Filter Icon...

Page 78: ...exposure to the light source Back Move ACB 1 Select by pressing the Left Right button and press the OK button 2 The Making New Image message is displayed and the image is saved as a new file name Red...

Page 79: ...ange the saturation of the image 1 Select by pressing the Left Right button and press the OK button Then a bar for selecting the saturation will be displayed 2 Change the saturation by pressing the Le...

Page 80: ...button Back Set Images All Interval 1 sec Music Off Effect Off Start Play Repeat You can select image to view 1 Use the Up Down button to select the Images menu and press the Right button 2 Select a...

Page 81: ...utton to select the desired interval 3 Press the OK button to save the configuration Back Set Images All Interval 1 sec Music Off Effect Off Start 1 sec 3 sec 5 sec 10 sec The loading time depends on...

Page 82: ...unprotected files in the DCIM subfolder will be deleted Remember that this will permanently delete unprotected images Important shots should be stored on a computer before deletion takes place The sta...

Page 83: ...emo Off DPOF Delete Copy To Card Protect All Lock Unlock Start Stop Back Set Protect Face List Edit Voice memo Off DPOF Delete Copy To Card Off On Face List Edit Portrait images can be classified or d...

Page 84: ...Some photo labs may not support the wide angle size print DPOF Standard This function allows you to embed printing quantity information on a stored image 1 Press the Up Down button and select the DPO...

Page 85: ...he Size menu and press the Right button again Sub menu will display 3 Select a desired sub menu by pressing the Up Down button and press the OK button Select Selection window to change the printed siz...

Page 86: ...e Copy to Card command will copy only some of the images and display Memory Full message Then the system will return to the playback mode Please be sure to delete any unnecessary files to free up spac...

Page 87: ...Once the camera is turned on the camera automatically recognizes the printer and is connected to it If automatic connection fails set the USB menu to Printer p 63 For a printer that can enable removab...

Page 88: ...Size Auto Layout Auto Type Auto Quality Auto Images One Photo One Photo All Photos PictBridge Print Setting You can select the Paper Size Print Format Paper Type Print Quality Date Print and File Name...

Page 89: ...or the inside of a vehicle in hot weather Environments where there is high magnetism or excessive vibration Areas with high explosives or highly flammable materials Do not leave this camera in places...

Page 90: ...t notes Camera Maintenance Use a soft brush available from photo stores to gently clean the lens and LCD assemblies If this does not work lens cleaning paper with lens cleaning fluid can be used Clean...

Page 91: ...card or internal memory is full Insert new memory card Delete the unnecessary image files No Image File There are no images stored on the memory Take images Insert a memory card that is holding some i...

Page 92: ...when pressing the Shutter button There is insufficient memory capacity Delete unnecessary image files The memory card has not been formatted Format the memory card p 59 The memory card is exhausted In...

Page 93: ...or The external monitor has not been connected properly with the camera Check the connection cables There are incorrect files on the memory card Insert a memory card that has correct files When using...

Page 94: ...ion 2EV 1 3EV steps ISO Auto 80 100 200 400 800 1600 3200 Flash Modes Auto Auto Red eye reduction Fill in flash Slow sync Flash off Red Eye Fix Range Wide 0 2m 3 5m Tele 0 4m 2 0m Recharging Time Appr...

Page 95: ...024X 768 Specifications Capacity 1GB Size Super Fine About 134 About 151 About 181 About 200 About 316 About 499 About 1822 Fine About 221 About 249 About 297 About 329 About 516 About 815 About 2816...

Page 96: ...imensions WxHxD 90 9 x 56 x 16 5 mm excluding protrusions Weight Approx 96 3 g without battery and card Operating Temperature 0 40 C Operating Humidity 5 85 Software Intelli studio Adobe Reader Specif...

Page 97: ...024 X 768 pixels 16 bit color display compatible monitor 1280 X 1024 pixels 32 bit color display recommended Microsoft DirectX 9 0c or later For Windows users Using a self assembled PC or a PC and OS...

Page 98: ...th the USB cable You must plug the end of the cable with the indicator light into your camera If the cable is reversed it may damage your files The manufacturer is not responsible for any loss of data...

Page 99: ...camera fails to connect a pop up window will appear Select Computer Disconnecting the camera for Windows XP The way to disconnect the USB cable for Windows Vista 7 is similar 1 If the status lamp on y...

Page 100: ...the Intelli studio icon on your Windows desktop The Intelli studio allows you to play back and edit files You can also upload files to websites such as Flickr or YouTube For details select Menu Help...

Page 101: ...in the list 7 Select a file type 8 View files of the selected folder on your computer 9 Show or hide files of the connected camera 10 View files of the selected folder on the camera 11 View files as t...

Page 102: ...disk icon 4 Transfer photos or videos to the computer 1 Connect your camera to a Macintosh computer with the USB cable You must plug the end of the cable with the indicator light into your camera If t...

Page 103: ...connected to the USB port located on the front of the computer the computer may not recognize the camera Connect the camera to the USB port located on the back of the computer Case 1 USB cable is not...

Page 104: ...h the camera stops responding while Windows is starting In this case disconnect the PC and the camera and Windows will start If the problem happens continuously set the Legacy USB Support to disable a...

Page 105: ...ne or more of the following measures Reorient or relocate the receiving antenna Increase the distance between the equipment and receiver Connect the equipment to an outlet on a circuit different from...

Page 106: ......

Reviews: